Friday, October 21, 2011

MeshCAM: An Inexpensive Commercial CAM Program

I was recently contacted by Robert Grzesek, developer of MeshCAM, a 3D CAM program. He'd seen my earlier article where I express some frustration with "free" software, particularly for CAM. The free software I tried usually did simple rasterized cuts of the object loaded, with the result that a lot of the design's detail was lost.

Robert offered me a free copy of MeshCAM if I'd blog about it. I took a look at the product information online and took him up on his offer.

MeshCAM is in the same price range as the other commercial CAM program I've been using--it's a hobbyist-affordable program. This is very nice, as so much of the available software is well beyond the budget of an amateur, or a small business where CAM work is a sideline without a large budget.

It's documentation and the tutorials are very good. Having recently gone through some tutorial-based training with some other programs that are from much larger companies in the past few days, I'm pretty well up to speed with what can go wrong with a tutorial. The MeshCAM tutorials are up to date and in sync with the current version of MeshCAM. They describe the process well from the basis of someone trying to get a specific task accomplished, they're not just a description of what appears in the menus.

At first, I wasn't sure that double-sided machining for full 3D objects was going to be covered, but it was, I just needed to stop anticipating possible problems quite so much.

Working with MeshCAM itself, I've opened up the provided files and a couple of files of my own. For the file types it accepts (STLs and DXFs, in addition to its own MCF format, plus a number of 2D image formats for image-based height maps), it opens the files without a problem and displays them properly. Wavefront OBJ files would be a nice addition, but then that's why I've got the open source program MeshLAB (which has no relation to the MeshCAM line of products) which is frustrating at times, but mostly does the job of object type conversion and it's free.

object display for MeshCAM
Above is an example of MeshCAM's display of an object. The way MeshCAM displays its axes is a bit cartoonish, but at least you won't have to worry about missing them. They can get in the way of small objects in the display screen. There may be a way to deal with that by changing the way they're displayed, but so far I've just moved or rotated my objects away to view detail then moved them back.

The thing that makes MeshCAM stand out for me at this point is its finishing abilities:
MeshCAM's many flexible finishing options.
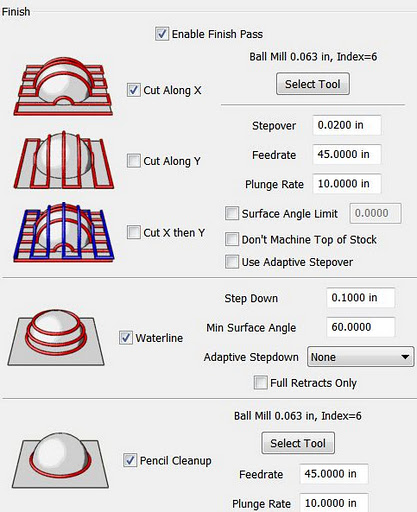
It has built-in multi-pass finishing. I've managed to get the same results from Cut3D through a work-around. There, I create a finishing toolpath for one tool, save those toolpaths, then go back and define a different finishing pass, then save those toolpaths, and run them on the CNC one after the other.

MeshCAM doesn't require this. It gives a great set of finishing options for multiple tool passes right out of the box. I'm presently working on a model specifically to take advantage of these capabilities. Since much of what I'm doing is intended to have a high level of detail, I'm looking forward to seeing what comes off the CNC when I use MeshCAM to build the toolpaths.

MeshCAM displays the toolpaths it generates in the 3D view once they've been calculated, which gives a good first-look check to make sure that things came out right. There's no preview of the cutting operation built in to MeshCAM, however, as in Cut3D. Instead, a separate program, CutViewer is offered. Or you can do a "dry run" in most CNC control programs like EMC2 or Mach3 to see what the cutting will look like, at least as far as tool head movement is concerned.

The previews of the cutting operations have been one of my favorite features of Cut3D, so it's a feature I miss in a CAM program. I've gotten a higher degree of confidence from using this to see how the cutting operation will proceed ahead of time--the order of cuts is not always what you'd expect. The ability to check this during the CAM operation is very nice.

So I'd recommend planning to add CutViewer to your purchase if you buy MeshCAM, or make sure you're comfortable with your CNC control program's preview abilities. I'm using the preview abilities of EMC2's Axis view, myself.

Once I've finished the models I'll be trying out with MeshCAM, I'll be reporting on the final results. I'm planning both a flat relief object and a full 3D, 2-sided object.

Stay tuned...

Thursday, October 20, 2011

Objects of Rotation in Google Sketchup: A Problem of Nomenclature

I've been using Google's free Sketchup program for some 3D object designs lately. I've been using it for a while, but I only use it off and on, so my expertise is growing slowly.

Tonight I wanted to model something based on an Object of Rotation, which we all remember from math class is what you get when spin a shape around an axis. This is usually a trivial thing to do in both CAD and 3D design programs like AutoCAD, Lightwave, and so on. I couldn't remember how to do it offhand, so I did a quick search, expecting "sketchup object of rotation" would get me there in moments.

Technically Accurate, but Useless
I soon got lots of results for "Rotate Object", including a Sketchup tutorial video link. Unfortunately, I realized about 30 seconds into the video that it wasn't what I was looking for. It's a very nice tool for rotating an existing object's position around some arbitrary center of rotation, and possibly replicating it in a pattern around that center.

Nice, but not what I needed.

After a few frustrating attempts to rephrase the search to get what I wanted, I ended up just doing a search on what I knew is usually created as an object of rotation: a rocket.

"Sketchup rocket" yielded a couple of promising results. An amateur rocketry buff had instructions for drawing model rockets in Sketchup. The instructions for the nose cone were: how to draw an object of rotation in Sketchup.

Sketchup Follow Me Tool icon
Words Get In the Way
The tool for creating objects of rotation in Sketchup is the Follow-Me tool. In Sketchup terminology, an object of rotation is called a Lathed Object. Which makes perfect sense, if you already know it. (Thank you for the meme, Arthur Conan Doyle!)

So, to successfully search for how to create an object of rotation in Sketchup, use the terms "sketchup lathed object" or "sketchup follow me tool" to get what you want.

Hopefully this will show up when you search for "sketchup object of rotation" and save you some grief. ;)

Monday, October 3, 2011

CNC Rooster: Third Time's a Charm

In a prior post, I'd made a mistake handling the material when cutting a full 3D object using gcode files generated by Vectric's Cut3D CAM software. After that I tried again. That time things were going swimmingly until I got some gunk on a leadscrew that hung up the X axis and ruined the cut.

Well, I tried again today. After doing some preventative maintenance on my microCarve A4 CNC, testing it thoroughly and making sure of myself as well, I managed to turn out a small urethane rooster:

CNC 3D Rooster cut from Butter-Board using Cut3D and EMC2
Rooster, Side A


CNC 3D Rooster Back Side cut using MicroCarve A4 CNC Router
Rooster, Side B

The part turned out very well. The whole time the second side was cutting, I was fretting over how good my alignment would be. It turned out to be just fine.

The beak looks worse than it actually is because of a loose bit of plastic that'll come off when I scrape it with a thumbnail. It isn't perfect, however, because of the overcut depth I specified for the first side's cut. It's too deep for the thickness of the beak, and though the overall alignment of front and back side is excellent, the beak is at an angle, so one side is lower than the other. If I hadn't specified such a deep overcut, it would not have cut through this way.

Still, it'll clean up nicely.

Further Observations

The facets you see, particularly in areas like the chicken's breast, are part of the original 3D model. They aren't machining flaws. On the second side I cut the machining marks that are there are a little deeper than they should be because I trimmed my tab sizes down way too much, so they flexed a bit during machining.

Still, the overall quality of the part is such that I could clean it up to use as a casting master easily, if I were going to duplicate this part.


The Materials

The prior two tries were done using NC Proofboard, a urethane foam board, with densities of 60 and 48 lbs. per cubic foot. This last one was done in Butter-Board, which has a density of about 64 lbs per cubic foot. All are machinable plastics from Golden West Manufacturing.

60# NC Proofboard
The 60# proofboard was a very nice material. The cell size of the foam is very, very small and could easily be coated to smooth it enough to use a part made from it as a casting master. In fact, the mold release might be sufficient. It's very tough, and machines like a dream.

48# NC Proofboard
The 48# proofboard machines very easily as well, but tends to be a bit more brittle in thin sections than the 60# board. The cell size is about half again as large, but still small enough to be easy to coat, it'd just take more to do it--some sort of filler rather than a primer coat or a thick mold release agent.

Butter-Board
The Butter-Board machines to a fine, smooth surface. It takes a little more care in feed rates than the proofboards, which have a lot of resiliency thanks to being foamed products. But the completed part has an impeccable surface so far as the machining makes it so. It's not as tough in thin sections as the 60# proofboard, but it's stronger than the 48# board in thin sections in general, though it tends a bit toward the brittle.

I like all three materials quite a bit, and plan on getting some more of the Butter-board and 60# NC Proofboard soon for both business and hobby use.

Tooling
The rough cuts were done with a 1/8" 2 flute square end mill, the finishing cuts were done with a 1/16" 2 flute ball nose end mill. Both bits were purchased from IMService, at nice prices and the bits are very good. I was concerned that I may want to use single-flute bits, but these bits performed admirably with these materials. At some point I'll try a future cut with single-flute bits for comparison's sake, but these bits cut well, showed no propensity for clogging. They stayed sharp and cool through the cuts.

CAM Software
As to Cut3D, I'm quite happy with it so far, and I'm planning two more jobs for it in the immediate future. I'm also going to be giving MeshCAM a spin for a high relief piece of work in the near future, and I'll be reporting on that soon.