Showing posts with label Graphics. Show all posts

Thursday, May 29, 2014

ZBrush Export to Unity 3D, Mesh + UV

ZBrush is a great tool in many ways. But there are other ways in which it is infuriating. It is mysterious about what it is doing in many cases, and the documentation on these mysteries is usually nothing more than a longer version of the text on the buttons and menus.

UV maps are one of the places where the data is slim, and the documentation tells you nothing about what's going on with the choices you make. It's like that Sherlock Holmes quote about it making perfect sense once you already know the answer.

On top of that, there's a lot of FUD about transferring data from ZBrush to Unity. Certainly there are other programs for which Unity makes the process more or less seamless, but ZBrush is perfectly capable of providing all the same data to Unity. It's just a matter of knowing the correct process. Which is difficult with ZBrush if you're just trying it on your own, because there are so many settings for which ZBrush doesn't show you directly the effects of your choices. You have to keep going back and forth between ZBrush and Unity--does this work? Does that work? What about that? On and on. And at each stage you're guessing, because you can't look at what comes through in Unity and say, "Oh, I see the problem. I need to just do -that-!" It's just a mishmash of unmatched data.

Well, I spent two solid days experimenting. Trying out different things, getting something to work, making sure I can do it twice in a row and have it work both times. Researching on the internet to see if someone else had a better way, and so on. You don't need to hear the whole litany--getting it done was my job, now here's the results for you to take advantage of so that you can get on with your project.

I'm using Unity 4.3.4f1 and ZBrush 4R6 for this. I'm covering just exporting the object mesh and its UV texture here. A normal map works similar to the UV texture--the key point being that it has to be vertically flipped to align with the mesh in Unity. If you're interested in another post that covers normal maps specifically, email me or leave a comment and I'll do it.

You've Got an Object in ZBrush

So your object is sculpted and polypainted in ZBrush, now you want to drop it into Unity.

First, you've got to convert the polypainting into a separate image file that will wrap around your object's mesh in Unity. This is called a UV texture. What makes things confusing is that it's often called a UV Map in casual usage, but a UV map is actually something else. The UV Map is the relationship between pixels on a UV Texture and points on the mesh. In ZBrush these are separate and distinct items. In many other programs, the UV Map and UV Texture are conflated to simplify things. Which makes it seem like ZBrush has an extra step when creating UV Textures for Unity and other 3D software.

Before beginning, save your project and your tool(s) in ZBrush. There will be opportunities for things to get messed up or confused.

Create the UV Map
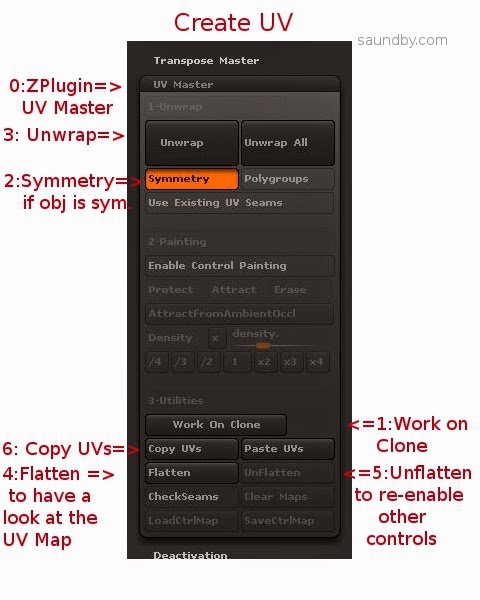

0: Open up UV Master in the ZPlugin menu.

This is where we'll create the UV Map, the Texture itself comes later.

1: Click Work on Clone

This takes care of a bunch of stuff to prepare for making the UV without disturbing your original object. I've screwed up several meshes trying to go without it. My advice is to just use it, it makes things easier.

2: Turn on Symmetry if your object is symmetrical.
Symmetry will try to make a symmetrical UV map, which results in a symmetrical UV texture that's easier to edit by hand. If your object is just sort of symmetrical, you might give it a try, too.

3: Click the big Unwrap button.
This will unwrap the current tool. My advice is to work one tool at a time, and to reduce the number of tools to the minimum necessary before getting to this point to reduce the repetition of exporting meshes and maps.

4: Click Flatten to have a look at the shape of your UV map.
You will see a wireframe of the UV map, this is the form into which your object's polypainting will be projected to make a UV texture. If you're expecting to do any hand editing of the texture's details, make sure that the forms are not too distorted and that seams are not crossing critical areas of the mesh, like across the face of a character. If they are, you can use Control Painting to get a better mesh.

I'm not going to cover that in detail, there are good videos on this at Pixologic and on YouTube, but the short form is:

  • Click Unflatten to get the controls back.
  • Click Enable Control Painting
  • Click Protect, then draw red on the parts of your mesh where you absolutely don't want a seam in the UV map (like the face of a character.)
  • Click Attract, then draw in blue the areas that you'd like the seam to be (like the back of a character's head, or under their chin.)
  • Click Unwrap again and check the results using Flatten.

5: Click Unflatten to get your controls back.

6: Click Copy UVs to put your UVs from the Clone on the Clipboard.


You've now created a UV map, which you need to apply to your original object to guide the creation of a UV texture from its polypainting.
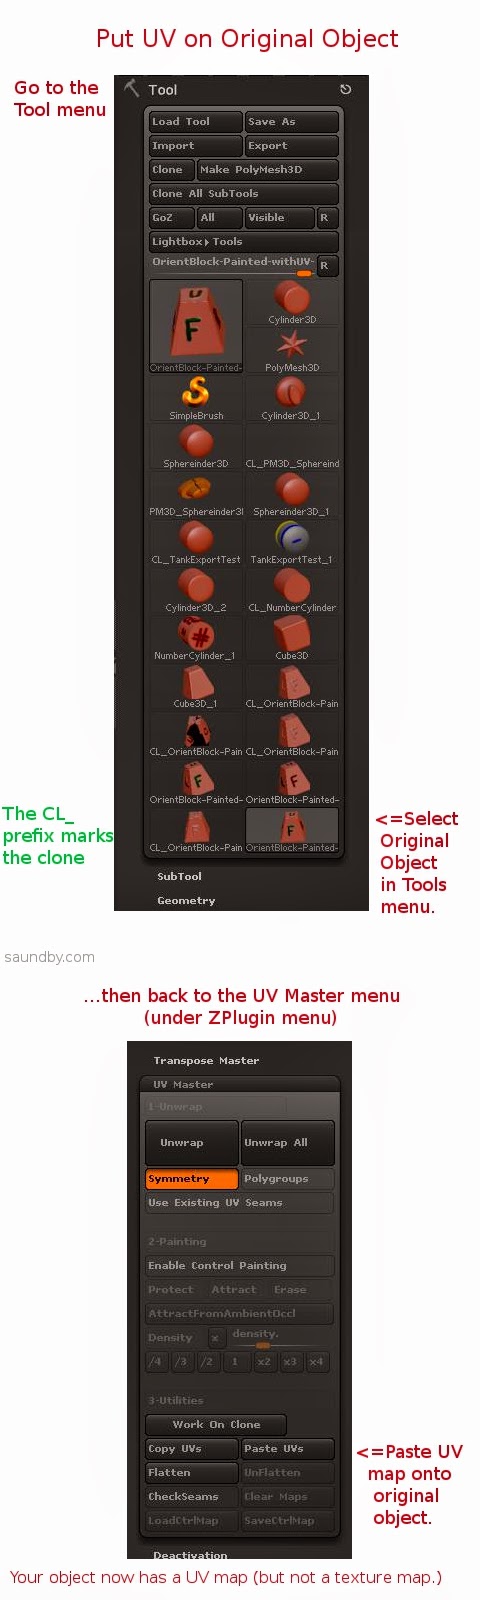


7: Select your original object from the Tool menu.
This will bring it back into the Document view and make it the active object. If something's wrong, or you can't find it, reload it using Load Tool (because you saved it before starting like I advised, right?)

8: Click Paste UVs in the UV Master menu.
This puts the UV from the Clone that's on the Clipboard on your object. It's now ready to have its texture map made from the polypaint on it.

9: Save your tool. Give it a distinctive name, like MyTool-withUVs.ztl.

10: Take a deep breath. The rest is pretty easy.
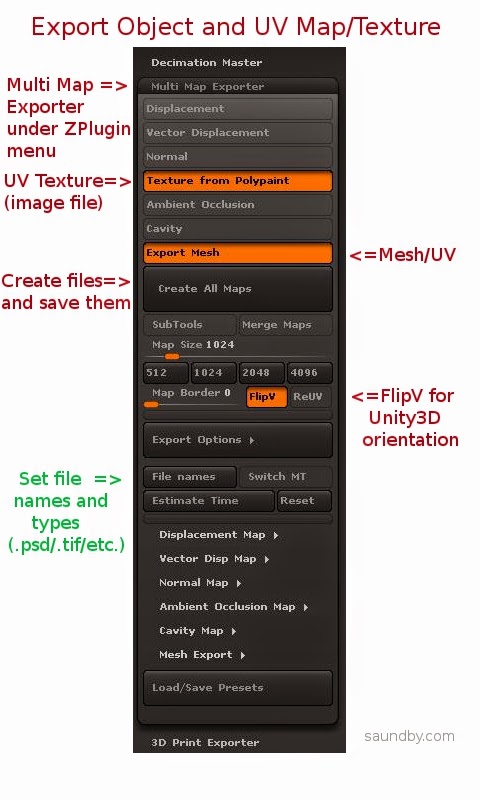


11: Open Multi Map Exporter under the ZPlugin menu.

12: Choose the things you want to export. Mesh and Texture from Polypaint for this example.

13: Choose FlipV to orient maps correctly for Unity.

If you want to have your map files in a specific format, select it in the Export Options and file names sections.

14: Click Create All Maps to create the UV texture and to save the mesh as an .OBJ file. This is one of the most poorly worded bits of button text in ZBrush. Even just "Save" would have made more sense. Oh, well, if we start talking about what's screwy with ZBrush's UI, we'll never finish.

15: Import assets into Unity (Assets=>Import New Asset...).


Gotchas

OK, that's the process. Having it all written out in detail makes it look worse than it really is, it actually happens very quickly once you know it. It's those first few passes that are a problem.

One of the things that really slowed me down in ZBrush is the fact that ZBrush doesn't tell you anything inside ZBrush about what the orientation of the UV map is relative to the base orientation of the mesh. If you open the Tools=>UV Map menu and start clicking the buttons like FlipV, FlipH, Cycle UV, Switch U<>V, it's easy to get lost really quickly as to which transformations you've applied. And there's no simple way to set it back to its base orientation.

Finally, what I ended up doing was creating the UV texture, while applying no transformations at all, then I opened it in GIMP & performed all the tranformations there, saving a clearly marked file for each. Then I pulled the mesh into Unity as well as all the versions of the map. I just drug maps onto the mesh object in Unity until I got the right one (FlipV.)

Colors from ZBrush

To make sure, I saved the map from ZBrush again with FlipV on, and it worked. But then I noticed something. The colors were off on part of the map in Unity. It looked OK in ZBrush and GIMP, but for some reason the color encoding came across wrong in Unity.

Left, Texture map in .psd straight from ZBrush. Right, texture map opened in GIMP and re-saved.

The quick fix was to load the map in GIMP then re-save. It may also be possible to use other file types, like .tif, and have the colors work out perfectly from ZBrush.

The Effects of UV Orientation
The map on the left was saved with FlipV on, the one on the right was saved without. If you get an object looking like the one on the right, check your UV map's orientation, or flip it vertically in an image editor (flip, don't just rotate 180.)

Mesh Orientation

The mesh orientation will get rotated front-for-back when going from ZBrush to Unity, too. It's just a 180 degree rotation, so it's not difficult to fix, just turn it around. If it's facing the camera in ZBrush, it'll be facing away when it comes into Unity.


The object on the left has been rotated to bring the 'F' side (Front) to face the camera, as it was saved in ZBrush, the one on the right is how it came into Unity.

Torn Edges on UVs

You'll notice in that picture of the back of the block above that there's some ragged stuff showing at the edges of the UV map. At first I blamed bringing the map through GIMP, but it does that straight from ZBrush, too. Fortunately the fix for that is simple, too.

For this simple texture, I just did a flood-fill of the black areas of the UV map with the background color (white). With a more complex texture, I would have used smudge or something like to bleed out the edges of the map a few extra pixels.

Map on the left has been cleaned up, UV on the right is as original, with visible seams.

Here are the maps used in the above image:


The original UV texture map from ZBrush.

The UV texture map with the black areas flood-filled with the foreground color of the object.

That's a Wrap

I hope that helps. If you feel I've been unclear anywhere here, or missed something important, please leave a comment or drop me an email message. If I've been helpful, let me know that, too!

Good luck with your ZBrush and Unity endeavors!

Tuesday, May 7, 2013

New Android Devices 1:A Samsung Phone Clone


I decided to finally dip my toe into the Android world a few months ago with the purchase of a new Android phone. I should have done this over a year ago, at least, but I decided to give a Blackberry phone a try, first. Boy, what a disappointment and waste of time that was!

So I went looking at different phones and their prices. I was looking for something on the economy end of the scale at first, but as time went on and my BB convinced me I really needed to just pull the trigger as even a low-spec candy bar feature phone would be less frustrating, I upped my commitment to the point where I was looking at bigger displays.

To stay within the price range I was looking at (less than $200 at the end, though originally I had been thinking less that $100), I went looking at clone phones from China.

Not My First China Phone

Those of you who've been reading here a while may recall a series of articles about a prior phone I owned, a Sciphone G2. This was a Java-based feature phone that had been skinned to look like Android. It was an excellent phone, and it's use of Java was a big advantage for me, as there were plenty of good Java phone apps and I could write my own J2ME apps as well. Calling it a mere "feature phone" was an insult, in fact, as I'd rather have one of these than any of the contemporary iPhones that were out at the time.

In fact, after mine went to the eWaste recovery site in the sky, I wished I still had it every day that I was using my Blackberry 8900.

When I went to get another, new China phone, I returned to where I'd bought my G2, hoping to find something equally good. Unfortunately, when I returned to the BlueLans site, I found more clothing than electronics. Their phone selection was ridiculously out of date. Yes, at the time, with the BB 8900 on my belt, I really did consider buying another SciPhone G2.

So I went looking for another supplier. I tried getting a phone from PandaWill. But that turned into a fiasco. It never even got past customs. I ordered a phone from them with a version of Android on a 4" display for about $80. It would have been a good deal, if it had been for real. Unfortunately, they sent me some runaround about not being labelled properly to be shipped with the shipper I chose. They wanted to change shippers, and from what they were saying it didn't sound as if the phone was what it had been represented as on their web page, as well.

Round and round we went. After over a month past the promised delivery date, still no phone. Still some incomprehensible messages from them that made no sense. I tried to cancel the deal with them. They said the phone was in transit (though they also said it wasn't, and that they wanted to change shippers. How can they change shippers if it's in transit? I know there's a logical explanation, and I can think of several possibilities, but they refused to be clear in their communications.) Finally I demanded cancellation of the deal or I'd dispute with Paypal. That did the trick. Suddenly, all their excuses for why the deal couldn't be completed as they told me it could until I actually paid my money disappeared and they cancelled it.

Stay clear of them. If they're not entirely dishonest, they're at least shady enough you don't want to have to sort out a problem with them. If there's a problem of any sort, they'll make it your problem, and my experience they'll at least lie through omission to do so.

Attempt 2

For the second try, I decided to go through a supplier on Amazon with a good track record and Amazon fulfillment. That would at least give some shielding against what I'd just been through with the first place. Initially, I looked for the phone I'd tried to order before. But, it had been a bit longer, and I decided to go with something with a newer version of Android and a larger display (there had also been several more checks deposited to the bank since my first try. I guess that's one good thing about the delay.)

The phone I finally opted for was an SIII clone. It has a display just short of 5", and claimed to be running the Jelly Bean version of Android. Fortunately for me, I didn't care if the phone had Jelly Bean or Ice Cream Sandwich.

When the phone arrived, it was running 4.0, ICS. The About This Phone page had been programmed to lie and say 4.1 (Jelly Bean), but the interface was clearly not JB, the phone reported 4.0.x when I hooked it up to my PC with the Android development software, and the "Easter Egg" on the phone is the ICS easter egg, not the one for JB.

Nevertheless, it's a great phone. The display is really good, the responsiveness was good. It had the right amount of memory and the processor and all the other technical bits were as promised on the Amazon page.

In fact, it was good enough I bought two more. I got one for my daughter about a month after I bought mine. Hers came with a version of ICS with more of JB hacked into it. The interface was more JB, and it had the JB Easter Egg. I guess someone saw my post on Amazon and updated the things I specifically mentioned. It even reported that it was 4.1.x to my PC with the Android Development System. There were still some pieces of ICS in it, though. But it still ran great.

About two months later I bought another for my wife. This time the OS really was Jelly Bean. 100%. And it was a different phone, though the mold lines were about the same. My wife's phone has a much brighter an more vibrant display. That's the first thing I noticed. Inside, the layout of SIMs and memory card is different, as is the battery. And while I had to buy the back with the flip cover screen protector as an add-on for the phones for my wife and daughter, it came in the package with my wife's phone.

One thing to note--while I ordered the same model of phone for my wife, the original supplier I bought from for myself and my daughter had stopped listing that model of phone, so I went with another source. Another source, a different phone.

I'm not disappointed, though, on any count. Everything important about each of these phones was as I wanted it.


Review

Bottom line: This is a great phone. The actual phone interface in Android isn't everything I could want in the way of usability, but that's an Android problem (and each version varies.) Once you get used to the Android Phone application, they work well as a phone. The important functions for me, beside the usual calling and logging, are speaker phone ability and good reception in marginal areas. While my old, lamented Nokia 3650 was a better phone in both these respects, the SIII clone has been better than any phone I've owned since the 3650. It certainly beats out my "name brand" Blackberry, which was purchased in large part because it was lauded on these points.

Processor:
The MTK6577 processor is really what's in it, and it's a great processor for a phone. I would say my tablet blows it away, but my tablet needs to drive a whole lot more screen, so as far as my feeble human perception is concerned, they're both fast.

Memory:
It's a phone. There's never enough, especially when you're like me, loading oodles of memory hog techie apps like the Spartacus Rex Terminal Emulator. That said, it provides easy and immediate use of the MicroSD card memory when you put one in. Unlike, say, Samsung, which treats MicroSD as "something else". If an app allows itself to be loaded on the SD card, this phone will let you put it there and execute it from there. (For those not familiar with some other Android devices, they only use the SD card as data memory, and won't execute apps off of them, or move them to them.)

Programmers take note: making your app run off an SD card takes nothing more than a single line in your manifest file for the app, unless you're doing something on a very short list of things that require the app to be on the phone's main memory. (In which case, write a small helper app that does that in the phone's memory, then put the bulk of your app in another package on the SD card, dangit!)

Display:
It's great. My wife's phone is "wipe your chin, the drool is showing" beautiful, but the ones on my phone and my daughter's are very nice and sharp. Here's an oversized image. The colors are stronger and sharper than in this image, I did my best with the camera:


I/O:
USB works great for recharging as well as for mounting the phone as a file system to Linux, Windows 7 or XP, and Mac OS X. I haven't tried Win8, nor am I likely to unless I have a powerful incentive deposited to my account.

The Wifi is also excellent. I've had several devices with disappointing Wifi, some that cost many times what I paid for this phone. It hooks up easily, and gets good reception no matter what mishandling I'm engaged in with the phone while browsing or whatever. I depend on Wifi, as I'm way too darned cheap to pay for phone-based data services ever since T-Mobile screwed me out of my grandfathered plan after lying to me when I changed service plans.

Both SIM slots work fine, and like most clones, this phone functions fine without a SIM if you're not planning on using it with a phone service. It has two SIM slots, I use one, but plan to add a second SIM card since we have a county nearby where normal phone service from outside the county doesn't operate.

The phone does not include Near Field Communications or IR, but it does have Bluetooth. This works well with headsets and for data file transfers. It's easy to set up and connect to devices, and the antenna on this phone is good enough to get it a good range (I send photos to my computer when outside and around the house without a problem.)

Accessories:
I picked up the flip cover to keep the screen protector from being scratched. My phone came with the screen protector already on, as did my wife's phone, but my daughter had to put hers on. Since mine floats around in my pocket now, and I occasionally put metal things in there before I think to pull them out and move them to the other pocket, I decided to get the flip cover.

The flip cover comes as a new back for the phone. The new back has the cover attached.


At first I found the flip cover annoying whenever I had it open and in my hand. It can get in the way of your fingers, or press into them when you're gripping the phone. After a while, the area around the hinge of the flap gets softened, and this problem becomes pretty much unnoticeable. At first, however, it's a pain in the tookus.

Covers made for the Samsung SIII don't fit, there is enough difference in the forms of the two phones that even the soft "jelly" covers don't fit this phone. So don't plan to add anything specifically designed for the SIII if you get one of these.

Needless to say (I hope), you'll also want to add a MicroSD card to the phone. It's good for up to 32GB. I've got a 16GB in mine, loaded with books and apps, but with still about 9GB free. If I put much music on, that would probably fill it. Personally I recommend the smallest size you think you can live with, as larger cards tend to respond more slowly, especially if you have lots and lots of files in a single directory. This is aside from the concern about speed of the MicroSD. Get the fastest you can find, at least Class 6, if you don't want to hate your phone because you bought a slow MicroSD (I used mine with a Class 4 until I bought a Class 10 for it, and the difference when the new card went in was like someone opening the windows in a stuffy room.)

Wrap Up
Finally, if you don't have a phone with a recent Android OS (4.0 or newer), I highly recommend getting one. It's a solid OS with plenty of tools to let your smartphone be really smart rather than just a parasite living off your PC or a toy trapped inside other people's apps. Load up a real file manager (I recommend ES File Manager, for a start, but get several as each will have its own strengths), a terminal program (several will do the trick without "rooting" your phone), one of the Scripting Languages for Android (which work through SL4A) and a cool old system emulator or two. You'll have a phone that you can really compute on.

This phone is the best pocket-sized device I've had since my old HP 200LX. Believe me, I've blown over a couple of thousand trying to replace my old 200LX with other mobile devices, trying to get something that I could do with a mobile computer from 1994. Now I'm there.

In fact, things went so well for me with this phone, that I decided I'd pick up an Android tablet, too.

But that's another story.

Thursday, October 11, 2012

Introducing ZBrush by Eric Keller

This is the book that Pixologic should have included with ZBrush. It explains ZBrush in a clear fashion with common pitfalls clearly pointed out and described. If I'd had this book from day 1, I'd have spent less time being confused and confounded by the interface and its way of working.

As it is, I'm still learning new things from this book. Plus, I'm getting the reassurance that those things I've sort of figured out on my own are correct.

My earliest experiences with ZBrush were frustration with it doing things that I didn't understand. At points that made no sense to me conceptually, it would remove work from the editing area above the canvas, sometimes obviously putting the data elsewhere, other times apparently just losing my work--so far as I could tell. It was a field of landmines.

Then, once I started to come to grips with some of the basics of object creation and editing, it became a game of "how do I do this simple task?" Obvious, simple operations in 3D modelling were possible, but performed in mysterious ways. The searches for information done against Pixologic's online documentation were frequently fruitless. But gradually I built up a repertoire of actions I could perform, and remember the processes for, to build models.

But some things remained a mystery. I have no idea how much time I spent watching videos, screaming at the screen "How did you do that?" as they blipped casually past a whole series of critical operations that I needed to learn how to do in a few milliseconds. Note to Pixologic: in tutorial videos use something that shows keypresses and mouse clicks on screen. At least then I can go back frame by frame and find out what sort of finger gymnastics went into the quick and spiffy operation that just flashed by.

The next stage was gathering confidence in what I could do, while trying to gradually expand the envelope on that. While trying to produce models to my prior concept, rather than just sitting down and seeing what happens. Here I had many pieces of work come to a halt because of some simple operation that I didn't know how to perform. How to cut a piece into multiple pieces? How to match colors? How to control dimensions tightly? And so on.

After a while in this phase, I started to get a sense of how ZBrush "thinks", and I started to learn more of the program ever faster. There were still lots of mysteries, including a lot of the buttons in the standard interface, but I was able to do most of the things that ZBrush was good at, and make some of the things that I'd bought ZBrush to model.

That's the point was at where I got Eric Keller's book. It might seem that I was past the point of needing an introductory-level book at that point. But I needed it in the worst way. A lot of the most basic elements of ZBrush that I needed to know, to go from sort of working my way through ZBrush to being really productive with it and using my time effectively was what I needed and what this book delivered. Two chapters in I had a handle on the entire standard interface, now I'm going through the rest of the book, learning different sections in detail.

When is a Button not a Button?
One of the really important things I learned was why a number of the "buttons" around the canvas don't seem to do anything. There are a number of buttons, they look just like the other buttons above and below them. The other buttons do something when you click on them. They turn on the wireframe, or make other parts you're not editing transparent, or whatever.

But these buttons show your click, but do nothing. Seemingly.

That's because they're not really buttons. They're something else.

It's UI, Jim, but not UI as We Know It
These "buttons" are like some throwback to the early days of the Atari ST or Amiga, when intrepid programmers ignored the Human Interface recommendations made by earlier pioneers and rolled their own visual interface components.

They work like this: You click on them, then drag off of them to perform some action.

There are a number of these scattered around ZBrush. That's how color picking works. The color selection tool, which Pixologic calls a "Color Picker" (which is why searches on how to pick a color in ZBrush will be frustrated), has this method of operation as a secondary function (secondary, at least from what it apparent.) Clicking in the Color Picker's central area, then dragging to the Canvas and releasing over some color there will match the color of the object on the Canvas or being edited above the Canvas. Holding Alt while doing this will select the displayed color (including shading) rather than the actual color of the object.

Clear as mud, eh?

Well, Eric Keller makes it clear. That and the other buttons that operate this way.

If you've got ZBrush, no matter what your experience level, I highly recommend this book. The info in it might be elsewhere, but it's not as clear, concise, or as well organized.

Pixologic should provide a copy of this book with every license they sell.

Tuesday, September 25, 2012

Starting to "Get" ZBrush

It's taken a while to get here, but I figured that there had to be a "here" so I kept at it.

I think I'm finally at the point where I "get it" with ZBrush. I'm not just struggling with basics and wondering where my mesh went when I do something any more. Instead, I have a number of modelling skills well in hand, I can pretty well control my projects and know what's going on while I work, and I'm expanding what I can do without too much trouble.

Prior posts expressing some of my frustration when learning ZBrush:
Trying to Learn ZBrush, Hitting Lots of Landmines
ZBrush: Finding the Hidden Spotlight

Subtleties of ZBrush
One of the things it takes time to learn are subtle little indications in the interface that let you know what's going on if you already know them and are sufficiently sensitive to notice them. It takes time to get to the point where they work for you, even when the docs tell you they are there (which they often don't, or at least not in the places you'll typically end up when searching at pixologic.com for information on what you're doing.)

After a while you notice little things, though. Like a thin white line around the border of the canvas when you're in Edit mode. So you begin to learn (in about the same way as an animal hit with a cattle prod when it does something "wrong") that you have to turn on Edit before doing something to a mesh if you don't see the border.

The same goes for subtle changes in the pointer. A very small + changes to a minus, subtle changes in shading and color occur, and so on. After a while it becomes obvious, and knowing that it's there helps.

Where is My Mesh?

There are some big things that are far too subtle that it takes too much trial and error to learn.

One of them is knowing what's going to happen to your mesh and when. There are operations that take your current mesh, or other meshes you presently have in work but aren't doing something to right now, and remove them from the work area. They go poof.

Sometimes they're still available, in the tool menu. Other times, it appears, they go poof, because they were in some transitional state and you should have saved them. Until you know what's going to happen when, it becomes a matter of saving your work with practically every brush stroke, because you never know when it's just going to disappear and no Undo will bring it back.

Because sometimes it warns you that you can't undo, other times it doesn't. When it doesn't warn you, it's usually just putting the objects in the tool menu. But if you can't distinguish them from other objects there (you haven't changed the name, a small picture doesn't distinguish them), or you just plain don't know to go looking there, you're going to end up very frustrated.

There's Hope

I'm here to tell you that perseverance can pay off. After a while, you start to get a feel for what's going on. The best way is to pick some part of ZBrush and try to learn to use it, even if it's not directly tied to the type of modelling you're most interested in. For me it was ZSpheres. They're most useful for soft-body modelling, like most of ZBrush, and most of what I hope to use ZBrush for is hard body modelling (combined with soft objects, later, which is why I'm using ZBrush and not Lightwave or something, but I need hard or hardish objects at the core), but learning to use them taught me a lot of things about ZBrush and how it "thinks".

For me, the next breakthrough came with the new solid modelling features in ZBrush version 4R4. I saw what looked like symbols for additive, subtractive, and intersection geometry in the Subtool palette of ZBrush 4R3. But I couldn't find docs for them anywhere, with a wide variety of searches on the pixologic site, or by reading the docs for the Subtool palette straight through. They were there, but not documented as far as I could tell.

Finally, I saw a video on the new ZBrush that showed them being used for solid geometry operations with Dynamesh, and now I'm able to do the solid geometry stuff I need to do to set up properly proportioned hard shape objects as starting points for the work I want to do.

Now I'm trying to learn the new Transform tool. It looks like it solves some problems I was having before, as well.

Monday, June 4, 2012

Parallax Propellor Quickstart Board

When I was at the Parallax Robotics Expo back in April, I picked up a P8X32A Quickstart Board. I've had my eye on the Propeller chip for a long time, I first heard of it before release. But to date, time spent on other things kept me from getting started with it.

Parallax P8X32A Quickstart Board, shown inside an Altoids Tin for scale.
The P8X32A Quickstart Board, in the obligatory Altoids tin for scale.
At the robotics expo Parallax was cutting some great deals on their products, however. And I figured that if I had something on hand it might make it a bit easier to take a first look at the Propeller. With the discounts they were giving at the show, I seriously considered the Propeller Starter Kit, which includes the Propeller Demo Board. But, since I had no idea how long it would be before I actually got a chance to use it, I decided that a smaller investment would be wiser. So I got a Quickstart board.

The Time Window Opens

Finally, last Friday afternoon, I had a chunk of time open up as a result of being too ill to make a prior commitment. (I can't help but think of how many important things in my life have happened because of time made available through being too sick to do what I was supposed to do, or because I was stranded somewhere without transportation.) The tiny box for the Quickstart board had been living next to one of my computer keyboards for over a month, so I didn't even have to go looking for it. There was a USB cable of the correct type sitting in the drawer next to me. So I started in.

To keep it simple I decided to start out with the Parallax programming environment, Propeller Tool on my Windows 7 machine. I expect to try out Brad's Spin Tool, the other major development tool for Propeller, on my Mac and Linux machines a bit later.

I was pleased to see that it installed everything, the driver for the USB interface chip on the Quickstart board, the IDE, and the serial terminal tool for the Propellor. It says it does that before you download and install, but I was a bit unsure of whether the Terminal program would actually be in there before I actually installed the program.

Once the software was installed, I started it up then plugged in the Quickstart board. I got a ding-dong from Windows telling me it saw the hardware. I was able to find a menu item to report what chip version the software saw, and it saw my chip. I didn't get the message I expected from the documentation at first, a dialog pop-up. That appeared later, the first time I tried to send a program to the board.

About that...

Parallax has a tutorial that runs you through the initial steps of programming the Quickstart board. Aside from the fact that to get to each of the several pages you follow a link from the product page (the pages aren't linked together--that is, when you get to the bottom of one page there's no link to the next one) there's another oversight on these pages as well.

The page gives a short, simple program, describes what it does, then goes on to a slightly more sophisticated program. It tells you about how the editor behaves. But it doesn't tell you how to actually get the code on the chip.

Now, I'm not exactly a first timer here. I looked at the menu and saw "Run" at the top of the screen. But when I chose that I got a list of items, none of which were clearly "compile and run". So I started selecting things at random. I also didn't know whether to expect a simulation environment to start, or how to select between a simulator and the real hardware. I scanned the tutorial web page up to the third program in it, and found no specific instructions.

This is one of those things of which Sherlock Holmes remarked, "the answer is perfectly obvious, once you know it." There is no simulation environment in the free tool, that costs extra (I wish Parallax could follow Atmel's example in providing it with the free tool, the first job I applied an AVR to happened because I was able to use the simulation tool to verify the software timings I needed). And the Run=>Compile Current=>Load EEPROM or Run=>Compile Current=>Load RAM would either have done enough to let me get what I wanted--the sample code running on the target hardware.

But that wasn't clear. I was doing a quick try it and see, so I hadn't spent time with the chip's datasheet yet to learn about how it loads and runs software, what facilities it has for storage, what the implications are of loading EEPROM vs. loading RAM (I didn't even know if they were both program storage, for all I knew one was program storage and the other was for loading an initial state for testing.)

So I was a bit stymied until I just decided to try things at random and see what happened.

At the bottom of the tutorial page is a short table describing the shortcut keys and what they do. Below the actual step-by-step examples that omit instructions for how to compile and run the code. There they describe F10 and F11, for example, and the implications of each choice (RAM or EEPROM).

I managed to get the short initial program (which lights an LED) loaded and running. The LED lit up. There was much rejoicing.

Demo, Demo, Who's Got the Demo?

The next thing I started to wonder about was the demo that showed off the touchpads by lighting up the LEDs when the pads are touched. This hadn't appeared to be pre-loaded like demos often are on other processors. Nor did there appear to be anything obvious among the Propeller code that came with the IDE (another thing I fouond by spelunking, rather than as a result of documentation.) There were no projects with names like "Quickstart Board Demo" or "Touchpad Demo" or whatever. Nearly all the demos appeared to be for hardware I didn't have.

At first I went back to the Quickstart tutorials on the web. I did searches for the demo on the Parallax website and through Google, but the closest I came up with was modified versions of the demo listed in a forum thread. I did find the demo later, but it was only by going back and looking for it time after time that I finally located it today, my fourth day trying, here, on the Parallax Semiconductor Quickstart product page, not on the Propeller downloads page or the Parallax store product page, where there are lots of other downloads but not this one. The location is so subtle, that even after I found it earlier today it just took me five minutes of backtracking to find the right page over again. It's on the linked page, at the end of the list of downloads at the bottom. Direct Link to P8X32A Quickstart LED-Touchpad Demo Software Download

Well, back to last Friday. The demo was interesting to me, but while I was looking for it I came across information about the video capabilities of the Propeller. Frankly, while I'd heard the Propeller did video I just figured it was something along the lines of bit-bashed video like what I've done with several other microcontrollers. I've even generated video from a little Atmel AVR ATTiny12 with nothing more than a software loop and a resistor divider-no fancy shift registers or anything.

Needless to say, it was pretty simple video. No colorburst, no color. But it got some data out of the chip on a two-pin interface nicely (three levels are needed for even black and white video to get the sync signals for timing in addition to the black and white pixel data.)

The Propeller goes way, way beyond this. It's got both NTSC and VGA signal generation hardware on board. And it's not just single bit video, either. It can generate full color at a number of resolutions. This I had to try. But my little Quickstart board doesn't have a video output on it. I looked at the Propeller Demo Board and saw that it had a video interface. It was just a 3-resistor DAC and an RCA jack, so I decided to make one.
Three resistors on an IDC header to an RCA jack, a fourth square pin on a wire provides a ground. Simple quick and dirty video interface for the P8X32A Quickstart board.
It doesn't get much quicker and dirtier. It took longer to pull the parts than to assemble.
Five minutes later, I had my own video interface. (Note: the accepted way to do this if you're not buying your Quickstart board at a Parallax event is to go to Gadget Gangster and buy your Quickstart board with a free QuickProto board, which includes the video interface along with lots of other cool bits that make the Quickstart board so much more ready-to-go.)

At first, the video was pretty wonky. Then I realized I had the resistor that's supposed to go to P13 going to P15. Once I fixed that, it was better, but still not good. The graphics demo ran OK, but one of the text demos wouldn't even sync properly, the other had poor contrast. The thought crossed my mind that either the timing in the Propeller wasn't much better than my old Atari Pong or that the provided 5MHz crystal meant that the timing wasn't right on. But I've learned the hard way, time and time again, to suspect user error first.

I took another look at my too-quick and too-dirty video interface and found that the resistors that were supposed to go between P12 and P13 were swapped. A moment later I had pulled the pins from the plastic IDC header and moved them to the correct positions. This is why doing electronics when you're under the weather is not always a good idea. Fortunately this wasn't a mistake that'd let the smoke out.

Once that was done, the video looked great on all the demos. I then had to make a batter adapter so that I could try it out on the big screen TV in my living room. A quad-AA battery pack came to hand quickly enough, one of the ones with the 9V snap connector on the end. Then I soldered a 9V snap connector pigtail to another IDC header and spliced in an IDC socket pigtail. That way I'd still have a place to put my ground pin from the Q&D video interface without soldering it to the battery connector. As a final refinement, I put a slider switch in line on the positive battery wire to act as a power switch.

Once that and the video adapter were plugged into the Quickstart board, I took it out to the living room and hooked up to a free composite video input. It looked great.

I spent the rest of my time mucking around with the code of the various NTSC video demos. Spin is a really easy language to learn, if you've got any programming experience it'll come easily. It's even simple enough I could easily see teaching it as a first language to new programmers (with a Propellor board on hand, of course, to get the full hardware + software experience!)

Cleaning Up Shop
As mentioned, I have now been playing with my new board for four days. In spite of a couple of minor snags (figuring out what to choose to compile and run my programs, finding the demo for the Quickstart board itself) it's been a very rewarding use of my time. I can see now why people who've been raving about this controller for five or six years are excited about it.

After my first night playing with the board, I learned while reading the Parallax forums that the Propeller could also do RF-modulated video. That's what I spent mid-day Saturday playing with. I put rabbit ears on my big screen (talk about incongruity!) and a pair of jumpers on the RCA jack and managed to receive video from the Propeller from about 25 feet away. What worked even better was an LCD handheld television left over from the analog TV transmission days. I was able to get as far as 10 feet from my back door, a total distance of about 50 feet, and still get good reception. I don't think it's making it as far as the neighbor's house, though (fortunately.)

Yesterday I buckled down to some more structured learning of the Spin language, reading the Propeller Manual and Datasheet, and so on. Today I'm continuing that, working my way through tutorials and such. I also took a look in the goodie bag I filled at the Free tables at the Robotics Expo--there are a couple of Propeller boards in there that I can't wait to find a use for now.

Monday, May 14, 2012

Paizo Pathfinder Lite PDFs

Paizo has regularly released inexpensive PDFs of the Pathfinder rule books as a convenient addition to their hardcopy versions. Of the various major game companies, Paizo has my favorite pricing policy on PDFs. They're cheap. Which makes it a lot easier to do what I like, which is have both the hard copy and the PDF. (Even better is the practice of some smaller publishers, like Jon Brazer Enterprises, where you get both hardcopy and PDF in one package deal!)

Pathfinder, the Vorpal d20 Rulebook

The PDFs for the Pathfinder books from Paizo had a problem that limited their utility, though. They have multiple layers with lots of vector art. This is great for getting the best image on any display or from any printer. It's a huge load of computation, though, if you just want to read the rule book on an e-reader or a laptop.

I originally bought the PDF of the Core Rulebook to be able to cut and paste items into my own adventures--little reminders for rules that I may not use often that would crop up, and other such things. The PDF did that job great. But when I went to put it on my Sony PRS-950 e-reader, so as to have a small, light copy of the rules where ever I went, it buried the poor e-reader's processor. Page turns took forever. It was nothing but frustration.

Halfling to fighter under huge stone: Get up, you big sissy!

Even the version of the rule book that has the chapters as separate files didn't help. The files are smaller, but the computational overhead was still just too much for my e-reader. Even when I threw it on my Eee PC (a "netbook" style laptop computer), it was just too slow to use. I was reduced to extracting the text from the PDF to rather ugly text files.

Lite PDFs

Fortunately, Paizo has now released Lite PDFs of the Pathfinder books.

I downloaded them this weekend, then tried them out on my e-reader and Eee PCs this morning. What a difference! They read smoothly and well, even on the Sony PRS-950's little processor (little by current standards--it's got far more power than my primary software development workstation from the '90s!)

I'm not the only one loving these new streamlined PDFs. Have a look:

The Iron Tavern Mini Review: Pathfinder Lite PDFs
The Earthen Ring comments on Pathfinder Lite PDFs
Paizo Messageboards: PFRPG Lite PDFs

Gaming with Death, fighter says to Death: If you say, Do you have any more twos one more time, I'm going to KILL you!

Monday, May 7, 2012

ZBrush: Finding the Hidden Spotlight

As I've commented recently, I'm working on learning ZBrush and running into landmines and frustrations regularly. The program is incredibly powerful, so I'm hoping all the time and frustration will be worth it in the end. Though I'm less than convinced it'll be so at this point. Presently I'm a bit over two weeks in, with about 60-70 hours using it and a lot of additional time reading docs and watching training videos.

Spotlight

Among the tools I set for myself to try out today is Spotlight, a very powerful-looking tool featured in this impressive video. After getting the "sizzle" on Spotlight from that and some other videos, I tracked down some more pedestrian stuff that I hoped would let me see how to actually do a little of that.

For example, this great video, which takes things step by step and at a pace where you can actually see what is being done. Unfortunately, when I tried to follow along on my own, there was a missing step.

Getting the texture into Spotlight.

Which opened another can of worms...

Where is the Spotlight?

I opened my Lightbox, selected my texture, and Spotlight was nowhere to be seen. So I took a look at the Pixologic site to find some written documentation. I found what seemed to be just the thing. I read carefully through the instructions, particularly noting:

You first need to load your textures using the Texture palette or Light Box.

then, later the detailed instructions:

3. In the Texture palette, load or import a source texture with which you will paint on the model.
4. Also in the Texture palette, click on the Add to SpotLight button. Your texture will be displayed as an overlay on the document and the SpotLight widget will appear. An alternative is to double click on a texture of your choice in Light Box.
Um, no.

First, double-clicking on the texture in Lightbox did not bring up the Spotlight widget. Then, looking in the Texture Palette, and in the Texture tool on the side of the screen--in case I misunderstood--revealed no "Add to Spotlight" button.


The Hidden Spotlight Button

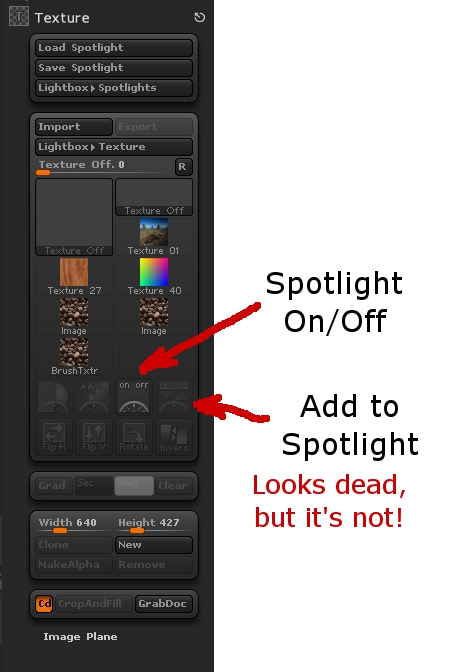
Well, I spent a fair bit of time reading FAQs and other information trying to find out why there were no visible parts of Spotlight in my ZBrush. Finally, I found an answer well down in this thread. The "Add to Spotlight" button is there, it's just not labelled, looks like it is inactive, and the icon makes no sense:

The icon for


To be fair, it does say "Add to Spotlight" off to the side if you hover over it. But then, what's to induce me to hover over everything in the 90 square hectares of ZBrush's menus just to see if I can find a button by spelunking? Especially when it's greyed out so as to look dead, inactive, unavailable, and, in subtle grey-on-grey, almost invisible?

Clicking on this added the texture to Spotlight, brought up the Spotlight wheel, and let me get on with walking into a new set of frustrations. But it was progress.


Endemic Problems

This relates to several of the endemic problems with ZBrush, particularly its user interface. There's a mix of text and image icons. The image icons are seldom intuitive. The color scheme makes icons look inactive when they're not.

At a larger level ZBrush has the problem of being a huge tool box with no organization to it. There are multiple ways of doing things, with no clear way of choosing which will get the desired results, or do so in the most time-effective fashion. Likewise, the only way to determine what something will do is to experiment, experiment, experiment. And with the number of options and settings (spread through several different "palettes" or menus) there's no guarantee that you can recreate something you've seen someone else do, or even recreate your own work later if you happen to have changed a setting three menu levels down earlier then forgotten about it.

There's also the keyboard interface. It's tricky and timing-dependent. For example, if you're drawing with short strokes, say, putting a mask on in an area while zoomed in close on the geometry, it'll go along putting down short light strokes of mask then suddenly, while you're doing something that feels exactly like every other stroke, make your entire mask go *poof*! Fortunately, a Ctrl-Z (Undo) will fix that one. But when you're working with short, fast strokes you'll hit this repeatedly (like every third or fourth stroke.)

What's worse is when you are trying to do strokes across an object. It appears that if you start a stroke off of your subject (even if by a single nearly-invisible pixel) you'll end up moving and spinning it. And if you're doing something like texturing from Spotlight, the position and scale of the object is critical. You can't use Undo to fix this, because you can't Undo changes of viewpoint (which are "really" moves of the object relative to the Canvas in ZBrush, but still.) So you're hosed with one touch of the mouse (or tablet.) Go back and start over.

Overall, there are a lot of frustrations and a lack of clear structure in the program. But it is capable of some cool things. Just save your work often (saving both Projects and Tools!)

Can I recommend ZBrush? Not yet. Besides, I'm not at all conversant of what the available options are on the market right now.

Thursday, May 3, 2012

Trying to Learn ZBrush, Hitting Lots of Land Mines

After having a lot of fun with the free Sculptris program, and with the need for a more fully-featured 3D modeling program, I decided to buy ZBrush a couple of weeks ago.

Unfortunately, it been a tough road trying to learn it.

I was running into a problem early on where I'd get out of Edit mode (3D editing) and couldn't get back into it. Going from 3D mode to 2D mode is strictly one-way. There are any of a number of ways to do it by accident, and once you do, there's no Undo. After about a week, it stopped happening to me, and now it's not so much of a problem. At first, though, I had no clue what was happening. And the "getting started" information was no help, nor was a search on the terms I could think of on the web site. There were dire warnings on Pixologic's site about saving a 3D object as a 2D image, then not being able to reload and re-edit the object even when you believed you saved it. I hadn't encountered that particular problem yet, but that wasn't my problem.

Finally I found an old video tutorial that's not featured in their "online classroom" any more that explained what is happening, and since I've seen that I've been able to mostly avoid running into the problem, and recovering when I do. Before that, I'd already developed some techniques on my own to tiptoe past that particular land mine.

New Land Mines

Since then I've had my work go *poof* on me in several different other ways. It's not exactly inviting you to explore its features when this keeps happening. My most recent (about ten minutes ago) was trying to add a new subtool to a project.

When I got started, I was mostly just sculpting shapes out of one object, or "subtool" in ZBrush parlance (a single mesh.) I learned how to add additional objects to a scene, but it was awkward enough for me with what all else I was trying to master that I was just avoiding it until later.

Now I've gotten to where not having separate pieces is more of a problem than dealing with adding, aligning, etc. the additional objects.

So I was working with a sort of cartoonish fox head. I had the basic head pretty well sculpted. I added a pair of eyeballs as separate spheres (which is a lot cleaner is Sculptris--there you can add a pair of objects simultaneously and move them fluidly around your reflection plane. In ZBrush you add one, position it, then, so far as I know now, create a duplicate and position it by guess and by golly to a position that matches the first one on the opposite side of the object you want it in. All very clunky.) I decided to do the teeth as separate objects as well. So I appended a new subtool, picked a Cone3D object, used the clunky sliders in the Deformation menu to move it (isn't that a Transformation, not a deformation?) Then I scaled it down to about the right size and slid it more or less in place.

Then I wanted to sculpt its form a bit. I wasn't entirely sure whether it was a primitive or a mesh, and I wanted to subdivide it to create more detail (rule: NEVER be ignorant about ANYTHING in ZBrush. You must understand absolutely everything, it would appear, in its entirety to avoid ending up with nothing to show for your time.) Well, I clicked the "Make PolyMesh3D" button in the Tools menu.

And the complex sculpt I'd gotten to a good state over the prior hour went *poof*. No warnings, no undoes, no saving throw. The head and eye subtools are gone. They don't appear in the available tools when I click "Append" in the subtool directory. I've found things that I thought went poof there a couple of times. Should I mention the times I did a save and had things disappear from view? In those cases they reappear when I click back in the work area. They just disappear to startle me, is the best I can figure.

But my fox head is gone and unrecoverable.

Yeah, I know I should save more often. As it is, I do save very often. I'm filling my hard disk with minor deltas of my fooling around and hoping this starts to be productive projects. I'm disinclined to save every time I click a button. I could wish that when I'm going to click a button that deletes subtools with no means of recovering them I'd get a nice warning, like I do on so many other things that aren't recoverable. I do get warnings on lots of other things, many of which I don't understand what it's asking me or the consequences of my choices, but at least I get a wake-up that lets me save before I start spelunking through my possible answers.

Not All Bad, But Jury's Still Out

The program has a lot of cool capabilities. But the question is whether I'll be able to get through all the trouble to really be able to take advantage of them. I'm two weeks into working with it, and I've got less to show than I had with one afternoon with Sculptris, or for that matter, one day with Sculpt-Animate 3D or Lightwave on my old Amiga over 20 years ago. There are a lot of places where I just don't feel like I've got much control, I'm just hoping for the best, or trying to jigger things with hand and eye.

A lot of sculpting tools behave in odd fashions--at times. If they were like that all the time I'd be able to at least avoid trouble. But they cause geometry problems that are difficult or time consuming to solve. There are other times where you're trying to do something just the way you have been all along, and nothing, or almost nothing happens. Then, suddenly, on another attempt, it shoots off, out of control.

I'm really hoping to make this work, because there's a lot I'd like to get out of this program in producing models for my CNC milling machine. But, if I don't start getting more out of it pretty soon, well, $700 is just too much for me to not ask for my money back. Especially after all the time I've put into watching training videos, reading documentation, and just working with the tool trying to get somewhere that I can reasonably predict the results I'm going to get--without even starting to talk about how much time it'll take me to get those results, yet.

Wednesday, May 4, 2011

First Attempt at Engraving an IC with my CNC

I decided to try doing a smaller, more precise job with my microCarve A4 CNC today. I took some of my GCode program from yesterday, scaled it down (fortunately I provided variables to do all that automatically for me) and added a chip number in characters that I hoped would show with the bit I'm using.

Here's what I got:

CNC Engraved IC. The bit isn't quite sharp enough for the level of detail.
My first shot at engraving an IC top. It's not really an 8085 microprocessor, it's a dead ROM I happened to have hanging around.


The cut widths are about 35 thousandths. Too large for the level of detail in the smaller key pattern. The single large key above is scaled three times larger than the smaller keys. The base leg length for the small keys (the smallest segment size) is 25 thousandths. So it's easy to see why it didn't quite come out.

Still, the accuracy would have been plenty good, if I'd had a sharp enough bit.

Onward and upward! :)

Wednesday, August 4, 2010

Java, Javascript, and the Installation Hurdle

For the past three years I've been teaching high school computer classes while using Java to teach the basics of programming in class. My usual routine is to teach HTML and CSS in the first semester, which provides the students with many of the basic skills of programming. Then in the second semester we start actually programming with Java.

The past two years I've taken advantage of the Greenfoot framework for Java. It eases the use of graphics and sound in Java programs, but more importantly it provides a visual representation of classes and objects. This greatly eases the burden of teaching what object oriented programming is all about, as well as demonstrating its advantages.

My reasons for using Java are several. Briefly, it's multi-platform. It's a "real" language, in that it is used outside the school and professionals are employed to use it. It incorporates the available facilities of the system, including graphics and sound, natively.

One of my hopes for my students is that after using Java in class, at least some of them will use it outside class as well. Unfortunately, for many of them the installation process has been a roadblock to doing this. Particularly in Windows, where an extra step has to be performed to add the Java SDK to the system's path. The students with Mac OS X at home are lucky, they don't have to install the SDK, it comes with the OS. The Linux users are usually capable of managing it for themselves. But about 80% of my students are under Windows outside of class. And the Java SDK install isn't what they're used to.

One potential solution to this would be moving to Javascript. There's no installation barrier there. One reason I've not used Javascript in class is that graphics subsystems like Canvas and SVG are not uniformly available. Even when IE9 comes out as a regular product next year, those students with Windows XP systems at home (about 75% of the Windows-only homes are running only XP, based on my surveys in class), this problem won't be entirely solved. The difference here is that the install of a second browser is a lot easier than a Java SDK install.

The installation barrier won't be the only thing my choice of language in class hinges on, but it's certainly a significant factor. Exactly why the Java SDK install has remained so hostile to Windows users is unclear to me. It smacks of elitism on the part of Sun/Oracle (if you can't hack the install process, we don't want you using it), but then the old saw about not ascribing evil intent where simple incompetence will suffice comes in. Maybe they just don't think it's a problem.

I expect to at least introduce Javascript this year as part of the HTML/CSS segment. Whether I do so and how deep we'll get into it will depend heavily on the character of the class--the chemistry of the students in any given class can make things vary a lot from class to class. Sometimes it's a struggle to get past <html><head><title><body>, other times I find them getting ahead of my lecture by several classes during one open work period.

Another factor in my willingness to consider using Javascript as the primary language in class is the advances the language has made recently. The ECMAScript Edition 5 specification is a big improvement on earlier specifications for the language. Likewise, the viewpoints of Douglas Crockford have influenced my impression of the language and its use.

If you're interested in Javascript, I highly recommend his book: JavaScript: The Good Parts.

Wednesday, July 1, 2009

Atari 7800 Video Modification

My website that details a modification to the Atari 7800 video game console to give it either composite or S-Video output has been moved!


Warning: Extreme Video Clarity for the Atari 7800!
Saundby's Atari 7800 Mods

I not only tell you what parts to use, where to get them, how to assemble and adjust the circuit but I also explain the electronic principles behind it all.

You can use it as an S-Video output by using the luma and chroma outputs separately, or as a standard composite video signal by tying the luma and chroma signals together on one line.

Thursday, June 18, 2009

A Semester with Greenfoot

This last semester I used the Greenfoot framework as an integral part of my high school computer class. It was an experiment to see what it could do for the students compared to the way that I've taught my class in the past. Based on the results that the students achieved, I'd have to say that Greenfoot was a very good addition to our class, with only a few reservations.

In my high school computer class, I spend the fall semester on basic computer skills, background knowledge, horizontal applications, and basic networking and communications knowledge. The highlights of the semester are class-produced websites (last year's are visible here), and a document including text, graphics, and tables which is a proposal for a video game concept. For the websites, I have each student produce a basic set of linked web pages individually while we learn rudimentary HTML and CSS, then the students are grouped into teams for the main website project. The game proposals are produced individually, and I have each student give a presentation to the class of their proposal.


The Problem: Getting Graphics

The second semester of the class moves on to computer programming. For this we use the Java programming language. It's not perfect for our needs in class, but it works well enough, as I've discussed before. One problem I've had with using Java as a teaching language is that while it has graphical abilities, they are so generalized that the learning curve for using them is difficult to manage in the limited class time we have. I want to provide at least a basic sense of what's happening in the computer when programming--all that stuff about data types, data structures, algorithms and so on--but still have sound and graphics available for the students since they provide a lot of motivation, as well as giving a source of feedback to students on what their program is doing that is more visceral than text. Likewise, different students respond to different stimuli. Some can perceive patterns in text, but more often they're more prepared for perceiving them in images or sounds. So this sort of program output can be critical in whether a student "gets" what a program is doing when it runs. I've discussed this in more detail before.

With the simple, constrained systems of the past, e.g. Apple II, Commodore 64, Atari 800, etc., accessing basic sound and graphics was easy compared to present day systems. There are still BASICs available today that provide the same sort of access, but they're also more divorced from mainstream programming than was the case 20 years ago. Java, while a relatively simple language in many respects, takes a very generalized approach toward graphics and requires a substantial amount of program infrastructure for graphics which is a distraction and source of confusion to new programmers.

Greenfoot: The Answer?

Enter Greenfoot, a framework for Java with design goals directly in line with my needs, it would seem. I admit to having some concerns and misgivings as I was preparing to use Greenfoot in class. Prior to the start of the year, I had two students try out Greenfoot over the summer. At the end of the first semester, the class members gave their video game proposal presentations and the class selected four games for development.

Now the semester is over and I've got time to reflect on the results of the year.

The games have been completed and posted to the Greenfoot Gallery. You can see what the students themselves had to say in their development blogs, linked below.


Army of One: Stoner Wombats

One of my students was having trouble meshing with a working group. After trying a few different arrangements, I ended up putting him on his own to work on an individual project. Since he was working alone, and had less time on his project than the other students, his project is far less developed than the others. Still, once on his own he was able to apply himself and showed the initiative to solve some programming problems he ran into in attempting to implement his ideas in his game. Here's his game:

Stoner Wombats


Never Say Die: Offroad Xtravagaanza Becomes The Art of Clay Pigeons

One of the groups started with an ambitious idea for a motorcycle simulation. They wanted something like the popular side-scrollers that simulate a motorcycle's balance and suspension while traveling over an obstacle course. I allowed the group to go ahead with the idea, and we worked hard on trying to divide the problems in implementing the simulation down to a scope that they could implement. However, the problems with learning the details of programming and debugging coupled with the difficulty they had in developing mathematical models for the simulation stymied them. They made significant progress along some paths, only to be stopped on others.

They then changed their objectives, changing the game to a top-view track racing game. Again they made substantial progress, only to run into problems with movement control and collision detection in their code that they weren't able to beat within a reasonable time.

So they stepped back once more, started with a working codebase (the ballon-popping demo scenario), and began modifying it and adding features. Even though they were weeks behind the other teams at this point, and shorthanded, they made good progress and turned out a good game.

The Art of Clay Pigeons

Art of Clay Pigeons Development Blog

Overall, I'd say this group had the most "educational" experience. As I mentioned, they did solve a lot of problems toward each of their prior goals. Though the process was very frustrating for them, they managed to maintain a good attitude and positively move forward from each failure.

Modularity is Our Friend: Day 3


Another group started out with a very basic idea for a shooter that needed a lot of fleshing out. They also ran into development problems, with collision detection and with hitting a mental limit on data structures. They managed to maintain a central base of working code, however, so their game didn't change as much through the course of development as the Art of Clay Pigeons/Offroad Xtravagaanza team. They began development of several different sets of possible features in parallel, then used the advantages of OO programming to add each to the central codebase, experiment with it, test interactions with other features, and then decide where to go.

They followed a very iterative process and learned to be fairly conservative about connecting ideas with their ability to implement them. They managed to apply some basic data structures to their game, notably Lists. They had other ideas for which I suggested more sophisticated data structures, but they decided they'd rather "limit their risks". Some of the students who worked on this game, "Day 3", have stayed in contact, and I know at least one update has been worked on since school ended, so this game may continue to develop. I know one thing they'd like to do is put one of the lines of work they had near completion that didn't quite make it in by the end of class into the game. So Day 3 may continue to develop:

Day 3

Day 3 Development Blog

Success by Design: Farm Frenzy

The remaining project ended up looking almost exactly like its original design. It was consciously designed as a modification of a classic video game (Pac-Man), and it avoided some of the problems the other teams ran into by sticking with large cells in the playfield. The team did a great job with this, with one of the team working out many of the little details outside of class, then coming in with sheets of layout information on graph paper and pseudocode ready for implementation.

Farm Frenzy, a.k.a. The Purple Piggy Game

Farm Frenzy Development Blog

Results: Positive

I have to say that I'm really pleased with how things turned out. All class members were able to contribute constructively to their team projects, and all teams were able to complete a game that actually runs and get it posted on the Greenfoot Gallery. I had my doubts, especially when one team was halfway through the last class without having yet even gone through the process of exporting their game from Greenfoot, much less posting it online. They rallied, however, and managed to get in under the wire.

Greenfoot worked well for giving students visual feedback on their program work, and it made the class fun and interesting for them. Overall I'd say motivation levels were higher than in my prior classes, in that a higher proportion of students were engaged with developing new ideas and seeking to implement them in code.

Greenfoot didn't prevent me from teaching more sophisticated programming concepts in class, but it did somewhat limit the scope with which I could approach them. Students were willing to follow discussions of the use of data structure objects, but they also wanted to "get back to work", so we weren't able to dig in as deeply in these area as I have with prior classes. We did manage to cover the basics, however, and I didn't see any reluctance to open up the Java API reference, or the API reference for Greenfoot, either. Overall, I'd say that the class moved into using data Objects faster than before, but didn't go as deep or into as broad a range of data structures as in previous classes. They did show that they understood what they were doing when they used Objects and Interfaces like List, though. They were able to deal with types, iterators, and selection of elements. So I'm satisfied that the important lessons were learned.


Problems Encountered

Our problems with implementing ideas in Greenfoot were a mix of things. In part, it was through our collective inexperience with Greenfoot that we didn't always conceive of things in a way congruent with how Greenfoot handles them. In other cases, we ran into problems when trying to implement things in ways that I've used in the past, particularly collision detection, that for whatever reason didn't appear to work in Greenfoot. Greenfoot is well suited for cell-based game models, it is more difficult to implement what might be called "small cell" models with pixel-level movement and control, or something close to it. Small cell models without "terrain" effects, such as space simulations don't seem to be as much of a problem. Other than that, for new programmers it seems best to stick with large cell games, where each player or game object occupies one cell on the playfield, and all interactions are based on occupation of the same cell or adjacent cells.

I had to write a fair bit of code myself outside of class to assist students with solving problems or developing implementations. I'll be writing more code before we start again next year, so that I've got a better handle on what it takes to solve some of the problems that we ran into last year. Especially dealing with collision detection. With this I'll be better able to guide the students in understanding how much work it'll take to implement their ideas, and help them make better decisions on how they design their games.

I expect to write more on my experiences using Greenfoot in class as time goes on, and provide some of the example scenarios I've developed. For now however, I have to say that I've quite happy with how Greenfoot worked in my class and I'm looking forward to using it again next year.

You Can't Argue with the Price (or License)

On top of that, thanks to the fact that Greenfoot is free, it allows me to have students create video games without using one of the commercial instructional development systems that have license fees that come out of our school's limited budget. And in this case the lower cost does not result in a reduction in the value of the product, much the opposite. The commercial systems that have been used by other instructors at our school in the past have no connection to real world programming languages, and the games require the system's runtime package to operate. My student's Greenfoot games, on the other hand, are written with their logic in Java, and are easily packaged for independent distribution as Java executables as well as web distribution.

Thumbs Up

Final word: Greenfoot's good stuff. If you're teaching introductory level computer programming, it's worth giving a try.

Monday, March 2, 2009

Dark BASIC Professional Retail Box

Since my earlier posts on Dark BASIC Professional (here and here), I have picked up a retail box version of it. I was using the trial version from an online download before.

There were a couple of snags on installation, one quite minor, one that became a real problem. The minor problem was that the autorun menu of the Dark BASIC Pro install CD wasn't as clear as it could have been. It gives a laundry list of things it can do, without being clear of which ones directly relate to installing Dark BASIC. There is a choice to install Dark BASIC, but whether any of the other items needs to be done before or after isn't clear, nor whether some of the other menu items install extras or demo versions of other products from The Game Creators.

I'm sure the menu makes perfect sense to someone who already knows what they're supposed to do. This sort of thing is typical of Dark BASIC. A little more work to determine what a first time user sees and thinks would make their products much nicer without a whole lot of extra effort.

As it turned out, the single Install Dark BASIC Pro item (the second item on the list on my CD, after an item allowing the installation of DirectX) was all that was necessary. I've not explored the other items on the CD as of yet.

The system I installed to initially is a netbook, without its own CD drive. I had the CD in my iMac, and was sharing it across my home network. The installation of Dark BASIC went fine this way. Until I got to the point where I needed to validate my copy of Dark BASIC.

Dark BASIC's copy protection keeps it from running unless its been authorized across the network from The Game Creator's authorization server. Having a network connection was no problem for my netbook, but first it had to validate the CD. Validation of the CD failed since I was working across a network share.

I took a trip to the Dark BASIC Pro website, and found that it's possible to authorize a copy of Dark BASIC by copying files from one computer to another. Well, I have an older, rather awful, WinXP laptop that has a CD drive directly in it, and which could probably be tricked into getting onto the internet.

Without going into all the details, I went through several iterations of trying various combinations of network connection, system, and CD and got nowhere for several hours. My older laptop didn't have a version of Windows Explorer that the server at The Game Creators was happy with (it apparently didn't support the correct procedures for talking to their server) attempts at upgrading only made things worse for the system itself, and at the end of over 4 hours of dinking around I still didn't have an authorized copy of Dark BASIC Pro.

Finally I decided to try one more idea with the netbook since using the old laptop on the network wasn't working out. If that didn't work out I would have been contacting The Game Creators directly. The last thing I tried on the off chance that it might work was connecting to the shared CD on my network by mapping it to a drive on the netbook, rather than connecting to it as an ordinary share.

This worked. The authorization program for Dark BASIC Pro was able to see that the CD was a valid CD and provide me with an authorization code for Dark BASIC when the CD was mapped as a drive.

With that hurdle out of the way, I was able to move on to using a full version of Dark BASIC Pro.

I've mentioned the manual in my earlier posts, but I hadn't really had a chance to look at it in detail. One of my students has the retail Dark BASIC, and I've glanced at his manual briefly, but not had time to do more. Now that I have my own copy, I can really see just how awful it is.

It's too bad, because the language itself isn't so bad.

Now where do I start on what's wrong with the manual? Let's start with alphabetization. It isn't.

The command lists have the commands listed in an order that suggests they appear in whatever order someone happened to think of them. As if that's not bad enough, a flip to the back of the book to the index shows that nobody bothered to do an alphabetic sort there, either.

A look at the "P" section shows:
PRINT
PREVIOUS
PERFORM...
PASTE IMAGE
POINT
PASTE SPRITE
PLAY
PERFORM...
PATH...
PLAY
PAUSE...
PLACE...
PERFORM...
PITCH...
and so on.

You have to scan every item in every list all through the book, and some of those lists are more than a page long. Somebody at The Game Creators needs to learn how to alphabetize their lists. Or how to hire someone else to do it for them.

Then we look at what should be the meat of the manual, the information on the commands in DBPro. There we find that the commands are listed, again, in an "eclectic" order, and that there are no useful examples given, most egregiously when the command is built to be used along with some other command. Multiline commands are split into multiple entries (e.g. DO and LOOP are two separate entries with the text cut and pasted between them.)

There are a multitude of other problems as well. Overall the manual reads more like an early draft than something that belongs in print in a retail box.

On the other hand, I do have to say that the inclusion of a printed manual, however rough, is a nice thing. The manual is difficult to use, but far from useless. It'll be of some use to experienced programmers. It'll be a source of confusion to beginners. It's also easier to mark up corrections in a print manual than in a PDF. So, kudos to The Game Creators for including a print manual. I'd like to ask them to please alphabetize their command lists and index, at least, in future printings.

The language itself is quite nice for what it does. If you're an experienced programmer you'll be able to write short pieces of test code pretty quickly and get some things going. There are some bugs and omissions in the language, though. The language itself is also quite inconsistant. Overall it's something like the manual. It seems to have grown up in pieces, and there hasn't been any oversight toward keeping the language consistant with itself. These problems coupled with the poor documentation means that you'll be writing a lot of test code before you get down to the real task at hand.

There are after-market books, but I've yet to find any of them at major retailers. They're available online, and while I've yet to see any it wouldn't take much to improve on the provided documentation. The forums at The Game Creators provide help as well. Most help seems to be provided in the form of example code. This is helpful to experienced programmers, less helpful to new programmers who aren't used to reading code yet.

While Dark BASIC Professional has a lot, and I mean a lot of rough edges, it pretty well does what it claims and it's quite inexpensive for a commercial product. The retail box runs $70-80. If you're completely new to programming, I wouldn't recommend it until you've spent some time learning the basics with something else that has better documentation. A free basic like Chipmunk BASIC or SmallBASIC (there's a different Small Basic especially for Windows) would probably be a better place for someone new to programming.

Then, once they get to where they need the features unique to DBPRo, they could pick it up.

Overall Grade: 78%, C

Pros:
Inexpensive for what you get.
Does what it claims.
Easy to get rolling for experienced graphics programmers familiar with current technology, but not wanting to deal with a non-procedural language like Java or C++.

Cons:
Poor manual.
Language provides poor abstraction for many graphics operations--a good knowledge of the underlying technology is required to use it properly.
Not a good language for new programmers.