Microsoft has recently announced that they are moving .Net to open source and supporting Mac and Linux in addition to their Windows OS with Visual Studio Community 2013. Also, Visual Studio 2015 will support iOS and Android development.
Frankly, it's a little confusing because in some places MS mentions Mac and Linux, but very few, and they mention iOS and Android in lots of places, but not everywhere. So the support may be different than what I said.
Nevertheless, MS is opening up. Or at least seeming to.
Their timing couldn't be better, in my opinion.
Oracle is working hard to poison Java. I'm not entirely sure why, unless they think that ticking off any Java programmers and users outside those developing middleware for Oracle's products is a really great strategy. Their support for Java as a general programming language, as Sun did, has been piss-poor since day 1. Every so often they make a grand gesture to try to present themselves as interested, but the product they offer now is not something I could send someone out to install with a good conscience. What kind of an honest, large-scale company thinks that half-sneaking some crap software in under the cover of installing their own is a really great idea? Not one that really treasures the individual customers, I can tell you (and yes, Adobe is on this particular excrement list, too.)
Couple that with their poor responsiveness to security concerns, to the point where the Java language is treated as a sort of worm or virus by most software, and you've got a company that's decided to leave a hole in the cross-platform development market simply because their interests are elsewhere.
Cross Platform Alternatives
C# is Microsoft's outgrowth from their own attempt at embrace, extend, exterminate targeting Java. It's a very good language, including the good parts of Java while having a set of libraries (.Net) that don't have the Java API's less than useless historical cruft but do have everything good about the API, which made Microsoft look really cool to programmers when it came out as most were not familiar with the Java API itself.
Switching to C# from Java is an afternoon's exercise. But it and the .Net library started out wed to the Microsoft platform.
Enter Mono, a cross-platform implementation of .Net supporting the C# language based on Microsoft's ECMA standard for its products. It has been growing, at least in part on the back of the decline of Java, as well as bringing the good things about C# and .Net to Mac and Linux development. It doesn't hurt that it is the core that drives products like the Unity cross-platform game-development system, too.
Now Microsoft is combining their products with Mono, and extending their reach to Android and iOS.
There are a Couple of Ways This Could Go (and Possibly More)
In Future A, Microsoft does the excellent work they do in producing development tools, but now with a return to platform-agnosticism. This encourages programmers to develop for Windows and Windows Phone as well, since programmers who might otherwise have been targetting only iOS or Android will be selecting these tools for their intrinsic value as development tools to write programs for their favored OS, then decide to toss a Windows/WinPho version out there, too, since it's not costing them any significant extra effort and might end up fattening the coffers a bit.
Microsoft gains developers for its platforms, draws "thought leader" and technical leaders into their ecosystem, and the developers get the advantage of having good development tools for any major platform they choose.
In Future B, Microsoft uses this as a ploy to draw programmers in, but cross-platform support is sloppy, or delivered slowly, or lags behind the native capabilities of the non-MS platforms. Perhaps it doesn't play well with the various different versions of Android, or maybe the Mac and Linux native code suffers by comparison with code developed with native tools for those platforms.
It turns out to just be hype. Maybe there are forces within MS that fight the release of solid tools that are truly cross-platform, so they ensure that foreign platform support is sub-par, thinking that they're helping their own products by making it "harder" to develop for other platforms. The only point of cross-platform, to them, is to allow Windows patriots to proclaim themselves cross-platform developers without knowing anything about the competition.
In this future, Windows does not become the programmer's platform of choice, Windows has extra costs of development that make it less attractive as a development target when another platform is the one that's going to pay the bills (probably iOS), and life goes on as it does today with possibly the Microsoft touch putting some poison into Mono.
I can only hope that the upper management at MS is committed to Future A. because that's what it's going to take to keep Future B from stepping in any time it pleases.
Microsoft, Doing You Know What in Their Own Messkit for the Past Decade
Windows 7 was a boon for programmers when it came out. I and many other programmers I know had been feeling somewhat kicked about by Apple, didn't see tools with the same level of sophistication on Linux (and generally more system maintenance than the commercial OSes, and system maintenance doesn't pay bills), and Windows 7 was a viable place to go, or to at least have as a second OS on our desk for conducting development and testing.
Windows 8 added some nice stuff behind the scenes, but not without wrecking the usability of the platform, as well as making it a far less attractive target for development. In my case, I abandoned Windows as a target for native development about a decade ago, and was waiting on Windows 8 to see if I might add it to my repertoire again. The answer became "no". Windows 10 will determine whether I ever consider it a serious platform for anything at all in the future, as the professional applications that I currently use on Windows have all become multi-platform over the past several years, so I can move my licenses over to Mac OS or Linux for all of them.
If Microsoft gets it right with their development tools, and Windows 10 restores the power to the desktop that earlier versions provided--not just a false appearance of it as in Windows 8.1--then they stand to become the defacto professional desktop again.
Whither Mobile?
And given that the consumer desktop is the market that is dying in the face of mobile platforms, one would hope that they are bright enough to strategically commit to a powerful professional computer OS again. While the mass market computer is probably going away, there was a profitable professional/hobbyist market before the internet boom put a computer in practically every household. That professional market stands to be even larger than the historical one, as many professions that had nothing to do with computers now rely on them, and many new professions have arisen over the past 25 years that rely on the computer.
Also, there's a possibility that the mobile device as a computer replacement is just a flash in the pan. Most people bought their mobile devices in place of a routine upgrade to their home computer for one cycle. Now that they have tablets, the tablet market is going flat while computers are seeing a modest rise in sales. I think just about everyone has had a chance to discover that the touch interface is very limited in what it can do with current technology. It's severely error-prone and it's not well suited to complex activities. It's too soon to read now, but there's a chance the tablet may be relegated to specialty use status, with the keyboard-equipped computer regaining its status as the "real" computer behind the smartphone's limited purposes as a personal communication and light entertainment device. We'll see.
The phone isn't going to go away, though. It's going to be the most personal of personal computers, at least until it's replaced by a small tablet and a complete phone the size of an earpiece, or some other revolutionary turn that gets people to give up a screen for convenience. So supporting the mobile platforms is, for Microsoft, probably a must to their survival. At least until they can get real market share for Winpho.
Either way, if Microsoft plays their cards right, going to platform-agnosticism in their development tools could be a really good thing for everybody--including and especially Microsoft.
Showing posts with label software. Show all posts
Showing posts with label software. Show all posts
Monday, November 17, 2014

Thursday, May 29, 2014
ZBrush Export to Unity 3D, Mesh + UV
ZBrush is a great tool in many ways. But there are other ways in which it is infuriating. It is mysterious about what it is doing in many cases, and the documentation on these mysteries is usually nothing more than a longer version of the text on the buttons and menus.
UV maps are one of the places where the data is slim, and the documentation tells you nothing about what's going on with the choices you make. It's like that Sherlock Holmes quote about it making perfect sense once you already know the answer.
On top of that, there's a lot of FUD about transferring data from ZBrush to Unity. Certainly there are other programs for which Unity makes the process more or less seamless, but ZBrush is perfectly capable of providing all the same data to Unity. It's just a matter of knowing the correct process. Which is difficult with ZBrush if you're just trying it on your own, because there are so many settings for which ZBrush doesn't show you directly the effects of your choices. You have to keep going back and forth between ZBrush and Unity--does this work? Does that work? What about that? On and on. And at each stage you're guessing, because you can't look at what comes through in Unity and say, "Oh, I see the problem. I need to just do -that-!" It's just a mishmash of unmatched data.
Well, I spent two solid days experimenting. Trying out different things, getting something to work, making sure I can do it twice in a row and have it work both times. Researching on the internet to see if someone else had a better way, and so on. You don't need to hear the whole litany--getting it done was my job, now here's the results for you to take advantage of so that you can get on with your project.
I'm using Unity 4.3.4f1 and ZBrush 4R6 for this. I'm covering just exporting the object mesh and its UV texture here. A normal map works similar to the UV texture--the key point being that it has to be vertically flipped to align with the mesh in Unity. If you're interested in another post that covers normal maps specifically, email me or leave a comment and I'll do it.
You've Got an Object in ZBrush
So your object is sculpted and polypainted in ZBrush, now you want to drop it into Unity.
First, you've got to convert the polypainting into a separate image file that will wrap around your object's mesh in Unity. This is called a UV texture. What makes things confusing is that it's often called a UV Map in casual usage, but a UV map is actually something else. The UV Map is the relationship between pixels on a UV Texture and points on the mesh. In ZBrush these are separate and distinct items. In many other programs, the UV Map and UV Texture are conflated to simplify things. Which makes it seem like ZBrush has an extra step when creating UV Textures for Unity and other 3D software.
Before beginning, save your project and your tool(s) in ZBrush. There will be opportunities for things to get messed up or confused.
Create the UV Map
You've now created a UV map, which you need to apply to your original object to guide the creation of a UV texture from its polypainting.
Gotchas
OK, that's the process. Having it all written out in detail makes it look worse than it really is, it actually happens very quickly once you know it. It's those first few passes that are a problem.
One of the things that really slowed me down in ZBrush is the fact that ZBrush doesn't tell you anything inside ZBrush about what the orientation of the UV map is relative to the base orientation of the mesh. If you open the Tools=>UV Map menu and start clicking the buttons like FlipV,
Tweet
UV maps are one of the places where the data is slim, and the documentation tells you nothing about what's going on with the choices you make. It's like that Sherlock Holmes quote about it making perfect sense once you already know the answer.
On top of that, there's a lot of FUD about transferring data from ZBrush to Unity. Certainly there are other programs for which Unity makes the process more or less seamless, but ZBrush is perfectly capable of providing all the same data to Unity. It's just a matter of knowing the correct process. Which is difficult with ZBrush if you're just trying it on your own, because there are so many settings for which ZBrush doesn't show you directly the effects of your choices. You have to keep going back and forth between ZBrush and Unity--does this work? Does that work? What about that? On and on. And at each stage you're guessing, because you can't look at what comes through in Unity and say, "Oh, I see the problem. I need to just do -that-!" It's just a mishmash of unmatched data.
Well, I spent two solid days experimenting. Trying out different things, getting something to work, making sure I can do it twice in a row and have it work both times. Researching on the internet to see if someone else had a better way, and so on. You don't need to hear the whole litany--getting it done was my job, now here's the results for you to take advantage of so that you can get on with your project.
I'm using Unity 4.3.4f1 and ZBrush 4R6 for this. I'm covering just exporting the object mesh and its UV texture here. A normal map works similar to the UV texture--the key point being that it has to be vertically flipped to align with the mesh in Unity. If you're interested in another post that covers normal maps specifically, email me or leave a comment and I'll do it.
You've Got an Object in ZBrush
So your object is sculpted and polypainted in ZBrush, now you want to drop it into Unity.
First, you've got to convert the polypainting into a separate image file that will wrap around your object's mesh in Unity. This is called a UV texture. What makes things confusing is that it's often called a UV Map in casual usage, but a UV map is actually something else. The UV Map is the relationship between pixels on a UV Texture and points on the mesh. In ZBrush these are separate and distinct items. In many other programs, the UV Map and UV Texture are conflated to simplify things. Which makes it seem like ZBrush has an extra step when creating UV Textures for Unity and other 3D software.
Before beginning, save your project and your tool(s) in ZBrush. There will be opportunities for things to get messed up or confused.
Create the UV Map
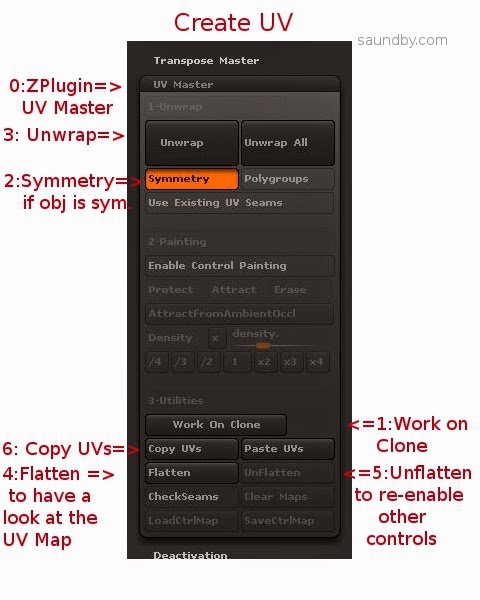
0: Open up UV Master in the ZPlugin menu.
This is where we'll create the UV Map, the Texture itself comes later.
1: Click Work on Clone
This takes care of a bunch of stuff to prepare for making the UV without disturbing your original object. I've screwed up several meshes trying to go without it. My advice is to just use it, it makes things easier.
2: Turn on Symmetry if your object is symmetrical.
Symmetry will try to make a symmetrical UV map, which results in a symmetrical UV texture that's easier to edit by hand. If your object is just sort of symmetrical, you might give it a try, too.
3: Click the big Unwrap button.
This will unwrap the current tool. My advice is to work one tool at a time, and to reduce the number of tools to the minimum necessary before getting to this point to reduce the repetition of exporting meshes and maps.
4: Click Flatten to have a look at the shape of your UV map.
You will see a wireframe of the UV map, this is the form into which your object's polypainting will be projected to make a UV texture. If you're expecting to do any hand editing of the texture's details, make sure that the forms are not too distorted and that seams are not crossing critical areas of the mesh, like across the face of a character. If they are, you can use Control Painting to get a better mesh.
I'm not going to cover that in detail, there are good videos on this at Pixologic and on YouTube, but the short form is:
- Click Unflatten to get the controls back.
- Click Enable Control Painting
- Click Protect, then draw red on the parts of your mesh where you absolutely don't want a seam in the UV map (like the face of a character.)
- Click Attract, then draw in blue the areas that you'd like the seam to be (like the back of a character's head, or under their chin.)
- Click Unwrap again and check the results using Flatten.
5: Click Unflatten to get your controls back.
6: Click Copy UVs to put your UVs from the Clone on the Clipboard.
You've now created a UV map, which you need to apply to your original object to guide the creation of a UV texture from its polypainting.
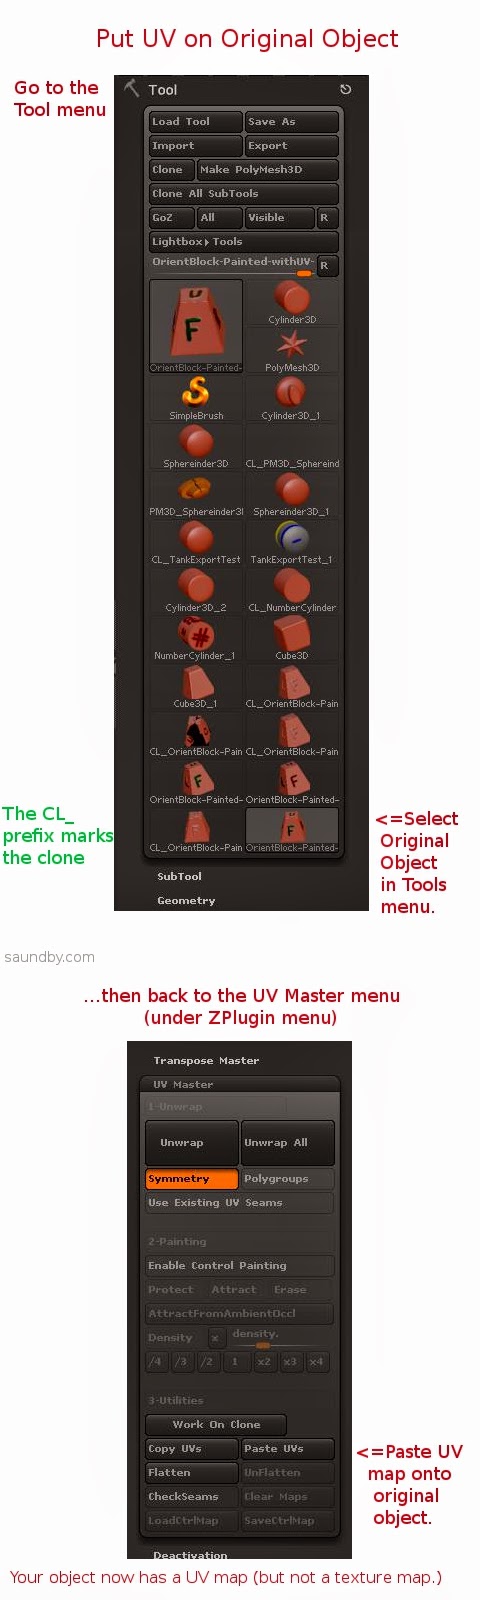
7: Select your original object from the Tool menu.
This will bring it back into the Document view and make it the active object. If something's wrong, or you can't find it, reload it using Load Tool (because you saved it before starting like I advised, right?)
8: Click Paste UVs in the UV Master menu.
This puts the UV from the Clone that's on the Clipboard on your object. It's now ready to have its texture map made from the polypaint on it.
9: Save your tool. Give it a distinctive name, like MyTool-withUVs.ztl.
10: Take a deep breath. The rest is pretty easy.
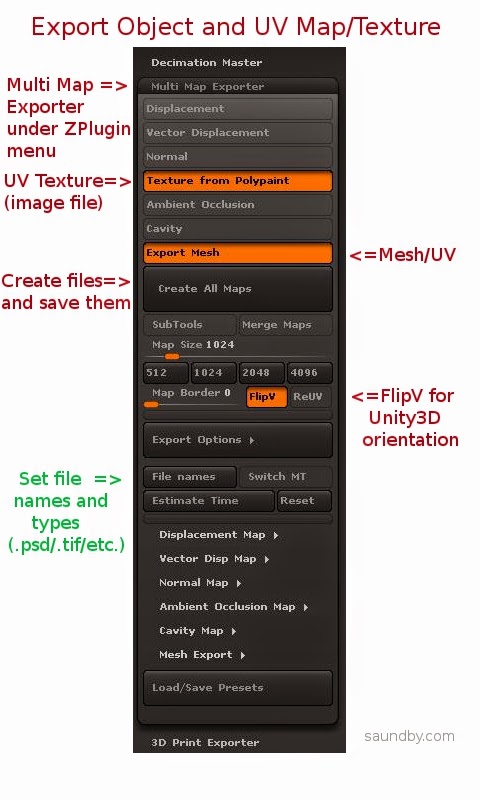
11: Open Multi Map Exporter under the ZPlugin menu.
12: Choose the things you want to export. Mesh and Texture from Polypaint for this example.
13: Choose FlipV to orient maps correctly for Unity.
If you want to have your map files in a specific format, select it in the Export Options and file names sections.
14: Click Create All Maps to create the UV texture and to save the mesh as an .OBJ file. This is one of the most poorly worded bits of button text in ZBrush. Even just "Save" would have made more sense. Oh, well, if we start talking about what's screwy with ZBrush's UI, we'll never finish.
15: Import assets into Unity (Assets=>Import New Asset...).
Gotchas
OK, that's the process. Having it all written out in detail makes it look worse than it really is, it actually happens very quickly once you know it. It's those first few passes that are a problem.
One of the things that really slowed me down in ZBrush is the fact that ZBrush doesn't tell you anything inside ZBrush about what the orientation of the UV map is relative to the base orientation of the mesh. If you open the Tools=>UV Map menu and start clicking the buttons like FlipV,
Monday, May 5, 2014
Kerbal Space Program + DayZ = ...Firefly?
Beside DayZ, I've recently started playing Kerbal Space Program. It's a game where you build rockets and send little green men off into space to land on their Mün and other planets in their little solar system. The physics engine lets it be moderately realistic in its behavior, enough for a game anyway. The build system is simple enough that a mere mortal can deal with it, or a rocket person who doesn't want to deal with lots of niggling details because nobody is paying them to do this.
I wrung the heck out of the demo version before I bought the full version. There are some significant differences between the two, aside from the obvious lack of features. For one thing, the simulation in the demo is more forgiving than the one in the full game. The full game does have the advantage that the simulation is more "fine grained" than the demo, though. This boils down to meaning that you have to pay more attention to how you build and fly your rockets in the full version, especially the large ones. The demo is more "gamey", in that you can slap together almost anything and get it into orbit. The full version requires a bit more thought and testing.
Recapitulating History
Since the demo's parts are similar to early NASA parts, I decided to get started by just putting together some simple tests to learn about building rockets in KSP.
My first was a capsule with parachute recovery (there's no other capsule or recovery system in the demo, so every flight is a "manned" flight.) I put this on top of a stack separator and a short tank with a large engine on the back and some fins for a bit of stability. I was worried that it would be too short to be dynamically stable along its length, that it would pitch or yaw wildly, but I decided to throw caution to the winds and launch it just to go through the process of getting something off the ground.

In spite of a lack of any control system, it flew just fine. It was about a 10 minute flight, surprisingly long for the amount of propellant, I thought. This basic configuration, sans fins, became the core of my next step--build a capsule and service module style combination that I could put on top of different boosters.
I added a dynamic control wheel system and some RCS jets to fill it out. Later, when I tried to use the RCS jets I learned that I needed to add RCS propellant tankage, too. It added a lot of weight, but at the end I had a solid core to build around for an orbital system.
This went on top of another stage separator, a taller tank, and another large engine for another suborbital test.

That flight also went well. The fins of the first flight had been removed, and I decided to see how much stability I got with just the reaction wheel system and no fins on the booster. One thing that I missed immediately from the construction information was the lack of a display of the center of pressure on the craft. A basic measure of stability is where the CP sits with respect to the center of gravity (CG) of the craft. CP needs to be behind CG, and the greater the distance between them then generally the more stable the craft will be in the face of perturbations.
The other thing I missed was the lack of a sequencer to control the craft. It's a game, they assume that you want to "fly" the craft. I'm an instrumentation and controls engineer. I expect to build a solid program to get the craft to where I want it, then sit back and let it do its work. A sequencer is sort of a computer that looks at inputs from control instrumentation--acceleration, altitude, etc.--then does certain things at certain times--adjust valve settings, thrust vectoring positions, engine cutoff, etc.
That way you can let the sequencer manage engine throttling on the basis of altitude or velocity, engine shutdown on the basis of same, staging, and firing of the new stage (through that stage's control system.)
In KSP, there are a sequence of events set up linearly that are activated by the space bar. Engine activation (throttling happens elsewhere), stage separation, parachute activation (deployment is controlled by the parachute itself, which deploys as a drogue at high altitude then opens fully at about 500m.)
It more or less works, but having to "fly" each craft gets tedious for me. I'm of the school of aerospace engineer that feels the job is done when the vehicle gets off the ground. Then you just sit back and chew your nails till your bit completes its mission sequence.
Ascent to Orbit
The next step was adding some more power to the booster to get enough velocity for orbit. Given the sort of downrange distance I got with my suborbital vehicles (I flew 3 suborbital flights to different altitudes and downrange distances to get a feel for the craft and the controls), it wasn't hard to get a "seat of the pants" feel for what it would take to stretch the craft for orbital flight. Since the game doesn't give you much in the way of real numbers, that's about all you'll get. The "empirical method" rules here. But since it's just a game, it's not a surprise or much of a problem--I'm just used to having numbers for planning.
I added a second stage between my service module stack and my first stage stack, then added a couple of strap-on boosters to the first stage. Since I hadn't sorted out the sequencing of engines on the first launch, the strap-ons ended up being my first stage, rather than a "stage 0", with the core stage only firing after they burned out and were dropped.
I'd already noticed that the game's world behaves pretty much like our own world. It rotates the same direction, for example, so pitching over to the east would be the most efficient path to orbit. I fired up the booster--fortunately the strap-on boosters had enough thrust to get the whole stack of the ground--rode them up to a decent altitude, staged, then started tipping over to the east.
I took it slow on the tipping, since the whole rocket was so heavy that I wanted to make sure I got enough altitude. As it was, I rode the core stage up, staged, then continued the pitch-over to the east under power the full time. I know it's probably more proper to get the apogee high enough, shut down, then fire up again for a circularization burn at apogee, but I wasn't sweating that at this point.
Having only limited data on the main screen meant popping back and forth between the main screen and the map screen to check my trajectory. I wasn't sure if the game world had the same acceleration due to gravity as Earth, so I didn't know how much I could tell by my altitude and ground-relative velocity (and it bothered me that I didn't have a radar altimeter or some such to know my distance above ground, too. But that really bit me later, when I got to the Mün.)
I did manage to set up a decent orbit, and, yes, with a plenitude of propellant. I would be able to go home again. I played around with raising and lowering the orbit.
And here's where KSP gets really cool.
The immediate display of effects of acceleration on trajectory in the map window is really neat. It's easy to see what happens when you accelerate at different points of your orbit. It also gives players the chance to get stuck in orbit, revealing a bit of physics about energy use. And, even more significantly, changing orbital inclination.
One of the things that irks me is the common perception of "space" being like one big room, where everything that's "in space" is together. It's often presented this way in the simplified presentation of general media, and those people who don't have any direct contact with space work just don't know any better. They see the Hubble Space Telescope as hanging right off the front porch of the ISS, with all the spy satellites, weather satellites, commsats, etc, all right there in a row.
Now, every time I hear someone ask why the astronauts at the ISS can't just grab the Hubble and fix it, or why a Shuttle sent to repair a Hubble can't just ditch out to the ISS if something goes wrong, I'll wish that I could sit them down with a copy of KSP with objects in the respective orbits and let them find out through personal (non-lethal) experience why this doesn't work.
Back to my orbit. I didn't know what my parachute could deal with in the way of incoming velocity, so I decided not to come in from the higher orbit (about 400km), but returned to a lower orbit of about 90km before doing a re-entry burn.
The parachute held up fine. In fact, I learned that the system could deal with returning from orbits beyond 500km, but it was having trouble reducing velocity enough from around 750km. I didn't pancake any spacecraft, but I don't think I'd want to try a direct re-entry from 1000km. I don't know if the game engine does enough simulation to cause the heat shield on the capsule to fail, either. In general, I didn't push it.
I flew several more orbital flights, with minor tweaks to my vehicle design (like having the core booster fire at launch along with the strap-ons). I used different techniques for getting to orbit, in one case going straight up until I had an apogee of 500km, shutting down, then tipping to the east and firing to circularize at apogee. It worked just fine. I also did the routine of going a bit to the east, raising my apogee to about 90km, shutting down then firing a second burn at apogee to circularize. It may have been more fuel efficient than going straight up before circularizing, but it wasn't as easy to fly.
I picked 90km as my altitude just because that's the simulated altitude I've used on numerous test programs to test equipment in space-like conditions of atmospheric pressure (or lack thereof.) I've used other targets as well, like 75km, but I went with 90 because I wanted a little room. And, I was glad to see that KSP seems to pretty well mimic Earth so that I can use familiar numbers like these.
Final Thoughts
KSP should be played in schools, for credit. I would like to think that it can be used without taking away the fun, and that kids could be induced to set objectives for themselves similar to actual space program objectives (rather than just blowing up little green Kerbal people or ramming them into the ground at supersonic velocities.) The game has tremendous potential for teaching, in a "seat of the pants" way, information about ballistics and orbital mechanics. Then, when these subjects are encountered in math and physics classes, the concepts will already be familiar.
While on Facebook, there was a little game someone started of asking what you'd get if you combined the two computer games you were playing presently. In my case it was DayZ and KSP. I figure mixing zombie apocalypse with rickety build it yourself interplanetary space flight gives something like a Firefly game (Reavers=zombies in this case, in case that's not obvious.)
Tweet
I wrung the heck out of the demo version before I bought the full version. There are some significant differences between the two, aside from the obvious lack of features. For one thing, the simulation in the demo is more forgiving than the one in the full game. The full game does have the advantage that the simulation is more "fine grained" than the demo, though. This boils down to meaning that you have to pay more attention to how you build and fly your rockets in the full version, especially the large ones. The demo is more "gamey", in that you can slap together almost anything and get it into orbit. The full version requires a bit more thought and testing.
Recapitulating History
Since the demo's parts are similar to early NASA parts, I decided to get started by just putting together some simple tests to learn about building rockets in KSP.
My first was a capsule with parachute recovery (there's no other capsule or recovery system in the demo, so every flight is a "manned" flight.) I put this on top of a stack separator and a short tank with a large engine on the back and some fins for a bit of stability. I was worried that it would be too short to be dynamically stable along its length, that it would pitch or yaw wildly, but I decided to throw caution to the winds and launch it just to go through the process of getting something off the ground.
The real thing version of where I started in KSP
In spite of a lack of any control system, it flew just fine. It was about a 10 minute flight, surprisingly long for the amount of propellant, I thought. This basic configuration, sans fins, became the core of my next step--build a capsule and service module style combination that I could put on top of different boosters.
I added a dynamic control wheel system and some RCS jets to fill it out. Later, when I tried to use the RCS jets I learned that I needed to add RCS propellant tankage, too. It added a lot of weight, but at the end I had a solid core to build around for an orbital system.
This went on top of another stage separator, a taller tank, and another large engine for another suborbital test.
Mercury Redstone Suborbital Launch
That flight also went well. The fins of the first flight had been removed, and I decided to see how much stability I got with just the reaction wheel system and no fins on the booster. One thing that I missed immediately from the construction information was the lack of a display of the center of pressure on the craft. A basic measure of stability is where the CP sits with respect to the center of gravity (CG) of the craft. CP needs to be behind CG, and the greater the distance between them then generally the more stable the craft will be in the face of perturbations.
The other thing I missed was the lack of a sequencer to control the craft. It's a game, they assume that you want to "fly" the craft. I'm an instrumentation and controls engineer. I expect to build a solid program to get the craft to where I want it, then sit back and let it do its work. A sequencer is sort of a computer that looks at inputs from control instrumentation--acceleration, altitude, etc.--then does certain things at certain times--adjust valve settings, thrust vectoring positions, engine cutoff, etc.
That way you can let the sequencer manage engine throttling on the basis of altitude or velocity, engine shutdown on the basis of same, staging, and firing of the new stage (through that stage's control system.)
In KSP, there are a sequence of events set up linearly that are activated by the space bar. Engine activation (throttling happens elsewhere), stage separation, parachute activation (deployment is controlled by the parachute itself, which deploys as a drogue at high altitude then opens fully at about 500m.)
It more or less works, but having to "fly" each craft gets tedious for me. I'm of the school of aerospace engineer that feels the job is done when the vehicle gets off the ground. Then you just sit back and chew your nails till your bit completes its mission sequence.
Ascent to Orbit
The next step was adding some more power to the booster to get enough velocity for orbit. Given the sort of downrange distance I got with my suborbital vehicles (I flew 3 suborbital flights to different altitudes and downrange distances to get a feel for the craft and the controls), it wasn't hard to get a "seat of the pants" feel for what it would take to stretch the craft for orbital flight. Since the game doesn't give you much in the way of real numbers, that's about all you'll get. The "empirical method" rules here. But since it's just a game, it's not a surprise or much of a problem--I'm just used to having numbers for planning.
I added a second stage between my service module stack and my first stage stack, then added a couple of strap-on boosters to the first stage. Since I hadn't sorted out the sequencing of engines on the first launch, the strap-ons ended up being my first stage, rather than a "stage 0", with the core stage only firing after they burned out and were dropped.
I'd already noticed that the game's world behaves pretty much like our own world. It rotates the same direction, for example, so pitching over to the east would be the most efficient path to orbit. I fired up the booster--fortunately the strap-on boosters had enough thrust to get the whole stack of the ground--rode them up to a decent altitude, staged, then started tipping over to the east.
I took it slow on the tipping, since the whole rocket was so heavy that I wanted to make sure I got enough altitude. As it was, I rode the core stage up, staged, then continued the pitch-over to the east under power the full time. I know it's probably more proper to get the apogee high enough, shut down, then fire up again for a circularization burn at apogee, but I wasn't sweating that at this point.
Having only limited data on the main screen meant popping back and forth between the main screen and the map screen to check my trajectory. I wasn't sure if the game world had the same acceleration due to gravity as Earth, so I didn't know how much I could tell by my altitude and ground-relative velocity (and it bothered me that I didn't have a radar altimeter or some such to know my distance above ground, too. But that really bit me later, when I got to the Mün.)
I did manage to set up a decent orbit, and, yes, with a plenitude of propellant. I would be able to go home again. I played around with raising and lowering the orbit.
And here's where KSP gets really cool.
The immediate display of effects of acceleration on trajectory in the map window is really neat. It's easy to see what happens when you accelerate at different points of your orbit. It also gives players the chance to get stuck in orbit, revealing a bit of physics about energy use. And, even more significantly, changing orbital inclination.
One of the things that irks me is the common perception of "space" being like one big room, where everything that's "in space" is together. It's often presented this way in the simplified presentation of general media, and those people who don't have any direct contact with space work just don't know any better. They see the Hubble Space Telescope as hanging right off the front porch of the ISS, with all the spy satellites, weather satellites, commsats, etc, all right there in a row.
Now, every time I hear someone ask why the astronauts at the ISS can't just grab the Hubble and fix it, or why a Shuttle sent to repair a Hubble can't just ditch out to the ISS if something goes wrong, I'll wish that I could sit them down with a copy of KSP with objects in the respective orbits and let them find out through personal (non-lethal) experience why this doesn't work.
Back to my orbit. I didn't know what my parachute could deal with in the way of incoming velocity, so I decided not to come in from the higher orbit (about 400km), but returned to a lower orbit of about 90km before doing a re-entry burn.
The parachute held up fine. In fact, I learned that the system could deal with returning from orbits beyond 500km, but it was having trouble reducing velocity enough from around 750km. I didn't pancake any spacecraft, but I don't think I'd want to try a direct re-entry from 1000km. I don't know if the game engine does enough simulation to cause the heat shield on the capsule to fail, either. In general, I didn't push it.
I flew several more orbital flights, with minor tweaks to my vehicle design (like having the core booster fire at launch along with the strap-ons). I used different techniques for getting to orbit, in one case going straight up until I had an apogee of 500km, shutting down, then tipping to the east and firing to circularize at apogee. It worked just fine. I also did the routine of going a bit to the east, raising my apogee to about 90km, shutting down then firing a second burn at apogee to circularize. It may have been more fuel efficient than going straight up before circularizing, but it wasn't as easy to fly.
I picked 90km as my altitude just because that's the simulated altitude I've used on numerous test programs to test equipment in space-like conditions of atmospheric pressure (or lack thereof.) I've used other targets as well, like 75km, but I went with 90 because I wanted a little room. And, I was glad to see that KSP seems to pretty well mimic Earth so that I can use familiar numbers like these.
Final Thoughts
KSP should be played in schools, for credit. I would like to think that it can be used without taking away the fun, and that kids could be induced to set objectives for themselves similar to actual space program objectives (rather than just blowing up little green Kerbal people or ramming them into the ground at supersonic velocities.) The game has tremendous potential for teaching, in a "seat of the pants" way, information about ballistics and orbital mechanics. Then, when these subjects are encountered in math and physics classes, the concepts will already be familiar.
While on Facebook, there was a little game someone started of asking what you'd get if you combined the two computer games you were playing presently. In my case it was DayZ and KSP. I figure mixing zombie apocalypse with rickety build it yourself interplanetary space flight gives something like a Firefly game (Reavers=zombies in this case, in case that's not obvious.)
Tuesday, November 19, 2013
ZBrush for CNC Got Better
Yesterday, I learned that ZBrush (my 3D design program) now has an extension that lets it directly export files I can use with my Computer Aided Manufacturing (CAM) programs. I spent most of my work time today testing the output of various designs to see how they looked.
ZBrush has this 'built-in' since version 4R6 came out, it was available as a plug-in before, but since it calls itself a 3D printing plug-in, I ignored it, assuming it was software to sent object data to one or more of the commercial 3D printing services, like Shapeways. Turns out it's an exporter for standard 3D object file formats like .stl.
This is a huge improvement for my workflow of going from design to a finished part prototype in the real world. Before I had to use a very complex conversion program. Its control panel makes the flight deck of a 747 look simple. And if I didn't get the settings just right, I could get some really nasty effects in the final machining. Using the same settlings over again doesn't work, I had to adjust things based on the size of the object, the scale of features on it, the size of the material it would be cut out of, the relative size of the tool, etc., etc.
Now that difficult & frightening step is gone. I do a couple of passes to simplify the 3D object design as much as possible without losing detail (which I was doing anyway, it speeds up everything later), set a couple of simple settings in the exporter, like the real-world size the final object will be, then export.
The resulting files load just fine into the two different programs I use that create the list of instructions for my CNC machine to cut the 3D object out of a solid block of some material (usually a polyurethane plastic). I did a dry run to set up two test files tonight--doing everything short of actually making the parts. Tomorrow I plan to make an actual part from a new file as a final test. Probably something fun.
For those interested in trying this at home, I use both MeshCAM and Vectric's Cut3D for CAM. Cut3D is my usual preference, though I'm using an older version of MeshCAM (4). I prefer Cut3D's interface for setting tabs, and its included machining preview.
Both produce excellent GCode for my CNC (a MicroCarve A4 driven by EMC2 and a Gecko G540 controller.)
For doing image depth maps, I use EMC2's built in facility, though if you want to bypass the copious experimentation & two pages of notes I use to get it looking good, you might want to look into one of the dedicated commercial programs for this.
Tweet
ZBrush has this 'built-in' since version 4R6 came out, it was available as a plug-in before, but since it calls itself a 3D printing plug-in, I ignored it, assuming it was software to sent object data to one or more of the commercial 3D printing services, like Shapeways. Turns out it's an exporter for standard 3D object file formats like .stl.
This is a huge improvement for my workflow of going from design to a finished part prototype in the real world. Before I had to use a very complex conversion program. Its control panel makes the flight deck of a 747 look simple. And if I didn't get the settings just right, I could get some really nasty effects in the final machining. Using the same settlings over again doesn't work, I had to adjust things based on the size of the object, the scale of features on it, the size of the material it would be cut out of, the relative size of the tool, etc., etc.
Now that difficult & frightening step is gone. I do a couple of passes to simplify the 3D object design as much as possible without losing detail (which I was doing anyway, it speeds up everything later), set a couple of simple settings in the exporter, like the real-world size the final object will be, then export.
The resulting files load just fine into the two different programs I use that create the list of instructions for my CNC machine to cut the 3D object out of a solid block of some material (usually a polyurethane plastic). I did a dry run to set up two test files tonight--doing everything short of actually making the parts. Tomorrow I plan to make an actual part from a new file as a final test. Probably something fun.
For those interested in trying this at home, I use both MeshCAM and Vectric's Cut3D for CAM. Cut3D is my usual preference, though I'm using an older version of MeshCAM (4). I prefer Cut3D's interface for setting tabs, and its included machining preview.
Both produce excellent GCode for my CNC (a MicroCarve A4 driven by EMC2 and a Gecko G540 controller.)
For doing image depth maps, I use EMC2's built in facility, though if you want to bypass the copious experimentation & two pages of notes I use to get it looking good, you might want to look into one of the dedicated commercial programs for this.
Thursday, November 14, 2013
Ted Nelson's Computer Lib 40th Anniversary to be Honored at Chapman University
I forgot to mention an additional item in my post on meeting Ted Nelson. Chapman University will be honoring the 40th anniversary of the publication of Computer Lib on April 24th-26th, 2014, presumably at Chapman's campus in Orange, California.
Here are images of the flyer (once again, apologies for the fold. I put it in my hip pocket since I wasn't toting anything else to carry things at the time.)


Tweet
Here are images of the flyer (once again, apologies for the fold. I put it in my hip pocket since I wasn't toting anything else to carry things at the time.)
Tuesday, May 7, 2013
New Android Devices 1:A Samsung Phone Clone

I decided to finally dip my toe into the Android world a few months ago with the purchase of a new Android phone. I should have done this over a year ago, at least, but I decided to give a Blackberry phone a try, first. Boy, what a disappointment and waste of time that was!
So I went looking at different phones and their prices. I was looking for something on the economy end of the scale at first, but as time went on and my BB convinced me I really needed to just pull the trigger as even a low-spec candy bar feature phone would be less frustrating, I upped my commitment to the point where I was looking at bigger displays.
To stay within the price range I was looking at (less than $200 at the end, though originally I had been thinking less that $100), I went looking at clone phones from China.
Not My First China Phone
Those of you who've been reading here a while may recall a series of articles about a prior phone I owned, a Sciphone G2. This was a Java-based feature phone that had been skinned to look like Android. It was an excellent phone, and it's use of Java was a big advantage for me, as there were plenty of good Java phone apps and I could write my own J2ME apps as well. Calling it a mere "feature phone" was an insult, in fact, as I'd rather have one of these than any of the contemporary iPhones that were out at the time.
In fact, after mine went to the eWaste recovery site in the sky, I wished I still had it every day that I was using my Blackberry 8900.
When I went to get another, new China phone, I returned to where I'd bought my G2, hoping to find something equally good. Unfortunately, when I returned to the BlueLans site, I found more clothing than electronics. Their phone selection was ridiculously out of date. Yes, at the time, with the BB 8900 on my belt, I really did consider buying another SciPhone G2.
So I went looking for another supplier. I tried getting a phone from PandaWill. But that turned into a fiasco. It never even got past customs. I ordered a phone from them with a version of Android on a 4" display for about $80. It would have been a good deal, if it had been for real. Unfortunately, they sent me some runaround about not being labelled properly to be shipped with the shipper I chose. They wanted to change shippers, and from what they were saying it didn't sound as if the phone was what it had been represented as on their web page, as well.
Round and round we went. After over a month past the promised delivery date, still no phone. Still some incomprehensible messages from them that made no sense. I tried to cancel the deal with them. They said the phone was in transit (though they also said it wasn't, and that they wanted to change shippers. How can they change shippers if it's in transit? I know there's a logical explanation, and I can think of several possibilities, but they refused to be clear in their communications.) Finally I demanded cancellation of the deal or I'd dispute with Paypal. That did the trick. Suddenly, all their excuses for why the deal couldn't be completed as they told me it could until I actually paid my money disappeared and they cancelled it.
Stay clear of them. If they're not entirely dishonest, they're at least shady enough you don't want to have to sort out a problem with them. If there's a problem of any sort, they'll make it your problem, and my experience they'll at least lie through omission to do so.
Attempt 2
For the second try, I decided to go through a supplier on Amazon with a good track record and Amazon fulfillment. That would at least give some shielding against what I'd just been through with the first place. Initially, I looked for the phone I'd tried to order before. But, it had been a bit longer, and I decided to go with something with a newer version of Android and a larger display (there had also been several more checks deposited to the bank since my first try. I guess that's one good thing about the delay.)
The phone I finally opted for was an SIII clone. It has a display just short of 5", and claimed to be running the Jelly Bean version of Android. Fortunately for me, I didn't care if the phone had Jelly Bean or Ice Cream Sandwich.
When the phone arrived, it was running 4.0, ICS. The About This Phone page had been programmed to lie and say 4.1 (Jelly Bean), but the interface was clearly not JB, the phone reported 4.0.x when I hooked it up to my PC with the Android development software, and the "Easter Egg" on the phone is the ICS easter egg, not the one for JB.
Nevertheless, it's a great phone. The display is really good, the responsiveness was good. It had the right amount of memory and the processor and all the other technical bits were as promised on the Amazon page.
In fact, it was good enough I bought two more. I got one for my daughter about a month after I bought mine. Hers came with a version of ICS with more of JB hacked into it. The interface was more JB, and it had the JB Easter Egg. I guess someone saw my post on Amazon and updated the things I specifically mentioned. It even reported that it was 4.1.x to my PC with the Android Development System. There were still some pieces of ICS in it, though. But it still ran great.
About two months later I bought another for my wife. This time the OS really was Jelly Bean. 100%. And it was a different phone, though the mold lines were about the same. My wife's phone has a much brighter an more vibrant display. That's the first thing I noticed. Inside, the layout of SIMs and memory card is different, as is the battery. And while I had to buy the back with the flip cover screen protector as an add-on for the phones for my wife and daughter, it came in the package with my wife's phone.
One thing to note--while I ordered the same model of phone for my wife, the original supplier I bought from for myself and my daughter had stopped listing that model of phone, so I went with another source. Another source, a different phone.
I'm not disappointed, though, on any count. Everything important about each of these phones was as I wanted it.

Review
Bottom line: This is a great phone. The actual phone interface in Android isn't everything I could want in the way of usability, but that's an Android problem (and each version varies.) Once you get used to the Android Phone application, they work well as a phone. The important functions for me, beside the usual calling and logging, are speaker phone ability and good reception in marginal areas. While my old, lamented Nokia 3650 was a better phone in both these respects, the SIII clone has been better than any phone I've owned since the 3650. It certainly beats out my "name brand" Blackberry, which was purchased in large part because it was lauded on these points.
Processor:
The MTK6577 processor is really what's in it, and it's a great processor for a phone. I would say my tablet blows it away, but my tablet needs to drive a whole lot more screen, so as far as my feeble human perception is concerned, they're both fast.
Memory:
It's a phone. There's never enough, especially when you're like me, loading oodles of memory hog techie apps like the Spartacus Rex Terminal Emulator. That said, it provides easy and immediate use of the MicroSD card memory when you put one in. Unlike, say, Samsung, which treats MicroSD as "something else". If an app allows itself to be loaded on the SD card, this phone will let you put it there and execute it from there. (For those not familiar with some other Android devices, they only use the SD card as data memory, and won't execute apps off of them, or move them to them.)
Programmers take note: making your app run off an SD card takes nothing more than a single line in your manifest file for the app, unless you're doing something on a very short list of things that require the app to be on the phone's main memory. (In which case, write a small helper app that does that in the phone's memory, then put the bulk of your app in another package on the SD card, dangit!)
Display:
It's great. My wife's phone is "wipe your chin, the drool is showing" beautiful, but the ones on my phone and my daughter's are very nice and sharp. Here's an oversized image. The colors are stronger and sharper than in this image, I did my best with the camera:

I/O:
USB works great for recharging as well as for mounting the phone as a file system to Linux, Windows 7 or XP, and Mac OS X. I haven't tried Win8, nor am I likely to unless I have a powerful incentive deposited to my account.
The Wifi is also excellent. I've had several devices with disappointing Wifi, some that cost many times what I paid for this phone. It hooks up easily, and gets good reception no matter what mishandling I'm engaged in with the phone while browsing or whatever. I depend on Wifi, as I'm way too darned cheap to pay for phone-based data services ever since T-Mobile screwed me out of my grandfathered plan after lying to me when I changed service plans.
Both SIM slots work fine, and like most clones, this phone functions fine without a SIM if you're not planning on using it with a phone service. It has two SIM slots, I use one, but plan to add a second SIM card since we have a county nearby where normal phone service from outside the county doesn't operate.
The phone does not include Near Field Communications or IR, but it does have Bluetooth. This works well with headsets and for data file transfers. It's easy to set up and connect to devices, and the antenna on this phone is good enough to get it a good range (I send photos to my computer when outside and around the house without a problem.)
Accessories:
I picked up the flip cover to keep the screen protector from being scratched. My phone came with the screen protector already on, as did my wife's phone, but my daughter had to put hers on. Since mine floats around in my pocket now, and I occasionally put metal things in there before I think to pull them out and move them to the other pocket, I decided to get the flip cover.
The flip cover comes as a new back for the phone. The new back has the cover attached.

At first I found the flip cover annoying whenever I had it open and in my hand. It can get in the way of your fingers, or press into them when you're gripping the phone. After a while, the area around the hinge of the flap gets softened, and this problem becomes pretty much unnoticeable. At first, however, it's a pain in the tookus.
Covers made for the Samsung SIII don't fit, there is enough difference in the forms of the two phones that even the soft "jelly" covers don't fit this phone. So don't plan to add anything specifically designed for the SIII if you get one of these.
Needless to say (I hope), you'll also want to add a MicroSD card to the phone. It's good for up to 32GB. I've got a 16GB in mine, loaded with books and apps, but with still about 9GB free. If I put much music on, that would probably fill it. Personally I recommend the smallest size you think you can live with, as larger cards tend to respond more slowly, especially if you have lots and lots of files in a single directory. This is aside from the concern about speed of the MicroSD. Get the fastest you can find, at least Class 6, if you don't want to hate your phone because you bought a slow MicroSD (I used mine with a Class 4 until I bought a Class 10 for it, and the difference when the new card went in was like someone opening the windows in a stuffy room.)
Wrap Up
Finally, if you don't have a phone with a recent Android OS (4.0 or newer), I highly recommend getting one. It's a solid OS with plenty of tools to let your smartphone be really smart rather than just a parasite living off your PC or a toy trapped inside other people's apps. Load up a real file manager (I recommend ES File Manager, for a start, but get several as each will have its own strengths), a terminal program (several will do the trick without "rooting" your phone), one of the Scripting Languages for Android (which work through SL4A) and a cool old system emulator or two. You'll have a phone that you can really compute on.
This phone is the best pocket-sized device I've had since my old HP 200LX. Believe me, I've blown over a couple of thousand trying to replace my old 200LX with other mobile devices, trying to get something that I could do with a mobile computer from 1994. Now I'm there.
In fact, things went so well for me with this phone, that I decided I'd pick up an Android tablet, too.
But that's another story.
Thursday, July 19, 2012
8085 Monitor Code and Other Distractions
I've been working on an 8085 microprocessor project for about 3 years now. It started with a simple circuit on a breadboard, moved to my HP Logic Lab, where it became a real computer, then got built into a permanent version on a prototyping PC board.
I've been documenting the thing since it moved to the Logic Lab on my web site, posting how-to articles on building both versions (the hardware is identical, only the construction method is different), as well as software to control the hardware.
Where I've come up short is putting together a sort of unified OS for the system online that allows software to be developed right on the system itself, as well as any high level languages. I've been writing lots of software for my own use with the system, mostly hand-coded using my assembly coding forms and my 8085 Pocket Reference Card. But I keep either getting distracted from or otherwise dodging the job of integrating all the software bits I've already got into a simple "monitor" program (sort of a mini-OS for machine language) for the system.
Part of it is the usual life distractions. I've been sitting next to a wild fire this past week, for example. And then I've got lots of other electronic toys I like to spend some time with. Each one has its own appeal.
Before the fire, and a bit during (when I was taking a break from cutting ever more brush around my property) I've gotten back to work on putting it together. The biggest part is the part that reads the keyboard, determines the current system state, and dispatches keystrokes and execution to the right place. All the hardware interfaces are already in place, most of the basic system routines are in place (timing/delays/string handling), etc. So the "glue" is pretty much all that's needed. And I got it about halfway done before the fire started, I'm writing the code that actually takes actions for each mode, or simply hands over the necessary info to user apps running on the system.
So, if I can get time away from deck repairs on my house this weekend (now that it looks like it's unlikely to burn down or that I get evacuated), I'll be trying to wrap up and test that code.
Small Thing, Big Obstacle
The other thing I'm looking forward to is replacing some of the switches I put on the MAG-85. I put in switches for various interrupts about two years ago, and the switches themselves turned out to bounce and make so much noise that I've given up on them. No amount of debouncing, hardware or software, within reason has made them reliable. I'd hate to have someone else construct a MAG-85 and have to deal with this. It's been a thorn in my side ever since I added them, and took a lot of the fun out of the permanent hardware project for me (on the breadboard version, I used some old keyswitches out of a knackered Mac Plus keyboard, they worked great with only the most minimal hardware debounce. But I figured I could hardly specify 25 year old keyswitches in a project that others might want to build.
I'm expecting a shipment of a bunch of different switches tomorrow that I can test and select from to replace the awful switches I have now. So I can put that behind me (and probably re-simplify the circuit to take out a bunch of the extra parts I put in to try to deal with the noise on these switches.)
Frankly, the old switches are something I'd about hesitate to use in a doorbell circuit, never mind real electronics.
Tweet
I've been documenting the thing since it moved to the Logic Lab on my web site, posting how-to articles on building both versions (the hardware is identical, only the construction method is different), as well as software to control the hardware.
Where I've come up short is putting together a sort of unified OS for the system online that allows software to be developed right on the system itself, as well as any high level languages. I've been writing lots of software for my own use with the system, mostly hand-coded using my assembly coding forms and my 8085 Pocket Reference Card. But I keep either getting distracted from or otherwise dodging the job of integrating all the software bits I've already got into a simple "monitor" program (sort of a mini-OS for machine language) for the system.
Part of it is the usual life distractions. I've been sitting next to a wild fire this past week, for example. And then I've got lots of other electronic toys I like to spend some time with. Each one has its own appeal.
Before the fire, and a bit during (when I was taking a break from cutting ever more brush around my property) I've gotten back to work on putting it together. The biggest part is the part that reads the keyboard, determines the current system state, and dispatches keystrokes and execution to the right place. All the hardware interfaces are already in place, most of the basic system routines are in place (timing/delays/string handling), etc. So the "glue" is pretty much all that's needed. And I got it about halfway done before the fire started, I'm writing the code that actually takes actions for each mode, or simply hands over the necessary info to user apps running on the system.
So, if I can get time away from deck repairs on my house this weekend (now that it looks like it's unlikely to burn down or that I get evacuated), I'll be trying to wrap up and test that code.
Small Thing, Big Obstacle
The other thing I'm looking forward to is replacing some of the switches I put on the MAG-85. I put in switches for various interrupts about two years ago, and the switches themselves turned out to bounce and make so much noise that I've given up on them. No amount of debouncing, hardware or software, within reason has made them reliable. I'd hate to have someone else construct a MAG-85 and have to deal with this. It's been a thorn in my side ever since I added them, and took a lot of the fun out of the permanent hardware project for me (on the breadboard version, I used some old keyswitches out of a knackered Mac Plus keyboard, they worked great with only the most minimal hardware debounce. But I figured I could hardly specify 25 year old keyswitches in a project that others might want to build.
I'm expecting a shipment of a bunch of different switches tomorrow that I can test and select from to replace the awful switches I have now. So I can put that behind me (and probably re-simplify the circuit to take out a bunch of the extra parts I put in to try to deal with the noise on these switches.)
Frankly, the old switches are something I'd about hesitate to use in a doorbell circuit, never mind real electronics.
Monday, May 14, 2012
Paizo Pathfinder Lite PDFs
Paizo has regularly released inexpensive PDFs of the Pathfinder rule books as a convenient addition to their hardcopy versions. Of the various major game companies, Paizo has my favorite pricing policy on PDFs. They're cheap. Which makes it a lot easier to do what I like, which is have both the hard copy and the PDF. (Even better is the practice of some smaller publishers, like Jon Brazer Enterprises, where you get both hardcopy and PDF in one package deal!)

The PDFs for the Pathfinder books from Paizo had a problem that limited their utility, though. They have multiple layers with lots of vector art. This is great for getting the best image on any display or from any printer. It's a huge load of computation, though, if you just want to read the rule book on an e-reader or a laptop.
I originally bought the PDF of the Core Rulebook to be able to cut and paste items into my own adventures--little reminders for rules that I may not use often that would crop up, and other such things. The PDF did that job great. But when I went to put it on my Sony PRS-950 e-reader, so as to have a small, light copy of the rules where ever I went, it buried the poor e-reader's processor. Page turns took forever. It was nothing but frustration.

Even the version of the rule book that has the chapters as separate files didn't help. The files are smaller, but the computational overhead was still just too much for my e-reader. Even when I threw it on my Eee PC (a "netbook" style laptop computer), it was just too slow to use. I was reduced to extracting the text from the PDF to rather ugly text files.
Lite PDFs
Fortunately, Paizo has now released Lite PDFs of the Pathfinder books.
I downloaded them this weekend, then tried them out on my e-reader and Eee PCs this morning. What a difference! They read smoothly and well, even on the Sony PRS-950's little processor (little by current standards--it's got far more power than my primary software development workstation from the '90s!)
I'm not the only one loving these new streamlined PDFs. Have a look:
The Iron Tavern Mini Review: Pathfinder Lite PDFs
The Earthen Ring comments on Pathfinder Lite PDFs
Paizo Messageboards: PFRPG Lite PDFs

Tweet
The PDFs for the Pathfinder books from Paizo had a problem that limited their utility, though. They have multiple layers with lots of vector art. This is great for getting the best image on any display or from any printer. It's a huge load of computation, though, if you just want to read the rule book on an e-reader or a laptop.
I originally bought the PDF of the Core Rulebook to be able to cut and paste items into my own adventures--little reminders for rules that I may not use often that would crop up, and other such things. The PDF did that job great. But when I went to put it on my Sony PRS-950 e-reader, so as to have a small, light copy of the rules where ever I went, it buried the poor e-reader's processor. Page turns took forever. It was nothing but frustration.
Even the version of the rule book that has the chapters as separate files didn't help. The files are smaller, but the computational overhead was still just too much for my e-reader. Even when I threw it on my Eee PC (a "netbook" style laptop computer), it was just too slow to use. I was reduced to extracting the text from the PDF to rather ugly text files.
Lite PDFs
Fortunately, Paizo has now released Lite PDFs of the Pathfinder books.
I downloaded them this weekend, then tried them out on my e-reader and Eee PCs this morning. What a difference! They read smoothly and well, even on the Sony PRS-950's little processor (little by current standards--it's got far more power than my primary software development workstation from the '90s!)
I'm not the only one loving these new streamlined PDFs. Have a look:
The Iron Tavern Mini Review: Pathfinder Lite PDFs
The Earthen Ring comments on Pathfinder Lite PDFs
Paizo Messageboards: PFRPG Lite PDFs
Monday, May 7, 2012
ZBrush: Finding the Hidden Spotlight
As I've commented recently, I'm working on learning ZBrush and running into landmines and frustrations regularly. The program is incredibly powerful, so I'm hoping all the time and frustration will be worth it in the end. Though I'm less than convinced it'll be so at this point. Presently I'm a bit over two weeks in, with about 60-70 hours using it and a lot of additional time reading docs and watching training videos.
Spotlight
Among the tools I set for myself to try out today is Spotlight, a very powerful-looking tool featured in this impressive video. After getting the "sizzle" on Spotlight from that and some other videos, I tracked down some more pedestrian stuff that I hoped would let me see how to actually do a little of that.
For example, this great video, which takes things step by step and at a pace where you can actually see what is being done. Unfortunately, when I tried to follow along on my own, there was a missing step.
Getting the texture into Spotlight.
Which opened another can of worms...
Where is the Spotlight?
I opened my Lightbox, selected my texture, and Spotlight was nowhere to be seen. So I took a look at the Pixologic site to find some written documentation. I found what seemed to be just the thing. I read carefully through the instructions, particularly noting:
then, later the detailed instructions:
First, double-clicking on the texture in Lightbox did not bring up the Spotlight widget. Then, looking in the Texture Palette, and in the Texture tool on the side of the screen--in case I misunderstood--revealed no "Add to Spotlight" button.
The Hidden Spotlight Button
Well, I spent a fair bit of time reading FAQs and other information trying to find out why there were no visible parts of Spotlight in my ZBrush. Finally, I found an answer well down in this thread. The "Add to Spotlight" button is there, it's just not labelled, looks like it is inactive, and the icon makes no sense:
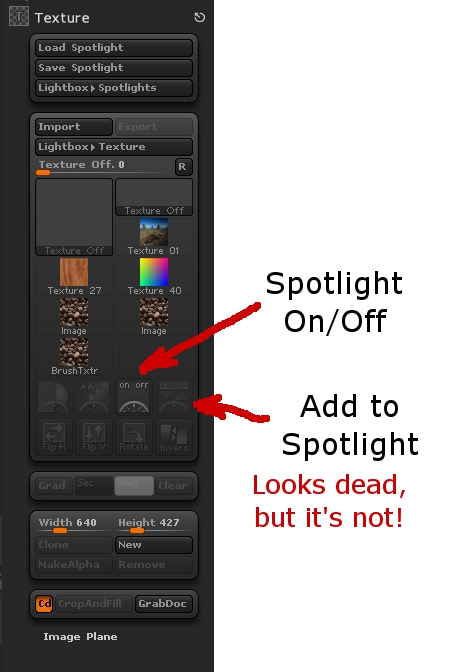
To be fair, it does say "Add to Spotlight" off to the side if you hover over it. But then, what's to induce me to hover over everything in the 90 square hectares of ZBrush's menus just to see if I can find a button by spelunking? Especially when it's greyed out so as to look dead, inactive, unavailable, and, in subtle grey-on-grey, almost invisible?
Clicking on this added the texture to Spotlight, brought up the Spotlight wheel, and let me get on with walking into a new set of frustrations. But it was progress.
Endemic Problems
This relates to several of the endemic problems with ZBrush, particularly its user interface. There's a mix of text and image icons. The image icons are seldom intuitive. The color scheme makes icons look inactive when they're not.
At a larger level ZBrush has the problem of being a huge tool box with no organization to it. There are multiple ways of doing things, with no clear way of choosing which will get the desired results, or do so in the most time-effective fashion. Likewise, the only way to determine what something will do is to experiment, experiment, experiment. And with the number of options and settings (spread through several different "palettes" or menus) there's no guarantee that you can recreate something you've seen someone else do, or even recreate your own work later if you happen to have changed a setting three menu levels down earlier then forgotten about it.
There's also the keyboard interface. It's tricky and timing-dependent. For example, if you're drawing with short strokes, say, putting a mask on in an area while zoomed in close on the geometry, it'll go along putting down short light strokes of mask then suddenly, while you're doing something that feels exactly like every other stroke, make your entire mask go *poof*! Fortunately, a Ctrl-Z (Undo) will fix that one. But when you're working with short, fast strokes you'll hit this repeatedly (like every third or fourth stroke.)
What's worse is when you are trying to do strokes across an object. It appears that if you start a stroke off of your subject (even if by a single nearly-invisible pixel) you'll end up moving and spinning it. And if you're doing something like texturing from Spotlight, the position and scale of the object is critical. You can't use Undo to fix this, because you can't Undo changes of viewpoint (which are "really" moves of the object relative to the Canvas in ZBrush, but still.) So you're hosed with one touch of the mouse (or tablet.) Go back and start over.
Overall, there are a lot of frustrations and a lack of clear structure in the program. But it is capable of some cool things. Just save your work often (saving both Projects and Tools!)
Can I recommend ZBrush? Not yet. Besides, I'm not at all conversant of what the available options are on the market right now.
Tweet
Spotlight
Among the tools I set for myself to try out today is Spotlight, a very powerful-looking tool featured in this impressive video. After getting the "sizzle" on Spotlight from that and some other videos, I tracked down some more pedestrian stuff that I hoped would let me see how to actually do a little of that.
For example, this great video, which takes things step by step and at a pace where you can actually see what is being done. Unfortunately, when I tried to follow along on my own, there was a missing step.
Getting the texture into Spotlight.
Which opened another can of worms...
Where is the Spotlight?
I opened my Lightbox, selected my texture, and Spotlight was nowhere to be seen. So I took a look at the Pixologic site to find some written documentation. I found what seemed to be just the thing. I read carefully through the instructions, particularly noting:
You first need to load your textures using the Texture palette or Light Box.
then, later the detailed instructions:
3. In the Texture palette, load or import a source texture with which you will paint on the model.Um, no.
4. Also in the Texture palette, click on the Add to SpotLight button. Your texture will be displayed as an overlay on the document and the SpotLight widget will appear. An alternative is to double click on a texture of your choice in Light Box.
First, double-clicking on the texture in Lightbox did not bring up the Spotlight widget. Then, looking in the Texture Palette, and in the Texture tool on the side of the screen--in case I misunderstood--revealed no "Add to Spotlight" button.
The Hidden Spotlight Button
Well, I spent a fair bit of time reading FAQs and other information trying to find out why there were no visible parts of Spotlight in my ZBrush. Finally, I found an answer well down in this thread. The "Add to Spotlight" button is there, it's just not labelled, looks like it is inactive, and the icon makes no sense:
To be fair, it does say "Add to Spotlight" off to the side if you hover over it. But then, what's to induce me to hover over everything in the 90 square hectares of ZBrush's menus just to see if I can find a button by spelunking? Especially when it's greyed out so as to look dead, inactive, unavailable, and, in subtle grey-on-grey, almost invisible?
Clicking on this added the texture to Spotlight, brought up the Spotlight wheel, and let me get on with walking into a new set of frustrations. But it was progress.
Endemic Problems
This relates to several of the endemic problems with ZBrush, particularly its user interface. There's a mix of text and image icons. The image icons are seldom intuitive. The color scheme makes icons look inactive when they're not.
At a larger level ZBrush has the problem of being a huge tool box with no organization to it. There are multiple ways of doing things, with no clear way of choosing which will get the desired results, or do so in the most time-effective fashion. Likewise, the only way to determine what something will do is to experiment, experiment, experiment. And with the number of options and settings (spread through several different "palettes" or menus) there's no guarantee that you can recreate something you've seen someone else do, or even recreate your own work later if you happen to have changed a setting three menu levels down earlier then forgotten about it.
There's also the keyboard interface. It's tricky and timing-dependent. For example, if you're drawing with short strokes, say, putting a mask on in an area while zoomed in close on the geometry, it'll go along putting down short light strokes of mask then suddenly, while you're doing something that feels exactly like every other stroke, make your entire mask go *poof*! Fortunately, a Ctrl-Z (Undo) will fix that one. But when you're working with short, fast strokes you'll hit this repeatedly (like every third or fourth stroke.)
What's worse is when you are trying to do strokes across an object. It appears that if you start a stroke off of your subject (even if by a single nearly-invisible pixel) you'll end up moving and spinning it. And if you're doing something like texturing from Spotlight, the position and scale of the object is critical. You can't use Undo to fix this, because you can't Undo changes of viewpoint (which are "really" moves of the object relative to the Canvas in ZBrush, but still.) So you're hosed with one touch of the mouse (or tablet.) Go back and start over.
Overall, there are a lot of frustrations and a lack of clear structure in the program. But it is capable of some cool things. Just save your work often (saving both Projects and Tools!)
Can I recommend ZBrush? Not yet. Besides, I'm not at all conversant of what the available options are on the market right now.
Thursday, May 3, 2012
Trying to Learn ZBrush, Hitting Lots of Land Mines
After having a lot of fun with the free Sculptris program, and with the need for a more fully-featured 3D modeling program, I decided to buy ZBrush a couple of weeks ago.
Tweet
Unfortunately, it been a tough road trying to learn it.
I was running into a problem early on where I'd get out of Edit mode (3D editing) and couldn't get back into it. Going from 3D mode to 2D mode is strictly one-way. There are any of a number of ways to do it by accident, and once you do, there's no Undo. After about a week, it stopped happening to me, and now it's not so much of a problem. At first, though, I had no clue what was happening. And the "getting started" information was no help, nor was a search on the terms I could think of on the web site. There were dire warnings on Pixologic's site about saving a 3D object as a 2D image, then not being able to reload and re-edit the object even when you believed you saved it. I hadn't encountered that particular problem yet, but that wasn't my problem.
Finally I found an old video tutorial that's not featured in their "online classroom" any more that explained what is happening, and since I've seen that I've been able to mostly avoid running into the problem, and recovering when I do. Before that, I'd already developed some techniques on my own to tiptoe past that particular land mine.
New Land Mines
Since then I've had my work go *poof* on me in several different other ways. It's not exactly inviting you to explore its features when this keeps happening. My most recent (about ten minutes ago) was trying to add a new subtool to a project.
When I got started, I was mostly just sculpting shapes out of one object, or "subtool" in ZBrush parlance (a single mesh.) I learned how to add additional objects to a scene, but it was awkward enough for me with what all else I was trying to master that I was just avoiding it until later.
Now I've gotten to where not having separate pieces is more of a problem than dealing with adding, aligning, etc. the additional objects.
So I was working with a sort of cartoonish fox head. I had the basic head pretty well sculpted. I added a pair of eyeballs as separate spheres (which is a lot cleaner is Sculptris--there you can add a pair of objects simultaneously and move them fluidly around your reflection plane. In ZBrush you add one, position it, then, so far as I know now, create a duplicate and position it by guess and by golly to a position that matches the first one on the opposite side of the object you want it in. All very clunky.) I decided to do the teeth as separate objects as well. So I appended a new subtool, picked a Cone3D object, used the clunky sliders in the Deformation menu to move it (isn't that a Transformation, not a deformation?) Then I scaled it down to about the right size and slid it more or less in place.
Then I wanted to sculpt its form a bit. I wasn't entirely sure whether it was a primitive or a mesh, and I wanted to subdivide it to create more detail (rule: NEVER be ignorant about ANYTHING in ZBrush. You must understand absolutely everything, it would appear, in its entirety to avoid ending up with nothing to show for your time.) Well, I clicked the "Make PolyMesh3D" button in the Tools menu.
And the complex sculpt I'd gotten to a good state over the prior hour went *poof*. No warnings, no undoes, no saving throw. The head and eye subtools are gone. They don't appear in the available tools when I click "Append" in the subtool directory. I've found things that I thought went poof there a couple of times. Should I mention the times I did a save and had things disappear from view? In those cases they reappear when I click back in the work area. They just disappear to startle me, is the best I can figure.
But my fox head is gone and unrecoverable.
Yeah, I know I should save more often. As it is, I do save very often. I'm filling my hard disk with minor deltas of my fooling around and hoping this starts to be productive projects. I'm disinclined to save every time I click a button. I could wish that when I'm going to click a button that deletes subtools with no means of recovering them I'd get a nice warning, like I do on so many other things that aren't recoverable. I do get warnings on lots of other things, many of which I don't understand what it's asking me or the consequences of my choices, but at least I get a wake-up that lets me save before I start spelunking through my possible answers.
Not All Bad, But Jury's Still Out
The program has a lot of cool capabilities. But the question is whether I'll be able to get through all the trouble to really be able to take advantage of them. I'm two weeks into working with it, and I've got less to show than I had with one afternoon with Sculptris, or for that matter, one day with Sculpt-Animate 3D or Lightwave on my old Amiga over 20 years ago. There are a lot of places where I just don't feel like I've got much control, I'm just hoping for the best, or trying to jigger things with hand and eye.
A lot of sculpting tools behave in odd fashions--at times. If they were like that all the time I'd be able to at least avoid trouble. But they cause geometry problems that are difficult or time consuming to solve. There are other times where you're trying to do something just the way you have been all along, and nothing, or almost nothing happens. Then, suddenly, on another attempt, it shoots off, out of control.
I'm really hoping to make this work, because there's a lot I'd like to get out of this program in producing models for my CNC milling machine. But, if I don't start getting more out of it pretty soon, well, $700 is just too much for me to not ask for my money back. Especially after all the time I've put into watching training videos, reading documentation, and just working with the tool trying to get somewhere that I can reasonably predict the results I'm going to get--without even starting to talk about how much time it'll take me to get those results, yet.
Monday, January 16, 2012
8085 Resurgent: Back to the MAG-85
I took a look at my own website the other day and realized it's been far too long since I have updated certain items there. Most noticeable to me was my MAG-85 project, an 8085-based micro trainer. There are a bunch of things I thought I'd posted over a year ago, but the information isn't there.
Obviously I never did it. Sorry about that.
The front page image for the 8085 project is was a really ugly thing I took at a very interim stage while I was doing regular updates on the project. If I wanted to scare someone off the project, I think that picture is what I'd use. What a rat's nest!

Shortly after that picture was taken I built a real front panel and enclosure. It's been happily living in that enclosure for well over a year, but I never posted the info on it. In fact, I've just started taking it apart in preparation for making some improvements. Since I like to take pictures of my work for documentation purposes (like getting the right connectors back in the right places), I took some photos of the partially-disassembled unit as it is before I make the updates. Here's one:

Here you can see that it's not so ugly as before. The LED to the left of the LCD display is controlled by the 8085's SOD output. The eight LEDs below the display are controlled by the 8085's OUT 01 command and held in their state by a register. The eight switches below that are on the 8085's IN 01 port.
The program that's running currently reads the position of the switches and outputs a byte to the LED bank to match what it sees on the input. It also reads the keyboard and sends the ASCII + 0x30 character to the screen that it reads from the keyboard (which is in IN 00). The LCD display is on the OUT 00 port.
The four push buttons above the keyboard are, from left (red) to right:
RESET
TRAP
RST7.5
RST5.5
In the crude OS/monitor I have running on the MAG-85 now, TRAP acts as an "Escape" key that returns control to the OS. This allows miscreant programs to be stopped and memory examined any time, since TRAP isn't maskable.
RST7.5 is used as the user vector to the start of the application program in memory. In essence, this is the "GO" or "Execute" button.
RST5.5 is also a user vector that should point to a subroutine that does something and returns. Either the application program should initialize it, or it has to be initialized by hand in the monitor.
The keyboard itself uses RST6.5 to read a key value into a buffer, where an OS routine can pick it up/translate it, etc. The keycap legends allow for several uses of the keys. The typical use of the yellow keys is hexadecimal number entry. But they can also be used as arrow keys and fire button (9) for games.
The top row has the IN or Enter key in red, the backspace (BK) in blue, the (M) mode and edit/view (e/v) keys in gray. The edit/view key toggles a flag in the OS that switches between a memory protecting mode (view) and editing mode in the various modes. The mode key modifies the mode variable in the system to switch between Memory, Register, and I/O port viewing or editing. It's possible to change from editing to viewing and back again while in any of the modes.
Current Rework
My current plans for reworking the MAG-85 have to do with replacing the buttons used for RESET, TRAP and the RSTs, plus improving the ergonomics of the unit a bit by replacing the top and bottom panels, which were hand-made on hardboard, with some nicer CNC'd panels that reposition some of the controls (I switched off the unit more than once when I meant to switch on or off the backlight for the LCD.)
The four pushbuttons above the keyboard are some really awful buttons. They ring like bells, causing all sorts of debounce problems. I have both hardware and software debouncing on them right now, and it *mostly* works. I think part of why I stopped posting before was that I wanted to kill this problem before I posted, so as to avoid causing anyone else the headaches I've had with these switches. And, as you can see, those switches are still in there.
A sideline on the current work is also preparing for a couple of improvements that have been planned since the beginning, but haven't happened yet. One is to put a nice little door in so that the NOVRAM/EEPROM/EPROM memory can be swapped out without opening the whole unit. Right now I unscrew the end pieces then pop out the face panel to get at the memory socket. Which is not clean, quick, or easy. I have to get the cables all to go back to their places each time I put it back together. A couple of times I've pulled out one of the input cables by accident, then wondered why the keyboard or switches aren't talking when I get it back together.
The other is preparing to mount a battery pack inside, so that I can go cordless with this thing. A lot of what I've been doing in design tweaks is reducing the power used by the system. Finding a good brightness for the backlight, putting a switch on the backlight so that I can turn it off when I'm in good light, reducing the brightness of the power LED and the I/O LEDs, that sort of thing. As well as looking at my nascent OS to see if there are things I can do there that will reduce power while staying out of the way of the user's programs.
I'm also planning on adding another memory socket for an EPROM. It won't have a ZIF socket in it like the one that's there now, but I'm getting to the point of wanting a more permanent memory for the OS, with the NOVRAM left for user space programs. This may involve some rejiggering of the memory map, since for mechanical reasons I'd like to have the removable memory in the center of the PCB side to side.
I'm also looking at adding an expansion port or two on the new end plates, which begs the question of whether to use a standard connector with a more or less standard wiring for the port (like a PC's bidirectional parallel port) or whether to roll my own for the sake of less constraint on how the lines are used. Basically just bringing the lines from the I/O buffer registers straight out of the box along with power and ground. This is my preference for a number of reasons, but there's an appeal to letting the MAG-85 drive standard I/O devices, too.
The addition of a serial port, either at TTL levels or a standard RS-232C port is another possibility I keep playing with. I've kept SID available for this possibility, though I was tempted to use it as either a user digital I/O or a memory bankswitch I/O or something of the sort. Being able to connect the MAG-85 straight to a terminal would be really nice, so I'm leaning toward an RS-232C port.
But if I do that, I'll need a separate set of I/O routines for that port that allow it to be the primary user I/O for the OS. So if I do that, it'll probably be deferred until some other things happen first.
Like finishing the OS well enough to post it.
Finishing the MAG-85 Operating System
I haven't posted the OS yet because it's still in a fairly yucky developmental state. That and my test hardware still has the crummy switches that do nasty things to me at times, and there's lots of code in the OS just to try to deal with them that can probably come out once I've got decent switches in.
So my present software objective is to clean up the OS and put a bow on it so that I can "ship" it to a download on my site. I may end up cutting some of the features, but there's also the possibility that I'll end up cleaning them up because I've already got too much other code running around that uses them. The core basics are the ability to view and edit the system's memory, and execute a program starting at some given address. I'll guarantee that much.
I think the ability to view and edit register values is pretty well sewn, too. It's possible to bork the OS by doing something stupid here, but I'm not trying to protect the user from being stupid. Press TRAP (probably to be labelled ESC) and the OS will restart and reset any values it needs to function (I hope!)
The ability to view inputs and edit outputs interactively shouldn't be a problem, either, but it's not an immediate priority. If it happens effortlessly, it'll be in the initial release. Otherwise, I won't hold up the release for it.
I've also got another mode that is enabled in some versions for viewing/setting user variables in the OS, such as the RST5.5 and RST7.5 vectors, selecting different display formats, setting the size of the LCD, and so on. I can pretty well guarantee that the full-up version of this will not be in the initial release, though a cut-rate version of it may be. That would mean that you would set these variables yourself when putting the code on your own MAG-85.
If I do go to a design that uses two memories, one rewritable in system and the other not, I'll have to put these variables in RAM, or expect that they be set once and for all in the firmware. I'd like to be able to provide an EPROM at some point for people who want to build a MAG-85 and get up and running without having to put the OS in themselves. But if I do, I either need to put some system information in the NOVRAM memory space (like the height/width of the LCD display) or require that only one size of LCD be used with a specific version of the OS. Since I'm looking forward to building another MAG-85 with a larger display (perhaps 32 characters wide by 4 lines high), I'd like to keep the OS flexible. The initial display routines will only use a portion of displays larger than 20x2, but the user programs can use the larger displays and the OS can be updated later to have multiple display formats that the user can select.
But right now, I just need to drive a stake through its heart and get a workable version out the door. :)
Tweet
Obviously I never did it. Sorry about that.
The front page image for the 8085 project
A Very Ugly Looking 8085 Computer
Shortly after that picture was taken I built a real front panel and enclosure. It's been happily living in that enclosure for well over a year, but I never posted the info on it. In fact, I've just started taking it apart in preparation for making some improvements. Since I like to take pictures of my work for documentation purposes (like getting the right connectors back in the right places), I took some photos of the partially-disassembled unit as it is before I make the updates. Here's one:
A bit ugly with the top and bottom panels off, connectors and wires trailing out, but not so bad at the first photo.
Here you can see that it's not so ugly as before. The LED to the left of the LCD display is controlled by the 8085's SOD output. The eight LEDs below the display are controlled by the 8085's OUT 01 command and held in their state by a register. The eight switches below that are on the 8085's IN 01 port.
The program that's running currently reads the position of the switches and outputs a byte to the LED bank to match what it sees on the input. It also reads the keyboard and sends the ASCII + 0x30 character to the screen that it reads from the keyboard (which is in IN 00). The LCD display is on the OUT 00 port.
The four push buttons above the keyboard are, from left (red) to right:
RESET
TRAP
RST7.5
RST5.5
In the crude OS/monitor I have running on the MAG-85 now, TRAP acts as an "Escape" key that returns control to the OS. This allows miscreant programs to be stopped and memory examined any time, since TRAP isn't maskable.
RST7.5 is used as the user vector to the start of the application program in memory. In essence, this is the "GO" or "Execute" button.
RST5.5 is also a user vector that should point to a subroutine that does something and returns. Either the application program should initialize it, or it has to be initialized by hand in the monitor.
The keyboard itself uses RST6.5 to read a key value into a buffer, where an OS routine can pick it up/translate it, etc. The keycap legends allow for several uses of the keys. The typical use of the yellow keys is hexadecimal number entry. But they can also be used as arrow keys and fire button (9) for games.
The top row has the IN or Enter key in red, the backspace (BK) in blue, the (M) mode and edit/view (e/v) keys in gray. The edit/view key toggles a flag in the OS that switches between a memory protecting mode (view) and editing mode in the various modes. The mode key modifies the mode variable in the system to switch between Memory, Register, and I/O port viewing or editing. It's possible to change from editing to viewing and back again while in any of the modes.
Current Rework
My current plans for reworking the MAG-85 have to do with replacing the buttons used for RESET, TRAP and the RSTs, plus improving the ergonomics of the unit a bit by replacing the top and bottom panels, which were hand-made on hardboard, with some nicer CNC'd panels that reposition some of the controls (I switched off the unit more than once when I meant to switch on or off the backlight for the LCD.)
The four pushbuttons above the keyboard are some really awful buttons. They ring like bells, causing all sorts of debounce problems. I have both hardware and software debouncing on them right now, and it *mostly* works. I think part of why I stopped posting before was that I wanted to kill this problem before I posted, so as to avoid causing anyone else the headaches I've had with these switches. And, as you can see, those switches are still in there.
A sideline on the current work is also preparing for a couple of improvements that have been planned since the beginning, but haven't happened yet. One is to put a nice little door in so that the NOVRAM/EEPROM/EPROM memory can be swapped out without opening the whole unit. Right now I unscrew the end pieces then pop out the face panel to get at the memory socket. Which is not clean, quick, or easy. I have to get the cables all to go back to their places each time I put it back together. A couple of times I've pulled out one of the input cables by accident, then wondered why the keyboard or switches aren't talking when I get it back together.
The other is preparing to mount a battery pack inside, so that I can go cordless with this thing. A lot of what I've been doing in design tweaks is reducing the power used by the system. Finding a good brightness for the backlight, putting a switch on the backlight so that I can turn it off when I'm in good light, reducing the brightness of the power LED and the I/O LEDs, that sort of thing. As well as looking at my nascent OS to see if there are things I can do there that will reduce power while staying out of the way of the user's programs.
I'm also planning on adding another memory socket for an EPROM. It won't have a ZIF socket in it like the one that's there now, but I'm getting to the point of wanting a more permanent memory for the OS, with the NOVRAM left for user space programs. This may involve some rejiggering of the memory map, since for mechanical reasons I'd like to have the removable memory in the center of the PCB side to side.
I'm also looking at adding an expansion port or two on the new end plates, which begs the question of whether to use a standard connector with a more or less standard wiring for the port (like a PC's bidirectional parallel port) or whether to roll my own for the sake of less constraint on how the lines are used. Basically just bringing the lines from the I/O buffer registers straight out of the box along with power and ground. This is my preference for a number of reasons, but there's an appeal to letting the MAG-85 drive standard I/O devices, too.
The addition of a serial port, either at TTL levels or a standard RS-232C port is another possibility I keep playing with. I've kept SID available for this possibility, though I was tempted to use it as either a user digital I/O or a memory bankswitch I/O or something of the sort. Being able to connect the MAG-85 straight to a terminal would be really nice, so I'm leaning toward an RS-232C port.
But if I do that, I'll need a separate set of I/O routines for that port that allow it to be the primary user I/O for the OS. So if I do that, it'll probably be deferred until some other things happen first.
Like finishing the OS well enough to post it.
Finishing the MAG-85 Operating System
I haven't posted the OS yet because it's still in a fairly yucky developmental state. That and my test hardware still has the crummy switches that do nasty things to me at times, and there's lots of code in the OS just to try to deal with them that can probably come out once I've got decent switches in.
So my present software objective is to clean up the OS and put a bow on it so that I can "ship" it to a download on my site. I may end up cutting some of the features, but there's also the possibility that I'll end up cleaning them up because I've already got too much other code running around that uses them. The core basics are the ability to view and edit the system's memory, and execute a program starting at some given address. I'll guarantee that much.
I think the ability to view and edit register values is pretty well sewn, too. It's possible to bork the OS by doing something stupid here, but I'm not trying to protect the user from being stupid. Press TRAP (probably to be labelled ESC) and the OS will restart and reset any values it needs to function (I hope!)
The ability to view inputs and edit outputs interactively shouldn't be a problem, either, but it's not an immediate priority. If it happens effortlessly, it'll be in the initial release. Otherwise, I won't hold up the release for it.
I've also got another mode that is enabled in some versions for viewing/setting user variables in the OS, such as the RST5.5 and RST7.5 vectors, selecting different display formats, setting the size of the LCD, and so on. I can pretty well guarantee that the full-up version of this will not be in the initial release, though a cut-rate version of it may be. That would mean that you would set these variables yourself when putting the code on your own MAG-85.
If I do go to a design that uses two memories, one rewritable in system and the other not, I'll have to put these variables in RAM, or expect that they be set once and for all in the firmware. I'd like to be able to provide an EPROM at some point for people who want to build a MAG-85 and get up and running without having to put the OS in themselves. But if I do, I either need to put some system information in the NOVRAM memory space (like the height/width of the LCD display) or require that only one size of LCD be used with a specific version of the OS. Since I'm looking forward to building another MAG-85 with a larger display (perhaps 32 characters wide by 4 lines high), I'd like to keep the OS flexible. The initial display routines will only use a portion of displays larger than 20x2, but the user programs can use the larger displays and the OS can be updated later to have multiple display formats that the user can select.
But right now, I just need to drive a stake through its heart and get a workable version out the door. :)
Wednesday, November 9, 2011
Low Level Computer Teaching Options
We have a current discussion on the COSMAC Elf Discussion Group that centers on the idea of a small computer to teach low level computer concepts. Many of us in the group got our start with the COSMAC Elf as our first home computer. It is a small, simple, inexpensive computer. One of its finest points is that it is simple enough that a person of ordinary intelligence can understand how every part of it works, down to the lowest detail.
The place for a small teaching computer, as we're discussing it, lies somewhere between electronics and the standard non-computer science introductory computer programming class. It's a matter of teaching what the components in the system do, and how they do it. This becomes a model of what happens inside more powerful modern computers at larger scale. Such as in current desktops, laptops, tablets, and smartphones.
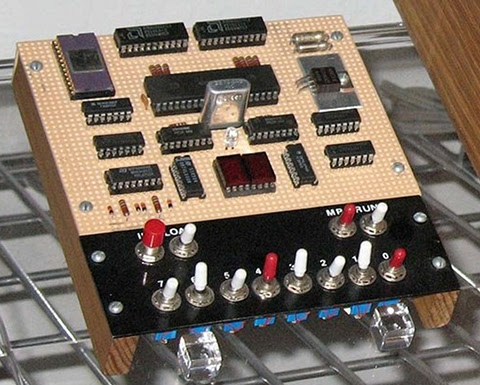
Is anyone using something along the lines of a microprocessor trainer in the classroom today outside a college level EE class?
Personally I can see two general approaches to this, with several possible variations on the two themes. Let's look at them, then I'll go into Blue Sky mode to talk about what I sort of wish for.
Some Ways to Bring Computer Hardware into Class
One is to fake it entirely with present-day hardware. After all, if it's possible to do a complete chip-level simulation of an 8-bit processor in Javascript, it shouldn't be much of a stretch to simulate an entire simple 8-bit microcomputer in a program with the ability to "see" all the operations inside simulated on the screen.
The problem is that this still really fails to make what's being taught "real". To the students, it becomes just another show to watch--one with no particular interest to most of them.
The other approach is to use an actual old microcomputer in class, like the Elf, with the students handling the system, measuring voltages or using logic probes to "see" the signals in the computer. Something more sophisticated would be using chip clips with LEDs on the various lines as a sort of multi-line logic probe. (Here is a place where an Elf or other RCA1802-based system would shine. The 1802 is a fully static processor. It can run at clocks speeds from 0Hz on up to its maximum clock speed, with clock changes on the fly. I have literally clocked 1802 systems by hand by connecting and disconnecting the clock line to +5V and Ground lines, counting out machine cycles as displays show the status of various system lines. There are not a lot of computer systems that can do that!)

Between these two lie many other options. One would be to have a hardware board that connects to a modern computer through a common interface, like USB, where some I/O devices could be visible controlled by the computer (via lights, motors, etc.) and with lines exposed that can safely be probed by the students.
Another would be using a more modern hardware platform, perhaps based on one or more microcontrollers that emulate the function of an older system, exposing such things as memory access, control signals, and so on to the students. The board could include displays and LEDs to show the status of the lines, internal pseudo-registers, and so on. The operation of the entire system, both inside and outside the simulated ICs, could be made available to the student's eyes.
Part of what needs definition is the acceptable limitations of the system. In my own case, I see such a system as being an introduction to low-level hardware operation and control of that operation through software.
Blue Sky Dreaming
If I could have what I wanted without any effort on my part or a significant amount of the school's money, here's what I'd like:
Step 1
I would want to introduce a basic system that's very similar to the original Elf of 1976.
It would have:
Step 2
After the first few lessons, the toggle switches would get old and I'd want to introduce a hexadecimal keypad. This would teach hexadecimal, and continue the association of computer instructions with numeric values in the computer. Presumably the connection between signal levels and numbers has been made using toggle switches.
With the easier input technique, it'd be nice to add some more memory, up to something like 512 bytes to 1 kilobyte.
Step 3
Next, a keyboard would be attached. Perhaps writing software to interface the keyboard to the system would be one of the Step 2 projects. While I'd be tempted to use an ASCII keyboard, I think a raw matrix keyboard would teach more. On this keyboard, machine language instructions and hexadecimal numbers would be mapped to each key. This would again speed programming, and reduce errors. The simple machine language I envision has a particular addressing mode associated with each mnemonic, so there's still no assembling of code required.
Step 4: A larger step
Next, I'd move to a more abstract level. I believe that the activities prior to this point would teach low level operations well enough to take this jump and still be able to show the connection between the two.
For step 4, the computer would get:
The point at this step would be writing high level programs to perform low level actions like those seen in the earlier steps. Seeing line levels and I/O operations performed, using bitwise operators, seeing the signals represented as numbers of various bases within the language (which I'd expect to support at least binary, hex, and decimal for representation and constants.)
Step 5
The final step with the low level computer would be to produce more sophisticated programs. These would be longer programs, probably projects done by groups of students over a few weeks in class. At this point the understanding of the program control structures and data structures should be a bridge to programming in the chosen language directly on the modern computer.
Final Thoughts
These thoughts are somewhat half-baked as they stand. I or someone would have to do some more work to really define this and turn it into hardware and software and a curriculum to go with it. Some points that need considering are the demarcation between this and a robotics class, common in many schools now (including the one at which I teach.) Also, how much class time does this merit? And so on.
Personally I think that using a micro trainer level system is simple enough to be mastered by most middle-school level students. I've got some actual experience with students to back that up, in addition to my own experience (I was 14 when I constructed my own Elf.) For the students, the information not only gives them an understanding of the underlying technologies of current systems, but would open the doors to embedded systems, far more common than conventional general purpose computers. Either way, it would make the computer far less a piece of technical magic controlled by somebody else and far more something comprehensible, and therefore controllable, by themselves.
Some related work--a 4 bit TTL Processor.
The fact is, all the steps above would probably be unnecessary and involve too many changes to the hardware platform to be practical in class. A more reasonable approach would probably be to go from a slightly more capable Step 1 computer directly to Step 4. This would reduce the opportunity for student disorientation as a result of seemingly constant hardware changes, and still be enough to get the key points across.
The activities I envision for Steps 2 and 3 could be either dropped or performed in either the initial or final configuration of the system. This would also simplify the system itself.
Tweet
The place for a small teaching computer, as we're discussing it, lies somewhere between electronics and the standard non-computer science introductory computer programming class. It's a matter of teaching what the components in the system do, and how they do it. This becomes a model of what happens inside more powerful modern computers at larger scale. Such as in current desktops, laptops, tablets, and smartphones.
The COSMAC Elf, this version includes video graphics.
Is anyone using something along the lines of a microprocessor trainer in the classroom today outside a college level EE class?
Personally I can see two general approaches to this, with several possible variations on the two themes. Let's look at them, then I'll go into Blue Sky mode to talk about what I sort of wish for.
Some Ways to Bring Computer Hardware into Class
One is to fake it entirely with present-day hardware. After all, if it's possible to do a complete chip-level simulation of an 8-bit processor in Javascript, it shouldn't be much of a stretch to simulate an entire simple 8-bit microcomputer in a program with the ability to "see" all the operations inside simulated on the screen.
The problem is that this still really fails to make what's being taught "real". To the students, it becomes just another show to watch--one with no particular interest to most of them.
The other approach is to use an actual old microcomputer in class, like the Elf, with the students handling the system, measuring voltages or using logic probes to "see" the signals in the computer. Something more sophisticated would be using chip clips with LEDs on the various lines as a sort of multi-line logic probe. (Here is a place where an Elf or other RCA1802-based system would shine. The 1802 is a fully static processor. It can run at clocks speeds from 0Hz on up to its maximum clock speed, with clock changes on the fly. I have literally clocked 1802 systems by hand by connecting and disconnecting the clock line to +5V and Ground lines, counting out machine cycles as displays show the status of various system lines. There are not a lot of computer systems that can do that!)
Between these two lie many other options. One would be to have a hardware board that connects to a modern computer through a common interface, like USB, where some I/O devices could be visible controlled by the computer (via lights, motors, etc.) and with lines exposed that can safely be probed by the students.
Another would be using a more modern hardware platform, perhaps based on one or more microcontrollers that emulate the function of an older system, exposing such things as memory access, control signals, and so on to the students. The board could include displays and LEDs to show the status of the lines, internal pseudo-registers, and so on. The operation of the entire system, both inside and outside the simulated ICs, could be made available to the student's eyes.
Part of what needs definition is the acceptable limitations of the system. In my own case, I see such a system as being an introduction to low-level hardware operation and control of that operation through software.
Blue Sky Dreaming
If I could have what I wanted without any effort on my part or a significant amount of the school's money, here's what I'd like:
Step 1
I would want to introduce a basic system that's very similar to the original Elf of 1976.
It would have:
- Toggle switch inputs (to associate signals with data and to help teach binary),
- A binary LED display and a two-digit hexadecimal display,
- Very limited memory (about 128 to 256 bytes)(to teach how much can be done in limited memory, and to limit the size of early programs to sane sizes.
- Exposed memory and I/O lines, possibly with LED monitors
- Extra monitors, like maybe dual color LEDs to show data direction on I/O ports, etc.
- A simple machine language with whole-word mnemonics.
- The ability to operate at extremely low clock speeds (0-100Hz) as well as higher speeds (1-10MHz or something like.)
Step 2
- Hexadecimal Keyboard
- 512B to 1024B of RAM
After the first few lessons, the toggle switches would get old and I'd want to introduce a hexadecimal keypad. This would teach hexadecimal, and continue the association of computer instructions with numeric values in the computer. Presumably the connection between signal levels and numbers has been made using toggle switches.
With the easier input technique, it'd be nice to add some more memory, up to something like 512 bytes to 1 kilobyte.
Step 3
- Keyboard with instruction mnemonics and hex digits
- Perhaps more memory, up to about 4K
Next, a keyboard would be attached. Perhaps writing software to interface the keyboard to the system would be one of the Step 2 projects. While I'd be tempted to use an ASCII keyboard, I think a raw matrix keyboard would teach more. On this keyboard, machine language instructions and hexadecimal numbers would be mapped to each key. This would again speed programming, and reduce errors. The simple machine language I envision has a particular addressing mode associated with each mnemonic, so there's still no assembling of code required.
Step 4: A larger step
Next, I'd move to a more abstract level. I believe that the activities prior to this point would teach low level operations well enough to take this jump and still be able to show the connection between the two.
For step 4, the computer would get:
- More memory. Anywhere from 4K to 64K. Perhaps it would start at 4K and grow as the students hit the limitations of each memory size.
- A terminal connection to a current generation computer for keyboard and display, or an encoded keyboard and some other form of text display.
- New firmware (probably activated from on-board with a mode switch), which would provide a fairly sophisticated command line interface with command editing, recall, etc., as well as an interactive programming language. The specific language doesn't matter too much, it could be a BASIC, a bash-alike, a LOGO, or an interactive form of some other compiled language.
- Mass storage. Probably some modern semiconductor memory.
The point at this step would be writing high level programs to perform low level actions like those seen in the earlier steps. Seeing line levels and I/O operations performed, using bitwise operators, seeing the signals represented as numbers of various bases within the language (which I'd expect to support at least binary, hex, and decimal for representation and constants.)
Step 5
The final step with the low level computer would be to produce more sophisticated programs. These would be longer programs, probably projects done by groups of students over a few weeks in class. At this point the understanding of the program control structures and data structures should be a bridge to programming in the chosen language directly on the modern computer.
Final Thoughts
These thoughts are somewhat half-baked as they stand. I or someone would have to do some more work to really define this and turn it into hardware and software and a curriculum to go with it. Some points that need considering are the demarcation between this and a robotics class, common in many schools now (including the one at which I teach.) Also, how much class time does this merit? And so on.
Personally I think that using a micro trainer level system is simple enough to be mastered by most middle-school level students. I've got some actual experience with students to back that up, in addition to my own experience (I was 14 when I constructed my own Elf.) For the students, the information not only gives them an understanding of the underlying technologies of current systems, but would open the doors to embedded systems, far more common than conventional general purpose computers. Either way, it would make the computer far less a piece of technical magic controlled by somebody else and far more something comprehensible, and therefore controllable, by themselves.
Some related work--a 4 bit TTL Processor.
The fact is, all the steps above would probably be unnecessary and involve too many changes to the hardware platform to be practical in class. A more reasonable approach would probably be to go from a slightly more capable Step 1 computer directly to Step 4. This would reduce the opportunity for student disorientation as a result of seemingly constant hardware changes, and still be enough to get the key points across.
The activities I envision for Steps 2 and 3 could be either dropped or performed in either the initial or final configuration of the system. This would also simplify the system itself.
Monday, October 3, 2011
CNC Rooster: Third Time's a Charm
In a prior post, I'd made a mistake handling the material when cutting a full 3D object using gcode files generated by Vectric's Cut3D CAM software. After that I tried again. That time things were going swimmingly until I got some gunk on a leadscrew that hung up the X axis and ruined the cut.
Well, I tried again today. After doing some preventative maintenance on my microCarve A4 CNC, testing it thoroughly and making sure of myself as well, I managed to turn out a small urethane rooster:


The part turned out very well. The whole time the second side was cutting, I was fretting over how good my alignment would be. It turned out to be just fine.
The beak looks worse than it actually is because of a loose bit of plastic that'll come off when I scrape it with a thumbnail. It isn't perfect, however, because of the overcut depth I specified for the first side's cut. It's too deep for the thickness of the beak, and though the overall alignment of front and back side is excellent, the beak is at an angle, so one side is lower than the other. If I hadn't specified such a deep overcut, it would not have cut through this way.
Still, it'll clean up nicely.
Further Observations
The facets you see, particularly in areas like the chicken's breast, are part of the original 3D model. They aren't machining flaws. On the second side I cut the machining marks that are there are a little deeper than they should be because I trimmed my tab sizes down way too much, so they flexed a bit during machining.
Still, the overall quality of the part is such that I could clean it up to use as a casting master easily, if I were going to duplicate this part.
The Materials
The prior two tries were done using NC Proofboard, a urethane foam board, with densities of 60 and 48 lbs. per cubic foot. This last one was done in Butter-Board, which has a density of about 64 lbs per cubic foot. All are machinable plastics from Golden West Manufacturing.
60# NC Proofboard
The 60# proofboard was a very nice material. The cell size of the foam is very, very small and could easily be coated to smooth it enough to use a part made from it as a casting master. In fact, the mold release might be sufficient. It's very tough, and machines like a dream.
48# NC Proofboard
The 48# proofboard machines very easily as well, but tends to be a bit more brittle in thin sections than the 60# board. The cell size is about half again as large, but still small enough to be easy to coat, it'd just take more to do it--some sort of filler rather than a primer coat or a thick mold release agent.
Butter-Board
The Butter-Board machines to a fine, smooth surface. It takes a little more care in feed rates than the proofboards, which have a lot of resiliency thanks to being foamed products. But the completed part has an impeccable surface so far as the machining makes it so. It's not as tough in thin sections as the 60# proofboard, but it's stronger than the 48# board in thin sections in general, though it tends a bit toward the brittle.
I like all three materials quite a bit, and plan on getting some more of the Butter-board and 60# NC Proofboard soon for both business and hobby use.
Tooling
The rough cuts were done with a 1/8" 2 flute square end mill, the finishing cuts were done with a 1/16" 2 flute ball nose end mill. Both bits were purchased from IMService, at nice prices and the bits are very good. I was concerned that I may want to use single-flute bits, but these bits performed admirably with these materials. At some point I'll try a future cut with single-flute bits for comparison's sake, but these bits cut well, showed no propensity for clogging. They stayed sharp and cool through the cuts.
CAM Software
As to Cut3D, I'm quite happy with it so far, and I'm planning two more jobs for it in the immediate future. I'm also going to be giving MeshCAM a spin for a high relief piece of work in the near future, and I'll be reporting on that soon.
Tweet
Well, I tried again today. After doing some preventative maintenance on my microCarve A4 CNC, testing it thoroughly and making sure of myself as well, I managed to turn out a small urethane rooster:
Rooster, Side A
Rooster, Side B
The part turned out very well. The whole time the second side was cutting, I was fretting over how good my alignment would be. It turned out to be just fine.
The beak looks worse than it actually is because of a loose bit of plastic that'll come off when I scrape it with a thumbnail. It isn't perfect, however, because of the overcut depth I specified for the first side's cut. It's too deep for the thickness of the beak, and though the overall alignment of front and back side is excellent, the beak is at an angle, so one side is lower than the other. If I hadn't specified such a deep overcut, it would not have cut through this way.
Still, it'll clean up nicely.
Further Observations
The facets you see, particularly in areas like the chicken's breast, are part of the original 3D model. They aren't machining flaws. On the second side I cut the machining marks that are there are a little deeper than they should be because I trimmed my tab sizes down way too much, so they flexed a bit during machining.
Still, the overall quality of the part is such that I could clean it up to use as a casting master easily, if I were going to duplicate this part.
The Materials
The prior two tries were done using NC Proofboard, a urethane foam board, with densities of 60 and 48 lbs. per cubic foot. This last one was done in Butter-Board, which has a density of about 64 lbs per cubic foot. All are machinable plastics from Golden West Manufacturing.
60# NC Proofboard
The 60# proofboard was a very nice material. The cell size of the foam is very, very small and could easily be coated to smooth it enough to use a part made from it as a casting master. In fact, the mold release might be sufficient. It's very tough, and machines like a dream.
48# NC Proofboard
The 48# proofboard machines very easily as well, but tends to be a bit more brittle in thin sections than the 60# board. The cell size is about half again as large, but still small enough to be easy to coat, it'd just take more to do it--some sort of filler rather than a primer coat or a thick mold release agent.
Butter-Board
The Butter-Board machines to a fine, smooth surface. It takes a little more care in feed rates than the proofboards, which have a lot of resiliency thanks to being foamed products. But the completed part has an impeccable surface so far as the machining makes it so. It's not as tough in thin sections as the 60# proofboard, but it's stronger than the 48# board in thin sections in general, though it tends a bit toward the brittle.
I like all three materials quite a bit, and plan on getting some more of the Butter-board and 60# NC Proofboard soon for both business and hobby use.
Tooling
The rough cuts were done with a 1/8" 2 flute square end mill, the finishing cuts were done with a 1/16" 2 flute ball nose end mill. Both bits were purchased from IMService, at nice prices and the bits are very good. I was concerned that I may want to use single-flute bits, but these bits performed admirably with these materials. At some point I'll try a future cut with single-flute bits for comparison's sake, but these bits cut well, showed no propensity for clogging. They stayed sharp and cool through the cuts.
CAM Software
As to Cut3D, I'm quite happy with it so far, and I'm planning two more jobs for it in the immediate future. I'm also going to be giving MeshCAM a spin for a high relief piece of work in the near future, and I'll be reporting on that soon.
Subscribe to:
Posts (Atom)


 Posts
Posts


 Webomator.com: Backward into the