Showing posts with label tips. Show all posts

Wednesday, November 27, 2013

Holiday Video Game Classics

It's that time of year. The music starts playing in the stores. The decorations go up. You come home, have a look in the closet, and find your old video game systems there waiting for you.

I don't know why it is, but this time of year seems to turn our minds back to games past. Pac Man, Super Mario, Donkey Kong. Just yesterday I had a friend over, we ended up doing a tour of my old video game systems. Later my daughter came to me. She'd been going through her old Gameboy cartridges, finding old friends in a dresser drawer. (I play my Gameboy games with my GameCube adapter, which puts them up on my 55 inch TV. No squinting for me any more.)


The problem is, how do you hook up these older systems to the new TV you bought in the meanwhile?

Fortunately, I've got an entire web page on hooking up your classic video game or computer system to your TV. So you can not only hook up your old Atari or Nintendo, but also your Commodore 64, Apple II, Atari 800, Vic-20, or whatever.

If it's gathered some dust, or got put away with finger smudges on it, I've also got a page on caring for your older electronics.

I love the old stuff myself. I know I'm not alone. When we have guests over the holidays, I can't tell you how much fun we have playing fun, simple old video games like Ms Pac Man, Pong, Shadow Squadron, Space Invaders, and so on. Even Katamari Damacy is on the old-time play list now, though the PS2 hooks up to our modern TV just fine--this year. In a few years I'll probably have to create a web page on that, or a page on building a video modification to allow PS2 players to relive favorite moments with their older game system.

We gotta keep bringing our old friends along into the future with us, right? ;)

Wednesday, March 6, 2013

A Documentary on Comics: Stripped, by Dave Kellett

Stripped, the Final Push, on Kickstarter

Dave Kellett has been working his tookus off on a documentary on comics and their artists. It's called Stripped, and he's just about finished it. He's doing a "Final Push" fundraiser on Kickstarter.

I've backed it, and am looking forward to getting a DVD of this film. I recommend you do so, too!

Wednesday, December 19, 2012

Age of Mythology for Mac, Network Address Wrongness

Well, I've lost a chunk of my life to a really stupid problem with Age of Mythology for the Macintosh.

My family and I like to play network games on the home LAN around the holidays. We have several old favorites, most of them were bought when they were old, too. We save dollars that way, plus we can buy enough for everyone's system without going broke.

One of those is Age of Mythology, from MacSoft.

Unfortunately, it tries to be intelligent with its network configuration. To simplify things, ya know? And it simplifies things to the point where you can't configure which network it uses, or any other network settings.

We have it on four systems. Two worked just fine right away. The third we saw was choosing its wired ethernet address over its wireless address. Unplug the wired network and hey, presto, it works. Number four, my own system, didn't respond to that.

I poked around through config files and tried editing them by hand, scanned the file system (find does more than Spotlight), and so on. All four games had been installed the same. They'd patched up to version 2.01, which fixes problems with an "out of sync" error in versions of OS X of Leopard and above. I looked on the internet, went many pages deep into various Google searches, and spelunked my computer's file system, hoping that I wouldn't wreck anything.


Nothing was working for me.

Finally, after chewing at it for literally hours, I stumbled into it.

Mamas Don't Let Your Babies Grow Up to Share Internet
Under System Preferences, there's a setting for Internet Sharing. I have it turned on, so that my beige G3 can reach the internet though my iMac's wireless connection.

Age of Mythology hates me for it.

Once I turned Internet Sharing off, and unplugged the wired Ethernet, I was able to connect to the other three computers with the game.

Sheesh!

Sunday, November 27, 2011

Amateur Radio Station from the Ground Up

I earned my amateur radio license about a week ago, and it posted in the FCC's data base last Wednesday. My call sign is AG6HU. Vanity call sign, here we come. ;)

Getting on the Air
Still, it's a good enough call sign to get me on the air.

I have two radios at present, both pretty old. One is an Icom IC-230 that I got from a ham in Hayward back in 1986 (another time when I was preparing for a license but didn't get one.) It was my one and only rig when I was KD6KGV. Presently, it's lost in storage some where. I remember coming across it sometime in the past year, so it's not completely lost. When I got it it needed some TLC. A little work and some new crystals and I was in business when I got my first license in 1992.

The other is a rig a friend gave me back when my first license was still active. It had been his father's and he wanted to find a good home for it. Unfortunately, I never got on the air with it. It's a Kenwood TS-700A, vintage 1976 or so. It's a pretty rig, and it was a lot easier to find than the Icom when I went into the garage this last week. However, when I turned it on and started listening to the local repeaters I found that the frequency readout shows a different frequency than the actual frequency of the repeater--by a lot. So I'm afraid to transmit on it until I can recalibrate it. I have the service manual, I just need to pull together some test equipment beyond what I normally use. Back to the garage I go, for more boxes.

Doing What Can Be Done

Meanwhile, I picked up an eight foot ground rod and a clamp at the hardware store, I already had a bag of rock salt on hand. I've got a place picked out in the back of one of my garages for my station set-up, and I was planning on installing the rod just outside. I've got two garages, both attached to the house. The spot I picked has a nice window, and I'll be able to install a combination heater/cooler unit in the wall beneath it.

I decided to use a technique similar to that used by Roger Halstead, K8RI. I had a heavy duty hose with no connector on one end that I slipped over a piece of full conduit (I didn't have a straight enough piece of thin wall tubing on hand). Then I put on a hose clamp, hooked it up to a hose bibb, and I was ready to do some hydromining.

My house is built on rock in a cut that was made to make enough flat space to build the house, run a driveway and so on. So a rock drill and blasting charges would be the most appropriate tools for making a deep hole. However, there's an area around the foundation of the house that was excavated for the foundation. My thought was that I'd put the rod into the area next to the foundation that was excavated, then backfilled.

Unfortunately, I couldn't get more than two feet deep this way. It appears the backfill is primarily what came to hand most easily:rock. So I changed my plans. I'll admit that while I was fighting with the conduit under the eaves of the house the idea of putting down a subsurface wire grid occurred to me, but that would be a weekend-long project at least.

I also have a retaining wall that forms the back wall of my far garage. That puts the ground rod a bit farther from where I want to stack my rigs, but not much further. If there's a real problem I can always move the station from one side of the garage to the other, even if it means being a but farther from the window.

So I climbed up the hill and tried again. It took about ten minutes, but I managed to get a seven foot deep hole without too much trouble. It's a good thing I used schedule 40, I had to ram down through some of the sandstone at two places, I don't think thin wall tubing would have managed that as well. Though schedule 40 required me to wiggle the tube around a bit to clear enough of a hole for the thick walls of the conduit.

I'm Grounded
I left the conduit in the hole until I had the ground rod ready to go in. In the dying light (hence no photos until tomorrow) I pulled out the conduit and ran in the ground rod. A few blows with a sledge seated it nicely at the tip. A few more minutes with a shovel dug a trench out around it that I poured a bag of rock salt into. It's raining off and on here right now, so it should have the ability to diffuse nicely over the next few days and raise conductivity.

New Toys
Meanwhile, I ordered some new equipment last Wednesday after I saw my call appear in the FCC ULS and realized my current rig wasn't going to get me on the air any time soon. I've got a new MFJ-259B antenna analyzer/frequency counter/cable tester/bottle opener headed my way with a full slate of accessories. I've also purchased a Yaesu FT-250R HT to get me in touch with my local hams while I fuss with the Kenwood and start working toward building up a station for HF work.

Frankly, test equipment is one of my favorite things in the world. Amateur radio lets me justify more test equipment. That's a good thing. :D

First QSO Soon
Each day I'm working to do something material toward getting a station running. My first QSO will probably be on the HT once I get it out of the box and charged up. But I'm looking forward to using the Kenwood once I get it sorted out, and getting connected with the local amateur community to learn about more types of operation. Plus getting or building more equipment to do even more.

Friday, October 21, 2011

MeshCAM: An Inexpensive Commercial CAM Program

I was recently contacted by Robert Grzesek, developer of MeshCAM, a 3D CAM program. He'd seen my earlier article where I express some frustration with "free" software, particularly for CAM. The free software I tried usually did simple rasterized cuts of the object loaded, with the result that a lot of the design's detail was lost.

Robert offered me a free copy of MeshCAM if I'd blog about it. I took a look at the product information online and took him up on his offer.

MeshCAM is in the same price range as the other commercial CAM program I've been using--it's a hobbyist-affordable program. This is very nice, as so much of the available software is well beyond the budget of an amateur, or a small business where CAM work is a sideline without a large budget.

It's documentation and the tutorials are very good. Having recently gone through some tutorial-based training with some other programs that are from much larger companies in the past few days, I'm pretty well up to speed with what can go wrong with a tutorial. The MeshCAM tutorials are up to date and in sync with the current version of MeshCAM. They describe the process well from the basis of someone trying to get a specific task accomplished, they're not just a description of what appears in the menus.

At first, I wasn't sure that double-sided machining for full 3D objects was going to be covered, but it was, I just needed to stop anticipating possible problems quite so much.

Working with MeshCAM itself, I've opened up the provided files and a couple of files of my own. For the file types it accepts (STLs and DXFs, in addition to its own MCF format, plus a number of 2D image formats for image-based height maps), it opens the files without a problem and displays them properly. Wavefront OBJ files would be a nice addition, but then that's why I've got the open source program MeshLAB (which has no relation to the MeshCAM line of products) which is frustrating at times, but mostly does the job of object type conversion and it's free.

object display for MeshCAM
Above is an example of MeshCAM's display of an object. The way MeshCAM displays its axes is a bit cartoonish, but at least you won't have to worry about missing them. They can get in the way of small objects in the display screen. There may be a way to deal with that by changing the way they're displayed, but so far I've just moved or rotated my objects away to view detail then moved them back.

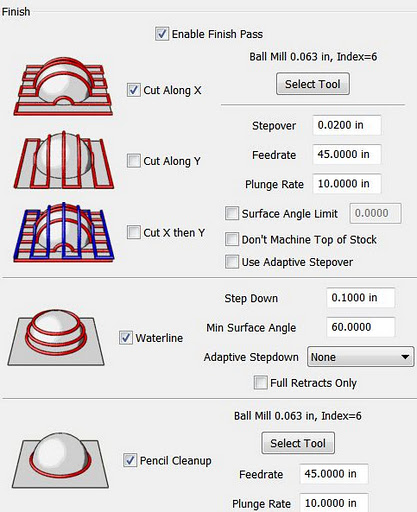
The thing that makes MeshCAM stand out for me at this point is its finishing abilities:
MeshCAM's many flexible finishing options.
It has built-in multi-pass finishing. I've managed to get the same results from Cut3D through a work-around. There, I create a finishing toolpath for one tool, save those toolpaths, then go back and define a different finishing pass, then save those toolpaths, and run them on the CNC one after the other.

MeshCAM doesn't require this. It gives a great set of finishing options for multiple tool passes right out of the box. I'm presently working on a model specifically to take advantage of these capabilities. Since much of what I'm doing is intended to have a high level of detail, I'm looking forward to seeing what comes off the CNC when I use MeshCAM to build the toolpaths.

MeshCAM displays the toolpaths it generates in the 3D view once they've been calculated, which gives a good first-look check to make sure that things came out right. There's no preview of the cutting operation built in to MeshCAM, however, as in Cut3D. Instead, a separate program, CutViewer is offered. Or you can do a "dry run" in most CNC control programs like EMC2 or Mach3 to see what the cutting will look like, at least as far as tool head movement is concerned.

The previews of the cutting operations have been one of my favorite features of Cut3D, so it's a feature I miss in a CAM program. I've gotten a higher degree of confidence from using this to see how the cutting operation will proceed ahead of time--the order of cuts is not always what you'd expect. The ability to check this during the CAM operation is very nice.

So I'd recommend planning to add CutViewer to your purchase if you buy MeshCAM, or make sure you're comfortable with your CNC control program's preview abilities. I'm using the preview abilities of EMC2's Axis view, myself.

Once I've finished the models I'll be trying out with MeshCAM, I'll be reporting on the final results. I'm planning both a flat relief object and a full 3D, 2-sided object.

Stay tuned...

Thursday, October 20, 2011

Objects of Rotation in Google Sketchup: A Problem of Nomenclature

I've been using Google's free Sketchup program for some 3D object designs lately. I've been using it for a while, but I only use it off and on, so my expertise is growing slowly.

Tonight I wanted to model something based on an Object of Rotation, which we all remember from math class is what you get when spin a shape around an axis. This is usually a trivial thing to do in both CAD and 3D design programs like AutoCAD, Lightwave, and so on. I couldn't remember how to do it offhand, so I did a quick search, expecting "sketchup object of rotation" would get me there in moments.

Technically Accurate, but Useless
I soon got lots of results for "Rotate Object", including a Sketchup tutorial video link. Unfortunately, I realized about 30 seconds into the video that it wasn't what I was looking for. It's a very nice tool for rotating an existing object's position around some arbitrary center of rotation, and possibly replicating it in a pattern around that center.

Nice, but not what I needed.

After a few frustrating attempts to rephrase the search to get what I wanted, I ended up just doing a search on what I knew is usually created as an object of rotation: a rocket.

"Sketchup rocket" yielded a couple of promising results. An amateur rocketry buff had instructions for drawing model rockets in Sketchup. The instructions for the nose cone were: how to draw an object of rotation in Sketchup.

Sketchup Follow Me Tool icon
Words Get In the Way
The tool for creating objects of rotation in Sketchup is the Follow-Me tool. In Sketchup terminology, an object of rotation is called a Lathed Object. Which makes perfect sense, if you already know it. (Thank you for the meme, Arthur Conan Doyle!)

So, to successfully search for how to create an object of rotation in Sketchup, use the terms "sketchup lathed object" or "sketchup follow me tool" to get what you want.

Hopefully this will show up when you search for "sketchup object of rotation" and save you some grief. ;)

Tuesday, July 12, 2011

CNC Projects: 10 Basic Rules I've Learned


Here are some basic rules I use when selecting or setting up CNC projects. Let me know your rules, or any tweaks you see to mine. Thanks!

1. Don't make anything that you can buy easily, unless you have some specific reason that over-rides the extra cost, effort, and likely unforeseen problems.

2. Remove as little material as possible. Look carefully at item placement in your material stock, different ways of cutting the piece, possible design changes, etc. to reduce the amount of cutting and the amount of material to be removed.

3. Plan your cuts so that the ones that most depend on the accuracy of the bit's size are done with a fresh bit. Bits wear while cutting, if you're planning on cutting, say, a 1/4" dado with a 1/4" bit, you should do it while the bit still has a 1/4" diameter to minimize post-machining to make things accurate.

4. Test your ideas in scrap material first, unless it's a minor variation on something you've already done. Chances are you'll either find a problem you didn't anticipate, or figure out a way to do it better on the next go.

5. Be fanatical about your means of mounting the work. The accuracy and success of the machining relies on it, so think about this as much as you think about the rest of the project.

6. Once you find something that works, build on it. Once you've developed a routine for mounting, cutting, registering, or whatever that regularly produces the results you want, keep doing it. It helps to take notes and pictures for reminders in case there's a break in operations that leaves you a bit rusty on how you did it before.

7. If something isn't working quite, don't keep tolerating it. Fix it, replace it, find another way. It'll be worth the time saved later.

8. Learn from others. Watch videos online, visit other folks' websites, visit with other CNC machinists, see how it's done with different machines or in different areas than your individual interests.

9. Do "science" projects. Plan and develop projects just for the sake of trying out something new or exercising a different procedure. Just like doing a first work in scrap, they'll save you time in the end.

10. Make one complete finished item before you cut out a whole set of parts production-line style. While it costs a fair bit of time in setup to go through once for the prototype, then go back and start over for production, it's better than finding out you've got a stack of parts that won't work when you get to final assembly.

My CNC Website

Thursday, May 26, 2011

Mount an HF Router on Your CNC, Quick and Easy

I posted my design for mounting the inexpensive Harbor Freight 1/4" trim router #44914 to a CNC on my website today. I've posted a dimensional drawing of the base plate, and given instructions for the rest (it's bone-simple, really!) Click the pic below to go right to it:

A quick and dirty spindle mount for the HF 44914 router

Sunday, March 20, 2011

Don't Let La-Z-Boy Re-Pad Your Chair

My spring break project this week has been redoing the padding on my easy chair. I've got a great big La-Z-Boy that I bought about 10 years ago. The padding on the seat and the lower back needed to be refreshed and the time off from teaching this week gave me a chance to do it.

This Time, I'll Do It

Normally, upholstering is not something I look to do as a pastime. But, some time ago, I made the mistake of taking it to the La-Z-Boy factory to get the job done. The chair is one with ten massage motors built in. I often get tears in my back muscles, those motors are really important to me. When the chair went in to the La-Z-Boy shop, all ten motors were working fine.

When it came out, only two at the top of the back worked, the two most useless motors (from my perspective) in the chair. None of the others functioned. Needless to say I was pretty upset. La-Z-Boy not only couldn't account for the problem, but refused to do anything about it. It wasn't part of the service, apparently, to make sure your chair wasn't damaged in the course of repadding.

Not only that, but the new padding job was pretty lousy. It was only a couple of weeks before the seat was mashing in again. Plus, everywhere they had lifted up the upholstery there were now lots of sharp little staple heads. Before the heads had either been placed better, or hadn't protruded from the fabric.

I've been getting along with a small pillow and a scrap of moving pad to make up the difference until I had a chance to spend the time to fix it myself. Now I can see what La-Z-Boy really did for me.

When they opened up the seat to put in the new padding, they cut and tore the cabling to the motors. What they didn't get with a knife in the first pass, they just tore by yanking. Real sweet. Next time I want this sort of service, I'll put my chair in the driveway with a "Please Vandalize" sign on it. The same was done inside the back, somehow they missed two of the cables.

The new padding was just as good. A folded over piece of cheesy, low density "egg crate" style foam was shoved into the seat and the back. None of the old crushed-down foam was removed. Needless to say, no accommodation was made for the wiring.

For some reason they opened up the upholstery on the sides of the chair as well. I have no idea what they were up to there. Pushing out the sides to make the whole chair look more puffy? I have no idea.

So if you've got some La-Z-Boy furniture, do yourself a favor. Don't take it back to their factory for work. It's a rip-off. Chances are you can find a small upholstering business nearby that you can hold accountable for the work, so even if they mess up your furniture, you'll have some recourse.

Rolling My Own

I've finished the seat now, and repaired all the wires to the motors. Fortunately, only the wiring was damaged. It took me most of an evening to go through, test each motor, and get it hooked back up to the correct position on the motor controller.

For the padding, I removed the crappy eggshell stuff (it was dirty looking, and even though it was shoved in under all the other padding that was in the seat, it smelled pretty bad, like hydraulic fluid.) I cleaned up the padding that was worth re-using from the original stuff, put in some new stuff where necessary. I added a layer of the fiber material that lets the fabric breathe just under the fabric.

Last night I got the seat back in, it feels much better. Sewing things back up was a bit of a chore, but the results are worth it.

The back is still waiting for me to repair its motors and update the padding, but it'll be a lot easier to work with.

Monday, February 7, 2011

Coding Forms for Hand-Made Programs


I've posted some of the coding forms I use on my website.

For me, hand coding and hand assembling software is pleasant and relaxing. It's like crochet or embroidery (I do both of those as well as programming.) Something as simple as a printed form makes it nicer, neater, and faster.

The forms of my own I've posted are generic assembly language forms. I've also posted a TI 960/980 assembly language form as well as some programming forms for the HP-41C, HP-67 and HP-97 that I use with all of my programmable calculators (like my HP-35S.)

Wednesday, October 20, 2010

Repairing the "Unrepairable" Microscope

The school I teach at has a small number of microscopes used by our science classes. I also use them once a year for a lesson where I bring in a bunch of microcircuits made visible to let my students see what's on a chip directly. I also bring in a wafer and some dice (the microcircuit variety, not the Yahtzee variety) for the kids to see and handle.

The exhibits themselves range from a 1959 transistor with the top of the can cut off to reveal the chip and a 1965 dual op-amp similarly prepared to a 1st generation microprocessor to late 80's memory circuits. All together I have about six to eight things I can put under the microscopes that would be interesting to look at.

Since I've been with the school, one of the microscopes has had a label on it reading "Broken, Save for Parts" on it. Since there are only six microscopes, including this one, it means I have to spend time in class changing over each scope from one object to another. Fortunately I've gotten good at talking while focusing a scope and shifting the light and indicator around to the best position. But it would be awfully nice to have at least one more scope. Recently another of the scopes got damaged, reducing us to only four scopes. This is really too few, especially for our science classes.

I Can Fix That

Our science teacher found out I work on optics (I build telescopes as a hobby, in addition to my work with sensor systems professionally.) She asked if I'd be willing to take a look at our newly broken scope. I agreed, and suggested that I might take a look at the "parts only" scope as well, since neither of us knew what was wrong with it.

The office staff let us know that the other scope had been declared "unrepairable" by a scientific instrument repair service that had looked at it several years ago.

When I took a look at the "unrepairable" scope, the optics appeared to be in perfectly good condition. The adjustments and controls were likewise all in good condition. All I found was that the light built into the base did not turn on. I had a light handy, for my own scopes I prefer a light that isn't built into the base, that way I can just grab another light if one of the bulbs burns out when I'm in the middle of a job. More than half the time I'm looking at something opaque anyway, and when I do look at translucent samples I use a mirror as often as I use a lamp for a backlight.

I opened the base to the "unrepairable" scope, wondering what would prevent the light from being fixed. Perhaps a small fire from a prior fixture?

Since When Is A Bulb Replacement "Unrepairable"?

When I got inside there was nothing worse than an empty light socket. The previous light had burned out, been removed, and not been replaced. I could see why, in part. It was an odd sort of bulb. The base style is the same as that for an automotive type "1004" bulb. It's a bayonet mount with two contacts at the tip of the base rather than the usual one. The designation is BA15D. It's an unusual type of bulb, especially for 120V. They run from about $5 to $35 depending on how specialized your supplier is. But they're not unavailable, by any means.

Still, they're hard to come by for people used to picking up light bulbs at hardware and grocery stores, so I decided to replace the base with a more common screw base. A standard medium size screw base, as used on most incandescent lamps around the home, would be too large to fit in the microscope's base. A small "candelabra" base would fit handily, but I wanted to make sure it'd be easy to get lamps in the right range of brightness. Candelabra base bulbs of up to about 15W are easy to come by in a size that would fit. But above that they tend to be the larger "flame" shaped bulbs in the 25 to 40W range, which wouldn't fit properly.

So it came down to an "intermediate" size screw base. Bulbs for these are common at hardware stores and such, as "high intensity" lamp bulbs (in 40W), and as lamps for vacuum cleaners, appliances, and such. 20W to 40W are common.

You Can Get the Bulb, But Not Its Base

Now the problem was finding such a base. I checked several hardware stores and lighting stores, with no luck. They all sold bulbs to fit an intermediate base, but no actual lamp bases in that size. I checked Radio Shack, just on the off chance, and my prejudices about their current parts stocking were confirmed. I even considered using the halogen lamps with the loop and straight leads on them. While the lamps are readily available, once again the bases are not.

I went to several stores and looked at cheap lamps, looking for one I could cannibalize without paying too much for the privilege. No luck, the LED lamp rules there, and none were suitable for a microscope. Neither the light pattern nor the size would work.

Finally I tried yet another hardware store while I was in another nearby town. I was ready to give up on intermediate size and go with candelabra, and hope to find a 20 or 25W bulb to fit. They had a single bulb wired fixture with a candelabra screw base. It looked perfect. The fellow minding the shop floor mentioned a lighting store nearby that I hadn't been to, as well. So I bought the candelabra fixture, a 15W bulb that would fit it, and headed over to the other store.

There they had lamp components in parts drawers, a very promising sign! I found several different types of base, but all in candelabra or medium size. One of the workers there helped me look, but we didn't turn up an intermediate base. We did turn up an adapter to go from a candelabra base to an intermediate base, though. I got that and a 25W bulb to fit, then went home with the lot.

Once home, I test fit the new fixture in the base with duct tape. I pulled out a selection of slides, and selected one with a nice thick feather sample on it to test the light level. I started with the 15W bulb and a thick section of the feather. The 15W bulb illuminated it, but not as well as I would like for students. Student's eyes aren't trained to pick out details yet. They need things well illuminated to help them see what they're supposed to see.

Putting It Together

I put in the adapter and the 25W bulb. That worked perfectly. Bright enough, without being too bright, even with a bacterial sample on a slide. In fact, the bulb aligned with the reflector in the base better with the intermediate base adapter. So I removed the old fixture from its bracket. Prepped the bracket and plastic welded the new base's fixture into place. I cut out the old fixture's wires, desoldered one end from the light switch, soldered and spliced the new fixture in. When it was all done, it looked like it was supposed to be that way. I tested everything to check for operation and safety afterward.

Then I added some labels to describe how to change the bulb to the outside of the case, and what bulb to use.

Now the "unrepairable" microscope not only works great, but can be maintained by an ordinary person without calling the "scientific instrument repair" service.

Tuesday, August 17, 2010

New Wireless Keyboard: Siig Multi-Touchpad Mini

I picked up a new keyboard to use in the living room yesterday. It's a Siig wireless model with a touchpad in it. I wanted to give up the mouse, and just get everything in one place for this work location. I'll do a full review on it later, once I've had a chance to get used to it.

So far, it's going well. They keyboard itself is very nice. Most of the mini keyboards I've tried have keys that are too small, or keycaps that are too close together at the top, making it easier to fat-finger them when typing in a lap. The Siig has well separated keys of good size. The Enter key is a little smaller than I would like, and there's a Fn key in the lower right corner where my CTRL key is, otherwise I'm pretty happy with the keyboard.

The mouse keys are recessed just a bit too much, and could be a millimeter or two taller (from front to back of the keyboard) to make them easier to hit.

My big open question at this point is whether I can learn to live with tap-to-click on the keypad. For the first few hours, I had no problems. Now it seems like I'm always clicking when I don't want to. Personally, I despise tap-to-click. I like touchpads for pointing, and scrolling. Clicking is for buttons.

Maybe I can learn to live with it. My daughter loves tap to click on her Eee PC (I turned it off on all of mine.) I haven't found a way to turn it off on this keyboard--the control in the OS's options controls the computer's inbuilt touchpad, but not this one. I suspect all the translation from touchpad to clicks is happening inside the keyboard itself, so the OS may have nothing to say about it.

I'll come back with a more full review after I've had another week or two with this keyboard.

Meanwhile, I can now sit in a number of different places while using this computer.

Wednesday, March 31, 2010

HFE: Sacramento Area Electronics Parts Source

There's a neat little place in Sacramento--next door to North Highlands--that sells lots of electronics supplies and surplus stuff, as well as some consignments. It's called HFE Electronics. It's at the prior location of HSC (Halted Specialties Corp., better known as HSC Electronic Supply.) HSC decided to consolidate, pulling out of the Sacramento location after over 25 years and focusing their attention on their Bay Area store and online sales.


HFE fills the gap that would have been left with the loss of HSC in this area. Not only that, but they've picked up for the Popkey Electronics store that recently closed here. They bought out Popkey's stock and are integrating it into their inventory now.

HFE is a fun place to poke around, ask questions of the staff (or, in my case, I more often get involved in helping the staff answer questions from other customers) and otherwise pick up all sorts of fun bits of electronics. They have everything from discrete components to ICs to equipment. There's new retail stuff as well as heaps of surplus and used stuff. There's lots of bits and bobs for those of us who like playing with microcontrollers, those of us who like building up analog circuits from scratch, amateur radio people, digital electronics types, tinkerers with pre-existing equipment, repairers of the $100 item with a broken ten cent part, and so on. Count me in all the above categories. I seldom get out the door without being about $100 lighter. :)

Among the things I noticed my last time in (no guarantees this will all be there when you walk in, especially if I beat you there) are:
  • An Odyssey 2 game console from the 70s (based on the 8048 CPU, with lots of room inside the case for mods!

  • Some Tek scopes and modules

  • An old Mac SE/30 unit (sans keyboard and mouse.)

  • Lots of interesting rocker switches

  • A bunch of LCD displays with 44780 controllers and similar

  • Oodles of LEDs and displays (I've picked up a bunch of dual digit 14 segment displays, among others.)

  • Prototyping boards, tools, wire jumpers for solderless breadboards, and other proto stuff.

  • Interconnects and sockets of all sorts of varieties.

This barely scratches the surface, and while some things are one-offs (like the Mac and Odyssey 2), much else is regular stock stuff. So if you're ticked about the fact that "Chicken Shack" doesn't have your favorite digital latch any more, take a stop by HFE Electronics.

Monday, October 12, 2009

Sciphone G2 Tips


Some tips for users of the Sciphone G2:

  • Fastest way to move all those files you just transferred from the "Received" directory to the place they belong is not to use the Move function in File Manager. Instead, use file manager to go to the Recieved directory, select the file, then select "Open" from the menu. It will ask if you want to "open it from" . Answer yes, it'll move it then open it in the app. Back-arrow to drop out of the app, then do it for the other files as needed.

  • If you're looking for something to select, but it doesn't seem to have it there, use a tap to select the thing you want.

  • If you're selecting a directory, and tapping on it gives you "Empty" (meaning it has no subdirectories, by the way, not that it has no files. It about gave me a heart attack the first time I saw it), then press the OK button below the screen.

  • Be patient. There are many operations that seem to have an I/O delay associated with them.

  • If you've been patient, try again. Clicks and touches can get missed if you're going too fast at some points.

  • You can use the rocker switch on the side as well as the four-way switch on the face to scroll.

  • If you're sick of hearing beeps while using the ebook reader, put it in Meeting mode. You'll feel the shake while you're reading, anyway.

  • Usually you can briefly press the hang up button when you're at the top window to lock the screen. But sometimes it won't respond to a short press. Press again, and hold, then select "Lock Screen" from the resulting menu.

  • Expect everything to be slow if you're running a large video.

  • When answering, the screen may be slow to respond if you tap the "Answer" button. Use the pick-up/call button on the face of the phone--the one that looks like an old phone receiver turned upward on the left side.

  • Have I mentioned patience? Overall, the phone works nicely, but there are points where it seems to pause for a moment, and other times when the menus don't seem to give you the right choices.

  • If a menu doesn't seem to have the logical choice, check selections on the screen if you've been navigating through the physical keys. Vice versa if you've been navigating via the screen. At some points you can only make selections one way or the other, but not both, it seems.

  • Remember that the camera takes the picture after the camera shutter noise. To avoid smearing, keep holding the camera steady until it displays the completed image.


Good luck!


My Articles on the Sciphone G2:

Tuesday, July 7, 2009

Bluetooth Headset for the Sciphone G2: Round 2

I had a little trouble getting my new Bluetooth headset to charge up, but now it's charged and ready to go.

Samsung WEP200 Bluetooth Headset
Blue Light=Good
It paired up with the Sciphone G2 just fine, the only hiccup was getting the correct menu (I'll post a step-by-step on my website soon, but it's not difficult.) Once paired, the phone switches automatically between the Bluetooth profile and General profile automatically depending on whether the headset is powered up or not.

Note: You'll want to make sure that you've got a reasonable ring tone set up for the Bluetooth profile, it won't default to the same one as your General profile.

Once on Bluetooth, everything worked great. The sound is good, there is no noise in the background as there is with the included wired headset. I'm still working on that problem, but Bluetooth is certainly a reasonable work-around.

Upshot is, if you're a frequent headset user (while driving or whatever), expect to purchase a Bluetooth headset to use with this phone.

I looked at the headsets at retail outlets, and choked at the prices I saw. Fortunately, I found that online prices are far more reasonable. I've linked the unit I bought here:


It's a pretty basic unit, no stereo but inexpensive, comfortable to wear, and it has good sound. The buttons are large enough to use easily while you're wearing it. Some headsets I've seen have volume controls that are impossible to use without pulling the headset out.

I'm still new enough to wireless headsets that I feel like I ought to be quoting Lieutenant Uhura while I'm wearing one, but nonetheless I'm happy with the one I got.

Also, the charging problem is easy to overcome once you realize it's there. If the light is flickering when you set the headset in its charger, take an extra moment to seat it properly. It's obvious once you know.

My Articles on the Sciphone G2:

Bluetooth Headset for the Sciphone G2: 1st Lesson

I picked up a Samsung WEP 200 Bluetooth headset to use with my Sciphone G2. I got it online at a great price. There were other headsets, but I wanted something with usable buttons, not something miniturized to the point of uselessness. The WEP200 looks like it'll fill do what I want, from the reviews I've read.

It arrived yesterday. I haven't used it yet, though. Step 1 in the instructions is to charge the headset in its little carrying case charger module.

The instructions say it'll take 2 hours to charge. So I tucked it in, and got a red LED which it is supposed to display until it charges, at which point a blue LED lights up. Well, after waiting overnight the red LED is still on. Sort of.

It's actually flickering a bit. Just a little, barely noticeably. I opened the case just now and fiddled with the headset. Now the light is on solid red.

Lesson 1: If the little red LED on the Samsung WEP 200 headset is flickering, it's not going to charge in two hours. It's not even going to charge overnight. Fiddle with it until it doesn't flicker.

More later, as events transpire...

Once the LED turns blue.

My Articles on the Sciphone G2:

Monday, February 16, 2009

Black Screen Saver for Mac OS X Leopard

Black Screen Saver for OS X Leopard. No Downloads Required.

My wife has a new computer, an Apple 24 inch Aluminum iMac. The screen on it is beautiful. It's brighter and has a much better range of viewing angles than my 20" Aluminum iMac (which display is pretty awful compared to the wonderful display in my old white 20" iMac that the Aluminum was supposed to replace.)

My wife's computer lives in the living room of our house. She likes to have it there so that she can be around her family while doing bills, working on video transfers, and so on.

This is the same room of our house that our TV resides in.

When we're watching a movie on the TV, that big, beautiful screen is serious competition for the TV. Annoyingly so. On her old computer, my wife had a standard screensaver for the system that would turn the screen black. That option was not provided on her new computer. On the old computer, the monitor was a separate piece of equipment from the computer itself. So the monitor could be switched off, if need be, while the computer was still running, perhaps encoding a video for writing to DVD. The iMac is all one thing. There's no separate power switch for the display.

Well, in fact there are ways of making the screen go black on the iMac. But they weren't obvious to us when we were preparing to sit down to a movie last night with the evening slipping away while we were fussing with a computer instead of starting the film.

What we expected to find was a screen saver in the Screen Saver section of System Preferences that would simply make the screen black. What we didn't find (mind you, we're not Mac novices around here) was the "Put the display to sleep" option under Energy Saver that would have done pretty much what we wanted--except that it can't simply be activated on demand, like a screen saver. (And exactly how one activates a screen saver on demand on a plain-jane Mac is yet another issue.)

An internet search turned up the Basic Black screen saver. It's donationware and I wish them all the luck in the world. It does exactly what's wanted. How much it's worth to someone should have nothing to do with the fact that we're talking five minutes with Quartz Composer, tops, to make the thing. It's like the old joke about the auto mechanic's bill presented after tapping on the car's engine to make a problem go away: $1.00 for the tap, $99 for knowing where to tap.

There are a couple of Quartz Compositions already on the Mac that can fill the bill.

They're in the Macintosh HD/System/Library/Compositions folder on a standard Leopard install.

Monochrome.qtz turns my screen black. I haven't looked at the QC script to see that it does it in all instances, but it seems to do so.

XRay.qtz turns the screen black with some very brief, and very subtle, flashes of dim, dim light every so often. The flashes are dim enough that they could easily pass unnoticed in normal lighting.

To make these available to Screen Saver in System Preferences, use Finder to copy these files from Macintosh HD/System/Library/Compositions to Macintosh HD/Library/Screen Savers. Then they will be available under the "Others" section at the bottom of the screen saver menu. They could also be placed in Macintosh HD/System/Library/Screen Savers but they might be lost through an OS update (though I would tend to doubt it.)

Another option:

You know that picture you've got in iPhoto of the inside of your camera's lens cap? The one labelled "Black Bats in Coalmine at Night During New Moon"? You can use it as a black screen saver, too. We didn't have ours available last night. So we ended up turning the iMac around so that the screen wasn't facing us during the movie.

Not what I expect to have to do with a Mac, I can tell you.

Edit:

I took a look at Monochrome.qtz. It'll show black for you. It wants an input image to convert to a monochrome image. No image, it stays black. It's overkill versus an even simpler Quartz Composer script to just show black, but hey, it does the job as-is and all you've got to do is copy it from one directory to another--no programming required.