Showing posts with label AVR. Show all posts

Monday, August 13, 2012

Parallax Propeller + Cosmac Elf = ?

I've started working on one implementation of an idea I've had for a while...

There's this neat old 70's computer system called the COSMAC Elf. It's like a lot of the microprocessor trainer systems of the time, but it's got some unique abilities that make it a bit more interesting to build, and expand on, than some of the others.

Video output being one of the biggies.

Step One
Before I go further, here's a look at an early step in implementing my idea:
An 1802 CPU on a breadboard connected to a Propeller Quickstart board for power and clock.
A first step: Power and Clock from the QS Board to the 1802. (Click for bigger image.)

Here I've gotten to the point of getting clock and two levels of power from the Quickstart board to the 1802 CPU. First, I had a crystal oscillator circuit providing a clock to the 1802. Only 5V power came from the Vin on the Quickstart board.

Then, I split the voltages. The crystal oscillator, the inverter for the clock signal, and Vdd for the 1802 were split off with 5V power, and the rest of the circuit was put on the 3.3V power from the Quickstart board. At this point, I'd been running the 1802 at 1MHz, slow enough I could easily watch the LEDs on the address lines changing as it ran.

Then I moved up to a 2MHz oscillator. The 1802 was still good with that, with its Vdd at 5V and Vcc at 3.3V.

Then I tried to get fancy.

I took an output off the Prop and tried to use a repeat-wait structure to clock the 1802. It worked, up to a point. But I got to where I was unsure of my actual frequency, and the 1802 stopped running at a slower speed than I expected (I thought.) In fact, I was getting too clever and messing myself up. Looking back, I was probably somewhere above 4MHz when the 1802 refused to run any more!

After a while I realized that, and just decided to put the crystal oscillator back in.

Then I took another look, and decided that a 5MHz XI off of the QS board could be used as a clock base. A 2.5MHz clock would be fine (actually, anything from 1.76MHz on up would be fine.) Most Elf computers run somewhere around 1.76 to 1.79MHz to accommodate the clock for the video IC they use. Getting at least that speed is pretty much a must for me to feel like this project is going where I want it to. But getting a faster clock would be even better, as we'll see.

First I dropped in a CMOS part--a 4013--to act as a divider for the 5MHz clock to drop it to 2.5MHz for the 1802. I forgot that at 5V the 4013 only really works up to 4MHz on its input. So that turned out to be a waste of time.

Then I dug out a small supply of 74AC74 ICs, which work fine at well 5MHz and above. It worked fine, dividing the 5MHz down to 2.5MHz. In fact, just to be a little conservative, I used both flip flops to divide the clock down to 1.25MHz, then ran that to the inverter I'd had the crystal oscillator going to.

That worked, so I tried the 2.5MHz output. At first the 1802 wouldn't run, I pushed the Reset switch, and noticed the clock took off when I bumped the Ground wire. Once the ground wire was back in its place securely, the 1802 ran just fine at 2.5MHz.

Then I bypassed the 4049 inverter, the signal from the 74AC74 is plenty strong enough to drive the 1802 by itself.

That was step one. Time for a break before step two.

The Plan
So why hook up an old CPU to a fast modern CPU like the Propeller?

Because of a problem with getting chips for the old Elf computer.

People still like building the old Elf computer. It's a complete computer system that can be built in an afternoon if you've got all the parts and tools at hand (I built my first in about four hours.) It's a computer that pretty well exposes all of its parts to examination, so it's easy to learn how it works, and to understand all the bits of the system.

The video IC, called the CDP1861 Pixie chip, is one of the simplest video ICs ever made. It's basically some timing and control signals wrapped around a shift register that works with the DMA mode of the 1802 to produce a really nifty one chip video interface.

It's not exactly workstation graphics, being monochrome with resolutions ranging from 64 x 32 to 64 x 128. But it does the job. People program the system using this quality of video. And you thought the Vic-20 was low-res!

Well, the problem is that in the past few years Pixie chips have pretty well become Unobtanium (a term that goes way back before the movie Avatar, by the way.) In other words, you can't get 'em. There have been a couple of less than optimal replacements (from the perspective of new ELf builders who have to make them up themselves rather than just buy one pre-made.)

I'm trying to come up with something slightly less suboptimal. And solve a problem that the Pixie chip has.


The Third Cycle...of DOOM

The Pixie's problem is that its timing only deals well with 1802 programs that use instructions that take two instruction cycles or less to complete. There are two instructions, Long Branch and Long Skip, that take 3 cycles. They create jitter in the video by throwing its timing off.

Since the Elf's video is basically just a straight bitmap of a chunk of memory on the screen (the lowest resolution, 64 x 32, is a map of the Elf's base 256 Bytes of memory straight to video.) So, if some other circuit could just read a relatively new, fast RAM in the time when the 1802 isn't reading it, then the other circuit could just pull the data then run it to video, and leave the Elf none the wiser.

That way all the Elf has to do is manipulate the data in the section of memory on the screen. And a 3-cycle instruction won't cause any problems. And the 1802 gets about 40% of its time back, during which it would otherwise have been doing DMA of that memory data to the Pixie chip's shift register.

So:
Video that doesn't need the unobtainable Pixie,
No 3-cycle instruction timing issues,
No loss of 40% processing time to video DMA, and
Able to run at higher clock speeds.

Sounds like a winner, right?

Implementation Details

Next was how to actually implement it. I've looked at several ways, with various advantages and disadvantages.

Using faster RAMs was a first building block I looked at. For example, a static RAM pulled out of a 486 motherboard's cache RAM would be more than fast enough. Both 20nS and 15nS are readily available. Plenty fast to grab a byte once every 1802 instruction cycle for the external video system.

Then, came my initial thought, maybe use an Atmel AVR microcontroller to do the grabbing, put the data into its internal RAM, use that as a frame buffer for some bit-bashed monochrome video. No big deal.

No big deal if you've already got the ability to program AVRs or are prepared to supply them preprogrammed. Still, not a bad solution. Just not likely to be popular as I'd like because of the hurdle of programming the chip. The idea wasn't just considered with an AVR, any of a number of uC families could work. But they had the same problem.

Another idea was to build a circuit from random logic. Not as appealing, with my schedule, but if I could be the pioneer on this and put something together then anyone could order the parts and start wiring. It would probably add about 1/3 to double the work to assembling an Elf computer. Again, not perfect, but possible.

Then I thought about taking the AVR idea and putting in a Propeller board. The advantage here is that, rather than getting a bare microcontroller and having to get the infrastructure to program it to do the One Job that that user may ever use it for, the board itself is all the infrastructure needed. (Yes, Arduino occurred to me, too.)

A download on a computer, a USB cable of the correct type (I'm using a cell phone charging cable), and you're in business. Even if the user never does anything with a Propeller again (what an unfortunate thought!) then they wouldn't be out anything but a bit of their time to get the "part" they need programmed for the job.

And it's less time than hand-wiring random logic on a perf board, no matter how you look at it.


It Just Keeps Getting Better

So, I started with the idea that the speedy (80MHz) Propeller would have no problem sneaking in and reading bytes out of the Elf's RAM during those long, lazy ~200nS slack periods. Then it could put the data into an internal frame buffer.

And, what hey!, the Propeller has built-in video. I could make it so that the final Propellor program puts out Composite baseband, Composite broadcast, and VGA all at once. What a deal! The user doesn't even have to pick between different programs based on what sort of video they want right now.

Then came the next idea. Replace a chunk of the Elf's RAM entirely. Let the Propeller be a chunk of RAM.

It can't replace all the possible RAM of an Elf in its present version. It's only got 32K of RAM in it, and it needs some of that for any applications it's running.

But, it can replace a chunk of the Elf's RAM. Enough for Pixie-quality video. And with some lines used for control, the video resolution and frame buffer location within that memory can be changed. I don't know yet, but it seems like mapping somewhere from 2K to 4K wouldn't be that difficult.


Pixie Compatibility

At first, I'm going to concentrate on a limited memory map, and on replicating the basic Pixie mode of 64 across by 32 high. In spite of the fact that there won't be any actual DMA transfer needed, it should be able to display video from the basic Pixie video programs like the iconic Starship Enterprise video from 1977 without modification. They'll just run faster as a result of no DMA overhead. I think.

Then looking at the exact details of how an expanded Elf uses the other modes (if it does, I've never done so myself) will let me look at expanding the Propeller's memory map area and responding to the Elf's control to do that.

So, if I can do what the Pixie does without requiring DMA, I'm already getting a system that's about 40% faster even if I don't move up the clock speed from ~1.79MHz. (The 1802 was the original overclocker's chip, way back in the 70's, but that's another story.) If I can increase the clock speed even more, with no effect on the video (since a hard-clocked Pixie chip isn't there any more), then I've got a system that'll run such things as Chip-8 and Tiny Basic that much faster than an original Elf with a Pixie.

If the 2.5MHz setup turns out to work (I see no obstacles at present, but that just means I haven't run into them yet), then I'm getting a system that should run about 2.3x faster than the stock Elf. It'll still be no speed demon (that's not the point), but it'll be nicer to use.

Next Steps, Baby Steps

I'm going to write a program for the Prop to make it pretend to be a RAM for the 1802. It will be a simple 256 byte memory. That avoids the multiplexed signals for the address. It'll (hopefully) receive and store data bytes from the 1802, and deliver data from its store on request.

The first pass is going to be really, really simple. I'm going to set up an array, put in a short program to blink an LED on the 1802's 'Q' output, and set it up to respond to the 1802's memory read requests. No writes required. If that works, then I'll add write capability and put in a program to test that (again using Q as an output.)

If that works, I'll proceed to give the 1802 some more sophisticated output and input capability and see where it goes from there. But best not to plan in too detailed a fashion too far ahead until the immediate problems are solved.

Wednesday, February 16, 2011

R.I.P. HFE Electronics, Sac's Electronic Part Source

I wrote a post about the HFE Electronics Store last year. They took over the former HSC Electronics store here in the Sacramento area. I drove by today, and the store was empty.

HFE Electronics. A Valiant Effort, but Now It's Gone.

It looks like they went out of business two or three months ago, based on their Facebook discussion page. I only got down there four or five times a year, but I usually stocked up on parts, tools, and supplies on each trip.

Unfortunately this leaves me without a local storefront supplier for electronics. Our local Fry's Electronics carries enough in the way of components and such to make up for what Radio Shack dropped from their line a few years ago. But the selection of parts like interconnects, switches, and prototyping components they had at HFE was far greater than I'd expect to find anywhere other than an old-fashioned electronics store.

I do buy a lot of parts online now, I'll admit. I have about two shopping sprees a year for parts from places like The Electronic Goldmine and BG Micro. Not to mention frequent buys of parts from regular suppliers like Jameco, Mouser Electronics, All American Semiconductor.

But there's a difference.

At a local storefront, the parts are in my hands today. Plus, I can see them and handle them. With items like switches this is extremely important. I can also buy parts in small quantities speculatively then come back the next day if they work out and I need more (I've done this several times over the years at HFE/HSC. I remember once buying over $100 more in components on both days than I had planned on buying on each of two consecutive days. As I recall, the main culprit was some displays one the first day, and some uP support chips the second.)

Another thing that's important about local stores is their accessibility to youngsters getting into the electronics hobby. I know that for me when I was young, and now my daughters, fishing through boxes of parts and imagining what could be done with them is very inspirational. A couple of the fellows at the shop I haunted in my teens (Wenger's Electronics in Walnut Creek, CA) mentored me on several of my early projects. Plus there was advice I picked up from other customers. Not to mention that Wengers had a rack of bubble pack parts from Jameco, where I got my first 8080A.

A Long Time Since

I've been shopping at what was HSC and became HFE since I moved to the Sacramento almost exactly 25 years ago. Back then, I lived just a few blocks away. I not only stopped by in the evenings (if I had to run out in the evening for something, hey, HSC was next door to a Circle K store. How convenient is that? Pick up milk and potentiometers on the same trip out!) They had great flea markets on the weekends. You could pick up most of an Altair or IMSAI for a song back back then, enough that a little TLC would get you there (I wish I'd picked up an IMSAI for the front panel.)

There were other electronics stores* in Sac back then, plus I was right at the north end of town so it was easier to get to places like Natomas and Del Paso Heights for those stores. Since I moved to the foothills, HFE has been where I go.

This is where I met Dave Baldwin. I followed him home to get a treasure trove of old computer and parts he was seeking a home for. It's where I picked up about half of my test instruments, in various states of operability, that I use regularly today. It's where I've picked up interesting bits for many projects, and bits that still inhabit my parts drawers awaiting future fun projects.

I'll miss it.
----------------------------------------------------------------------------

Note: If you know something else in the area that I don't seem to know about (I already know about Fry's and Radio Shack, obviously), then drop a comment or an email, please!

*I'm using the term "electronics store" to refer to what I consider to be an electronics store, which is not a place that primarily sells consumer electronics. We used to call those "TV shops" or "Stereo Stores". I'm rather perturbed by such places moving in on the term "electronics store" (though many old-line electronics stores were once TV stores or repair shops.)

Tuesday, August 10, 2010

Cornell University's AVR Projects: Hobby Inspiration, Teaching Inspiration

The ECE 4760 class at Cornell University posts their student projects for the class. There are several years' worth of class projects there, of all sorts. The class uses the AVR microcontroller, a very nice platform that I enjoy using both professionally and personally.

For personal use, I really like the Cornell site since it not only gives me ideas, but it lets me see implementations others have made (or attempted) of ideas I have for my own projects. The reports are usually sufficiently detailed that I can either replicate or build on the students' solutions to particular problems.

An AVR STK 500 development board in a custom case

Teaching Inspiration
I also find the site very inspirational as a teacher. Seeing the sort of results, rescopings, and occasional failures of the class projects undertaken by the students in this class is very valuable to me. I end my high school computer class with a project each year. My students go through the same set of compromises, adjustments, and triumphs as the students in the Cornell ECE 4760 class. While I know it's normal, it's also reassuring to see the "raw data" from another class in the form of the students' reports on their projects. It gives me a sense of where other instructors are in the scale of setting challenges before their students versus the results. Clearly the Cornell class is a challenging and dynamic class. The projects they undertake are exciting, and the results, even when less than hoped for, are exciting as well.

Plus, it makes me feel good to see that the much lower level and smaller scale challenges I present my students produce similar results. I can only hope that some of them get to go on to experience something like the ECE 4760 class in the future, and that I've helped prepare them for such things.

Wednesday, March 31, 2010

HFE: Sacramento Area Electronics Parts Source

There's a neat little place in Sacramento--next door to North Highlands--that sells lots of electronics supplies and surplus stuff, as well as some consignments. It's called HFE Electronics. It's at the prior location of HSC (Halted Specialties Corp., better known as HSC Electronic Supply.) HSC decided to consolidate, pulling out of the Sacramento location after over 25 years and focusing their attention on their Bay Area store and online sales.


HFE fills the gap that would have been left with the loss of HSC in this area. Not only that, but they've picked up for the Popkey Electronics store that recently closed here. They bought out Popkey's stock and are integrating it into their inventory now.

HFE is a fun place to poke around, ask questions of the staff (or, in my case, I more often get involved in helping the staff answer questions from other customers) and otherwise pick up all sorts of fun bits of electronics. They have everything from discrete components to ICs to equipment. There's new retail stuff as well as heaps of surplus and used stuff. There's lots of bits and bobs for those of us who like playing with microcontrollers, those of us who like building up analog circuits from scratch, amateur radio people, digital electronics types, tinkerers with pre-existing equipment, repairers of the $100 item with a broken ten cent part, and so on. Count me in all the above categories. I seldom get out the door without being about $100 lighter. :)

Among the things I noticed my last time in (no guarantees this will all be there when you walk in, especially if I beat you there) are:
  • An Odyssey 2 game console from the 70s (based on the 8048 CPU, with lots of room inside the case for mods!

  • Some Tek scopes and modules

  • An old Mac SE/30 unit (sans keyboard and mouse.)

  • Lots of interesting rocker switches

  • A bunch of LCD displays with 44780 controllers and similar

  • Oodles of LEDs and displays (I've picked up a bunch of dual digit 14 segment displays, among others.)

  • Prototyping boards, tools, wire jumpers for solderless breadboards, and other proto stuff.

  • Interconnects and sockets of all sorts of varieties.

This barely scratches the surface, and while some things are one-offs (like the Mac and Odyssey 2), much else is regular stock stuff. So if you're ticked about the fact that "Chicken Shack" doesn't have your favorite digital latch any more, take a stop by HFE Electronics.

Monday, September 28, 2009

8085 Trainer Project

I've posted a web page on my 8085 micro trainer that I'm building. I've posted instructions on building the system up just as I'm building it, along with my notes.

To date, I've posted instructions that go through getting the core system running with a memory, adding switch inputs through interrupts, and giving the 8085 an LCD display as an output. I'm presently integrating the LCD driver code with the interrupt code, then I'll add a keyboard to the system.

This system will be a small, hand-held micro trainer. It's intended for easy, anywhere machine language programming of an 8080-compatible system, for those of us who find such activities fun and relaxing.


Check it out >>


Yes, I do machine language programming for relaxation. I also crochet Irish lace and embroider knotwork patterns for relaxation. I like things that are mentally engaging, but that can proceed at a casual pace for unwinding at the end of the day.

In case I'm really fried at the end of the day, I keep databooks stacked on my bedside stand.

Have a look at my electronics web pages.

Monday, April 13, 2009

AVR Project Posted: Dual Hexadecimal Display Driver

I've posted another AVR project at AVR Freaks and on my website. It's a simple project, but a useful one. It's a dual hexadecimal display driver. See it on my AVR page or at AVR Freaks It uses an AVR ATMega8 microcontroller to convert a byte of data into an LED display pattern for two displays, each one showing one digit of the hexadecimal number that represents the data byte.


The display driver in action. This isn't part of a Christmas Carol, or The Sound of Music. It's the number 250 in hexadecimal (base 16.)


It's set up to let you use either 7 segment LEDs, which are common and cheap but don't do a good job at showing an attractive letter 'B' or 'D', or 10 segment LEDs which show much nicer B's and D's. You can also use 15 segment LED displays as 10 segment displays, as I do.


The value 189 in hexadecimal as "BD". This is the 7-segment character set. Seven segment displays are cheap and plentiful. But, ick.

Here is 187 in hex using the 10-segment character set. Much nicer!


Check it out, burn a chip, build a clock that'll confuse the guests, or put a data bus monitor on your Commodore-64. C'mon, you know you've always wanted to. ;)

Note: AVR Freaks has had to shut down the posting of project files for security reasons, so the resources at my AVR page are more complete, including an applications note for the project that shows how to use it in different circuits, with different display types.

Wednesday, November 5, 2008

Improving the Atmel STK500

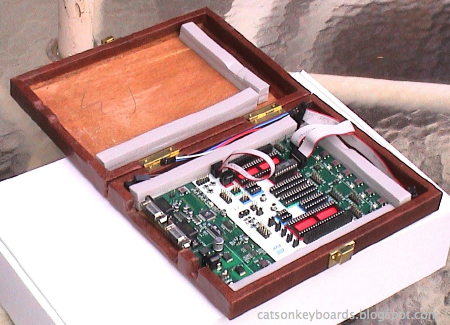
Atmel STK-500 in an attractive case
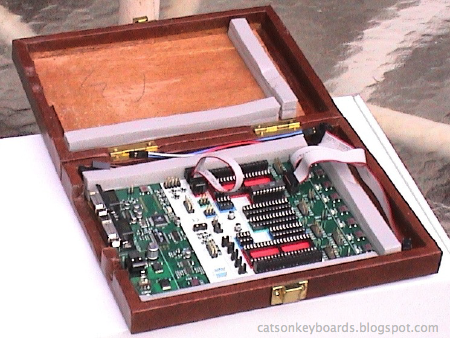
One of my new STK-500 boards inside the case I modded for it.

I recently bought two new STK-500 development boards from Atmel. I've had one for years, and it's been very useful to me when working with AVR microcontrollers. There are a few faults with the STK-500 however. One is that it doesn't provide for mounting in a case. There are no mounting holes, and the components on the board run out to within a millimeter or so of the edge, so there's not even room to put the board on rails.

STK-500 board with rails along edge, showing the components are too close to the edge for the rails.
The components don't provide enough clearance at the edge of the board for mounting rails, and there are no mounting holes on the STK-500 board.

My old STK-500 lives in a cardboard box for a 5-1/4" hard disk drive. It's worked out well, even if it's not very attractive. It lets me keep dust off the board, and it keeps people's fingers away when I take it out in the living room to program chips while I'm in my easy chair. It also lets me put it on a shelf safely when I'm not using it.

Cardboard case for the STK-500. Stylish permanent marker on the side keeps it from looking like trash.
My old STK-500 inside its box. The markings on the side keep me from thinking it's an empty box that belongs in the trash.


The connector cutouts at the end of the old cardboard box.
Here are the cutouts at the end of the box to let me get at the connectors on the STK-500.


My old STK-500 inside its box with the lid open.
The STK-500 inside the box.

I have to open up the box to turn the STK-500 on and off, but that hasn't been a problem. It usually only happens a couple of times a session.

When I got two new STK-500s recently, I originally figured I'd do the same thing with them. When I went looking for boxes, though, I couldn't find anything of the correct size. I haven't bought any hard disks this large for long enough that I've either used or thrown out the boxes of this size.

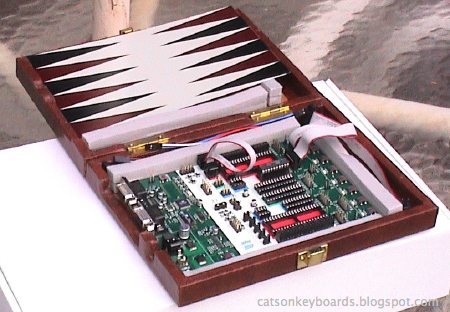
A trip to the local thrift store turned up a travelling backgammon game set that was just the right size. The plastic moldings for the game pieces and the metallic game boards came out easily. If the STK-500 had fit in alongside the game piece holders I probably would have left them as storage space for cables, but they were a bit too wide.

The new STK-500 case with one of the backgammon board pieces that was originally in it.
The case started life as a backgammon set.

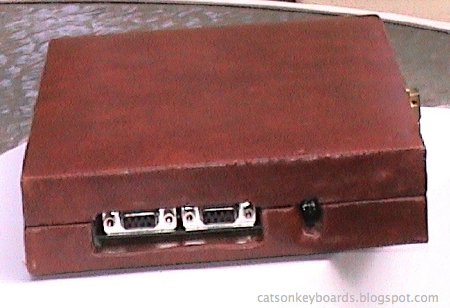
The adhesive on the vinyl covering was pretty dried out, so it wasn't hard to pull it up and away from the wood underneath. I set the STK-500 inside and marked the power and RS-232 connector locations on the wood with a pencil. A couple of sessions with a Dremel milling bit and test-fits later, I had the connector cutouts where I wanted them in the wood. The next step was fitting the vinyl to the new shape of the wood.

The new case with connector cutouts.
The connector cutouts.


I started by cutting the vinyl for the big cutout first, with yielded a sizable scrap of left over vinyl to use to cover up gaps and mistakes elsewhere. To attach the vinyl back to the box, I used the tail end of a can of spray-on contact cement that was sitting on the shelf going to waste. Brush-on contact cement would have worked just as well. I cut and folded the vinyl pretty much the same way as I would gift wrap around the wood. The results aren't perfect, but they're good enough for someone who's looking for something more classy than a cardboard box.

A closer look at the end of the new case.
The business end of the case. If I plug cables into the connectors I can cover up any flaws in my work before the guests arrive.

To support the board inside the case, I used some self-adhesive closed-cell weatherstripping. The closed-cell variety is stiff enough to hold the board and to hold its shape. I used 3/8" weather strip, two layers high. There are strips on both sides of the board to hold it in place, and a strip across the other side to hold it up against the side with the cutouts. The strips only need to be one layer high to hold the board. However, I want to be able to store jumper cables in the box without having them rattle around across the board when I move the box. So I stacked sections of weather strip on both the base and the lid of the box to fully enclose the board inside the box when the box is closed. The standard STK-500 jumper cables fit nicely in the extra space along one side and the end of the box.

The STK-500 held and enclosed by closed cell foam strips with space for jumper cables outside the strips.
The board safely held by the foam strips, with extra jumper cables stored safely along the sides.

Now I'm going to have to hit some more thrift stores. I've still got one more board to house, and I think my old one will get jealous if I don't find it a nicer home, too.

The finished case.
The finished case. Too stylish for the laboratory?

Friday, October 31, 2008

Atmel STK-500 Starter Kit for AVR: Now with Death-bots

I've been programming the Atmel AVR microcontrollers for some time, I got started with the old AT90S1200 a long time ago, and I've been enjoying programming them ever since. Shortly after I started using them, new chips came out that I couldn't program with my Xeltek SuperPro/L programmer. So I picked up an STK-500 starter kit to use as a programmer and for light prototyping of AVR circuits.

My old STK-500 has gotten quite a workout. I've used it with a lot of different AVRs and built a bunch of other prototyping hardware around it. Unfortunately, I usually have more than one project going at a time and often I'd like to use the STK-500 for more than one. It's also a pain to change the configuration of the board to and from some chips, like the ATTiny26, one of my favorites.

When I ordered some of a new model of AVR the other day (ATTiny13A, a big upgrade from another of my favorites, the ATTiny12), I decided to pick up two more STK-500s (I wish I'd decided to get them back when they were only $50, but oh well.)

The STK-500 itself is pretty much the same, except that it's lost the serial memory IC that they had on-board (which I never use.) But the packaging has changed significantly:

STK-500, Now with spear-throwing cybernetic Odin kill-bot.

STK-500 boxes. Old on right, bigger new box on the left.


The old box is nice enough. It's got that "Wonders of Science" look to the art that reminds you of the stuff they tried to dress up at school to make it seem interesting when in fact it was a drab treatment of something that could have been interesting before the educational system sucked all the life out of it.

The new box is something else again. When I got it, I wondered if the increased size and the new art meant something. Like maybe a spear-throwing one-eyed Odin kill-bot inside? With cyborg Hugin and Munin?

Unfortunately, no. If I want an AVR-powered kill-bot I'll still have to build it myself. The increased size of the box just provides more room for the STK and its cables inside. The preprogrammed board demo still just uses switches to make an ATMega8515 flash LEDs. No Doom-Spears or all-seeing crows to report back to you what you've been missing in the neighbor's yard.

I was a little disappointed that they didn't throw in an extra IC this time. My first set included a sample ATMega163 as well as the AT90S8515 that ran the demo program. It also had a hardcopy parametric list of AVR devices that were available at the time. The set still includes a fairly current CD with software and family data on it, but no additional chip samples. A free ATMega644P would have been really nice. ;)

Still, I got the main thing I wanted. New STK-500s. Now I can work on three things at once without having one project wait on another to finish. And I've got cool pictures of a Norse microcontroller robo-dude. I think I'll take one into my classroom to hang up on the wall.

Edit: One thing the new STK500 comes with that the old one didn't is a handy little JTAG adapter. That's got more long term utility than a hardcopy user's guide, I guess, but I still miss getting the guide with its listing of the LED blinker demo program in the back.