Showing posts with label cnc. Show all posts

Wednesday, March 1, 2017

3D Text from an Image in ZBrush


(Skip to the brief step-by-step directions)

Here's a simple process I use to create raised 3D text for my CNC in ZBrush. It has many other uses, too, of course, and can also be used to create any
sort of embossed or raised pattern you wish.

The raised object can also be used with ZBrush's solid geometry tools as a subtraction mesh to create indented text or patterns.

Create the Image

Create an image file of the text or pattern. ZBrush accepts .jpg and .psd and probably other common formats as well. I usually use .psd files, as they can also be used in other ways with ZBrush, but .jpgs work just as well.

Set a high resolution for good detail. I use from about 1400x1400 to about 2500x1500

The letters should be black on white. You can also do white on black, but I find that it's easier to see what's happening in ZBrush using black on white, since the black area will be transparent in Spotlight in ZBrush. Leave a margin around your text or design, about 2 or 3 letters wide works well. Save the image and go to ZBrush.

Set Up an Object in ZBrush

Append a 3D plane to your project to put the text on initially. You want enough resolution in the object to take the details of what you're projecting on it. Dividing it 6 or 7 times should do the trick. I usually have smoothing off when doing this, but since a plane doesn't get smoothed except around the edges, it doesn't matter much. Delete the lower subdivisions.

We will get a consistent height on the projected text by using the Layer brush. Layer brush always builds to a set height for a single stroke. So we will be doing the whole projection as a single stroke of the brush across the mask we'll be making from our image. If you mess up--don't cover all the text in a single stroke, or accidentally do multiple strokes leaving the projection of unequal height, then use Ctrl-Z to undo and try again. On large projections it often take me a few tries to make sure I cover it all and don't bobble the stroke (I usually use the mouse for this rather than my tablet, in fact.)

Select the Layer Brush, set your brush size well larger than a single character in the center ring. Set Zadd on. Make sure Material (M), MRGB and RGB are off.


Import the Image

Import the image into ZBrush's available textures in the texture menu. Clicking on the Texture Off thumbnail will bring up a menu with an Import button on the lower left side. Use that to select your image in the filesystem. You should now have a thumbnail of your image in the Texture menu.

Now you need to get it into Spotlight. This requires using the unlabeled "Add to Spotlight" button (See ZBrush: Finding the Hidden Spotlight for information beyond the image below.)
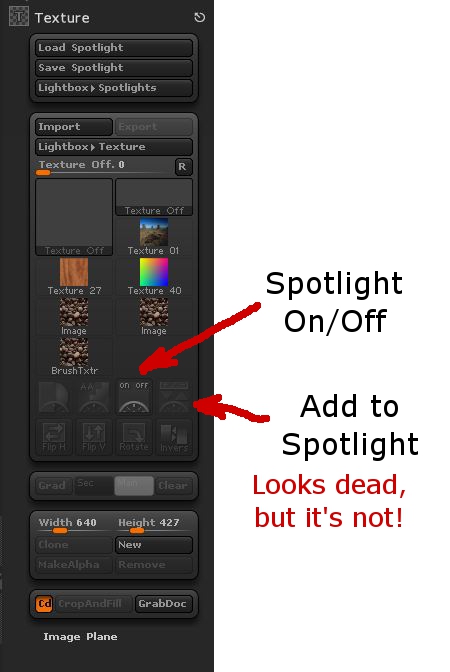
Image showing Spotlight Buttons

Then, if Spotlight doesn't turn itself on, do so, and use its tools to position your text (or design) over the 3D plane. It should have some extra plane on all sides of the text, but not a lot. In fact, the blank area at the edges of the image in Spotlight should lap over the edges of the 3D plane a bit if possible.


Embossing the Text

As stated earlier, we use the Layer brush to emboss the 3D Plane with the "cutout" in Spotlight. In one stroke, with Alt (or Option) pressed to raise the text, sweep repeatedly back and forth across the image over the plane to emboss it all to the same level. The actual level it ends up at doesn't matter, we just want it raised compared to the background of the plane to an even level overall. Once that's done, the scaling and deformation tools in ZBrush can raise it to the actual level you want it at.


To crop away the unwanted areas, put a mask over the text you want to keep, then go to Tools->Subtools->Visibility->Hide Pt to hide the unmasked points. Then go to Tools->Subtools->Geometry->Modify Topology and click "Del Hidden" to remove the hidden points.


Finally, simply grow or shrink the text along the axis that the embossing is raised in to set its height.


Quick Reference, Step by Step
  1. Create a black-on-white high res image of your text or design.
  2. Append a 3D Plane object to your ZBrush project. (Tool->Subtool->Append, choose 3D Plane) Make it the active object.
  3. Turn off smoothing on Divide (Tool->Subtool->Geometry->Smt is not highlighted.)
  4. Divide the plane 6 or 7 times (Tool->Subtool->Geometry->Divide)*
  5. Delete Lower Subdivisions (Tool->Subtool->Geometry->Del Lower)
  6. Position the plane square facing you in the display, zoomed so that it just fits in the display area.
  7. Select the Layer Brush (Hotkeys: B, L, A)

  8. Set Z Intensity to 100% (at top of screen).

  9. Zadd is ON. MRGB, RGB, and M are Off.

  10. Set a large draw size. (Top of screen slider, or Hotkey S)

  11. Load your image into the Texture menu (Texture->Click on Texture Off, click Import on lower left of drop-down, select your image from the filesystem.

  12. Load your image into Spotlight (Click your image's thumbnail in the Texture menu, then click on the Add to Spotlight button--it's top right below the thumbnails.)

  13. Turn on Spotlight (button to left of Add to Spotlight) if it doesn't do it itself.

  14. Position and scale the image over the plane.

  15. Press Alt, hold the left mouse button, wipe brush repeatedly across the letters or design all as one stroke (don't let up the mouse button).

  16. Crop the plane to the outline you want.(Ctrl-Boxmask area you want. Visibility: Hide Pt. Modify Topology: Del Hidden)

  17. Use deformations to stretch the plane the letters are projected in to set the height of the letters.

* Alternately, Divide a couple of times, then turn it into a Dynamesh with a resolution of about 240 or so.

Tuesday, November 19, 2013

ZBrush for CNC Got Better

Yesterday, I learned that ZBrush (my 3D design program) now has an extension that lets it directly export files I can use with my Computer Aided Manufacturing (CAM) programs. I spent most of my work time today testing the output of various designs to see how they looked.

ZBrush has this 'built-in' since version 4R6 came out, it was available as a plug-in before, but since it calls itself a 3D printing plug-in, I ignored it, assuming it was software to sent object data to one or more of the commercial 3D printing services, like Shapeways. Turns out it's an exporter for standard 3D object file formats like .stl.

This is a huge improvement for my workflow of going from design to a finished part prototype in the real world. Before I had to use a very complex conversion program. Its control panel makes the flight deck of a 747 look simple. And if I didn't get the settings just right, I could get some really nasty effects in the final machining. Using the same settlings over again doesn't work, I had to adjust things based on the size of the object, the scale of features on it, the size of the material it would be cut out of, the relative size of the tool, etc., etc.

Now that difficult & frightening step is gone. I do a couple of passes to simplify the 3D object design as much as possible without losing detail (which I was doing anyway, it speeds up everything later), set a couple of simple settings in the exporter, like the real-world size the final object will be, then export.

The resulting files load just fine into the two different programs I use that create the list of instructions for my CNC machine to cut the 3D object out of a solid block of some material (usually a polyurethane plastic). I did a dry run to set up two test files tonight--doing everything short of actually making the parts. Tomorrow I plan to make an actual part from a new file as a final test. Probably something fun.

For those interested in trying this at home, I use both MeshCAM and Vectric's Cut3D for CAM. Cut3D is my usual preference, though I'm using an older version of MeshCAM (4). I prefer Cut3D's interface for setting tabs, and its included machining preview.

Both produce excellent GCode for my CNC (a MicroCarve A4 driven by EMC2 and a Gecko G540 controller.)

For doing image depth maps, I use EMC2's built in facility, though if you want to bypass the copious experimentation & two pages of notes I use to get it looking good, you might want to look into one of the dedicated commercial programs for this.

Thursday, May 3, 2012

Trying to Learn ZBrush, Hitting Lots of Land Mines

After having a lot of fun with the free Sculptris program, and with the need for a more fully-featured 3D modeling program, I decided to buy ZBrush a couple of weeks ago.

Unfortunately, it been a tough road trying to learn it.

I was running into a problem early on where I'd get out of Edit mode (3D editing) and couldn't get back into it. Going from 3D mode to 2D mode is strictly one-way. There are any of a number of ways to do it by accident, and once you do, there's no Undo. After about a week, it stopped happening to me, and now it's not so much of a problem. At first, though, I had no clue what was happening. And the "getting started" information was no help, nor was a search on the terms I could think of on the web site. There were dire warnings on Pixologic's site about saving a 3D object as a 2D image, then not being able to reload and re-edit the object even when you believed you saved it. I hadn't encountered that particular problem yet, but that wasn't my problem.

Finally I found an old video tutorial that's not featured in their "online classroom" any more that explained what is happening, and since I've seen that I've been able to mostly avoid running into the problem, and recovering when I do. Before that, I'd already developed some techniques on my own to tiptoe past that particular land mine.

New Land Mines

Since then I've had my work go *poof* on me in several different other ways. It's not exactly inviting you to explore its features when this keeps happening. My most recent (about ten minutes ago) was trying to add a new subtool to a project.

When I got started, I was mostly just sculpting shapes out of one object, or "subtool" in ZBrush parlance (a single mesh.) I learned how to add additional objects to a scene, but it was awkward enough for me with what all else I was trying to master that I was just avoiding it until later.

Now I've gotten to where not having separate pieces is more of a problem than dealing with adding, aligning, etc. the additional objects.

So I was working with a sort of cartoonish fox head. I had the basic head pretty well sculpted. I added a pair of eyeballs as separate spheres (which is a lot cleaner is Sculptris--there you can add a pair of objects simultaneously and move them fluidly around your reflection plane. In ZBrush you add one, position it, then, so far as I know now, create a duplicate and position it by guess and by golly to a position that matches the first one on the opposite side of the object you want it in. All very clunky.) I decided to do the teeth as separate objects as well. So I appended a new subtool, picked a Cone3D object, used the clunky sliders in the Deformation menu to move it (isn't that a Transformation, not a deformation?) Then I scaled it down to about the right size and slid it more or less in place.

Then I wanted to sculpt its form a bit. I wasn't entirely sure whether it was a primitive or a mesh, and I wanted to subdivide it to create more detail (rule: NEVER be ignorant about ANYTHING in ZBrush. You must understand absolutely everything, it would appear, in its entirety to avoid ending up with nothing to show for your time.) Well, I clicked the "Make PolyMesh3D" button in the Tools menu.

And the complex sculpt I'd gotten to a good state over the prior hour went *poof*. No warnings, no undoes, no saving throw. The head and eye subtools are gone. They don't appear in the available tools when I click "Append" in the subtool directory. I've found things that I thought went poof there a couple of times. Should I mention the times I did a save and had things disappear from view? In those cases they reappear when I click back in the work area. They just disappear to startle me, is the best I can figure.

But my fox head is gone and unrecoverable.

Yeah, I know I should save more often. As it is, I do save very often. I'm filling my hard disk with minor deltas of my fooling around and hoping this starts to be productive projects. I'm disinclined to save every time I click a button. I could wish that when I'm going to click a button that deletes subtools with no means of recovering them I'd get a nice warning, like I do on so many other things that aren't recoverable. I do get warnings on lots of other things, many of which I don't understand what it's asking me or the consequences of my choices, but at least I get a wake-up that lets me save before I start spelunking through my possible answers.

Not All Bad, But Jury's Still Out

The program has a lot of cool capabilities. But the question is whether I'll be able to get through all the trouble to really be able to take advantage of them. I'm two weeks into working with it, and I've got less to show than I had with one afternoon with Sculptris, or for that matter, one day with Sculpt-Animate 3D or Lightwave on my old Amiga over 20 years ago. There are a lot of places where I just don't feel like I've got much control, I'm just hoping for the best, or trying to jigger things with hand and eye.

A lot of sculpting tools behave in odd fashions--at times. If they were like that all the time I'd be able to at least avoid trouble. But they cause geometry problems that are difficult or time consuming to solve. There are other times where you're trying to do something just the way you have been all along, and nothing, or almost nothing happens. Then, suddenly, on another attempt, it shoots off, out of control.

I'm really hoping to make this work, because there's a lot I'd like to get out of this program in producing models for my CNC milling machine. But, if I don't start getting more out of it pretty soon, well, $700 is just too much for me to not ask for my money back. Especially after all the time I've put into watching training videos, reading documentation, and just working with the tool trying to get somewhere that I can reasonably predict the results I'm going to get--without even starting to talk about how much time it'll take me to get those results, yet.

Saturday, April 14, 2012

Parallax Robot Expo

My daughter and I went to the Parallax Robot Expo today and had a great time. It's neat having an event like this only about 45 minutes from home. My daughter has a couple of BOE-Bot robots and a bunch of additional bits she enjoys working with. I'm into anything microprocessor or microcontroller, and I think Parallax is a neat company that makes great products.

We were a bit worried about the effects of the weather. We left home with snow falling and drove through a rainstorm on the way. When we got there it was only raining lightly. Even if it had been raining, everything was either under tents or inside. It wouldn't have been necessary to do more than duck across a few feet of open sky in any case.

As it happened, things only got better as the day went on.

We had a really good time checking out the various demos. They had one tent with activities, laptops set up with boards hooked up to them, where people could get their feet wet in programming the boards to blink lights, run servos, sound off on piezos, etc. We didn't check that out too closely since we can do that at home.

Alongside it was a "Learn to Solder" area with several tables. You get to build an S-2 Robot LED badge. Not an actual S-2 robot, mind you, but a little hang around your neck badge shaped like the Scribbler 2. It's got a 7 color LED on it, a switch, a battery, and some embedded logic. It's a neat little thing and it's entirely free.

I made one though I'm no newcomer to soldering. I had a very helpful young man making sure I prepped the parts properly and oriented them correctly. He was also able to answer my question about whether there was logic embedded in the printed circuit board.

The factory tour was also very nice. They've got some automation they're justifiably proud of. I'm surprised that it appears they actually use a CNC to make production parts. I'd have expected higher volume processes for them.

Also inside was a display and presentation area. They had various talks through the day by very approachable people with experience directly relevant to the attendees. It was interesting hearing them talk about their technical work and their work to develop their businesses. We weren't able to hear all the talks we would have liked.

Back outside there was a tent for vendors--the show prices on Parallax products were amazingly great and there were some other great vendors there, too. There was a show area for other companies, Panavise was among the companies showing there (IMO, yes, their products are worth every dime!)

Maxi Swag
One of the coolest things there, a real unexpected treat, was the Free Stuff tables. There were all sorts of free parts and boards and what I assume was discontinued product. I got a book on programming the SX microcontroller, a Javelin Stamp, some sort of Propellor board, and some other fun electronic "Junque Box" goodies, as did my daughter (I think I'll be showing her how to wire up a CCFL this weekend, there were packs of them on the tables.)

We both had a great time. My daughter got really excited and couldn't wait to get back home to her electronics. We picked up some great project books for her, cheap.

If you get a chance to go on Saturday, I recommend it highly.

Monday, November 28, 2011

CNC Enclosure: A Home for My MicroCarve A4

I originally set up my microCarve A4 on my workbench as I got the various bits and pieces put together and checked out. This was a convenient place to do the work at that time, but once everything was working, there were two significant problems:
  • It was in the open air. Sawdust and plastic chips were flying everywhere.

  • I wanted my workbench back for other projects!

So it was time to take time off from making cool CNC projects and time to make an enclosure. I spent quite a bit of time thinking through what I wanted. If I put the computer and CNC side by side, it'd take up too much room in the shop. I tried a test arrangement of putting the computer below the CNC, the display above the CNC, and the keyboard and mouse in a drawer just under the tabletop that the CNC sat on. This did my neck no favors at all.

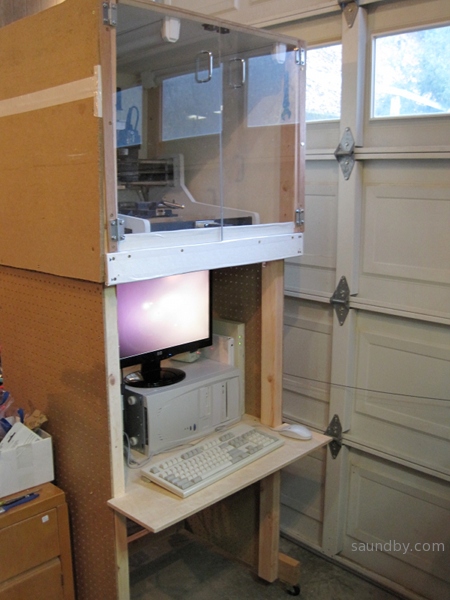
Finally I settled on putting the CNC itself a bit higher, with the computer completely underneath it. This worked out, barely. I had to replace my old CRT monitor with a lower-profile LCD display to get the heights I wanted. It was worth it.

microCarve A4 CNC enclosure, CNC in box on top, computer and controllers on desktop

The desktop is at 26 inches above the floor, the bottom of the CNC is at 48 inches above floor level. It's low enough to handle the tools, parts, and everything else inside as well as keep an eye on the machining as it goes, though an optimum height would probably be a bit lower. A different arrangement of the computer stuff down below could probably allow someone else to make theirs about six inches shorter, if they don't mind looking down at their computer monitor rather than propping it up on the computer cabinet for a comfortable height, as I did.

The desktop holds the computer, monitor, power control center, CNC power supply and Gecko G540 control unit, wireless network hub, keyboard, mouse, and an occasional can of soda (with care).

Another view of the enclosure, and all-in-one roller unit that has the CNC and all of its related electronics in a thirty inch wide unit.

The CNC box has removable panels on the back and sides. The back panel is in three sections, so that a middle section can be taken out for working with stock that's too long for the enclosure. This leaves a panel at the bottom to catch chips, and a top panel to trap some of the high-flying chips. If necessary, one or both of the front doors can be left open with longer pieces, a bottom panel will still cover the lower three inches of the front to trap some of the chips from spilling out. I thought about making sectioned doors, but this project was already getting too complicated.

A look inside the CNC enclosure box at the top of the unit, showing the CNC inside with integral lighting and a power bar for the router spindle.

The top box can lift off of the base with the computer desk. It has small feet that rest inside the uprights on the base and lock it in, as well as a pair of angle brackets that screw into it. Basically the power and control cables that run into the box through the two PVC feed-throughs are are disconnected, the box is lifted off the top of the base (a two-person operation when the CNC is in there!), then set on its feet where ever it suits you.

The base has casters on the bottom, so I can roll it around the shop or out onto the concrete apron outside if I feel like doing my CNC work under the sky. ;)

I plan on adding a vacuum motor and dust trap below the desktop when the urge to take things a step further strikes. I'll cut another feed-through into the box for the vacuum as well as an air intake for the enclosure. Until then I'll just be reaching in with the hose of a nearby canister vacuum to clean things out.

Friday, October 21, 2011

MeshCAM: An Inexpensive Commercial CAM Program

I was recently contacted by Robert Grzesek, developer of MeshCAM, a 3D CAM program. He'd seen my earlier article where I express some frustration with "free" software, particularly for CAM. The free software I tried usually did simple rasterized cuts of the object loaded, with the result that a lot of the design's detail was lost.

Robert offered me a free copy of MeshCAM if I'd blog about it. I took a look at the product information online and took him up on his offer.

MeshCAM is in the same price range as the other commercial CAM program I've been using--it's a hobbyist-affordable program. This is very nice, as so much of the available software is well beyond the budget of an amateur, or a small business where CAM work is a sideline without a large budget.

It's documentation and the tutorials are very good. Having recently gone through some tutorial-based training with some other programs that are from much larger companies in the past few days, I'm pretty well up to speed with what can go wrong with a tutorial. The MeshCAM tutorials are up to date and in sync with the current version of MeshCAM. They describe the process well from the basis of someone trying to get a specific task accomplished, they're not just a description of what appears in the menus.

At first, I wasn't sure that double-sided machining for full 3D objects was going to be covered, but it was, I just needed to stop anticipating possible problems quite so much.

Working with MeshCAM itself, I've opened up the provided files and a couple of files of my own. For the file types it accepts (STLs and DXFs, in addition to its own MCF format, plus a number of 2D image formats for image-based height maps), it opens the files without a problem and displays them properly. Wavefront OBJ files would be a nice addition, but then that's why I've got the open source program MeshLAB (which has no relation to the MeshCAM line of products) which is frustrating at times, but mostly does the job of object type conversion and it's free.

object display for MeshCAM
Above is an example of MeshCAM's display of an object. The way MeshCAM displays its axes is a bit cartoonish, but at least you won't have to worry about missing them. They can get in the way of small objects in the display screen. There may be a way to deal with that by changing the way they're displayed, but so far I've just moved or rotated my objects away to view detail then moved them back.

The thing that makes MeshCAM stand out for me at this point is its finishing abilities:
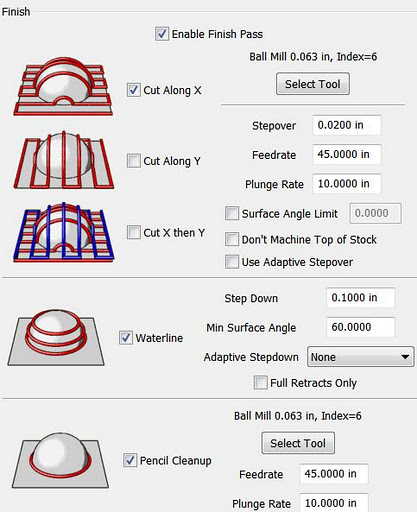
MeshCAM's many flexible finishing options.
It has built-in multi-pass finishing. I've managed to get the same results from Cut3D through a work-around. There, I create a finishing toolpath for one tool, save those toolpaths, then go back and define a different finishing pass, then save those toolpaths, and run them on the CNC one after the other.

MeshCAM doesn't require this. It gives a great set of finishing options for multiple tool passes right out of the box. I'm presently working on a model specifically to take advantage of these capabilities. Since much of what I'm doing is intended to have a high level of detail, I'm looking forward to seeing what comes off the CNC when I use MeshCAM to build the toolpaths.

MeshCAM displays the toolpaths it generates in the 3D view once they've been calculated, which gives a good first-look check to make sure that things came out right. There's no preview of the cutting operation built in to MeshCAM, however, as in Cut3D. Instead, a separate program, CutViewer is offered. Or you can do a "dry run" in most CNC control programs like EMC2 or Mach3 to see what the cutting will look like, at least as far as tool head movement is concerned.

The previews of the cutting operations have been one of my favorite features of Cut3D, so it's a feature I miss in a CAM program. I've gotten a higher degree of confidence from using this to see how the cutting operation will proceed ahead of time--the order of cuts is not always what you'd expect. The ability to check this during the CAM operation is very nice.

So I'd recommend planning to add CutViewer to your purchase if you buy MeshCAM, or make sure you're comfortable with your CNC control program's preview abilities. I'm using the preview abilities of EMC2's Axis view, myself.

Once I've finished the models I'll be trying out with MeshCAM, I'll be reporting on the final results. I'm planning both a flat relief object and a full 3D, 2-sided object.

Stay tuned...

Thursday, October 20, 2011

Objects of Rotation in Google Sketchup: A Problem of Nomenclature

I've been using Google's free Sketchup program for some 3D object designs lately. I've been using it for a while, but I only use it off and on, so my expertise is growing slowly.

Tonight I wanted to model something based on an Object of Rotation, which we all remember from math class is what you get when spin a shape around an axis. This is usually a trivial thing to do in both CAD and 3D design programs like AutoCAD, Lightwave, and so on. I couldn't remember how to do it offhand, so I did a quick search, expecting "sketchup object of rotation" would get me there in moments.

Technically Accurate, but Useless
I soon got lots of results for "Rotate Object", including a Sketchup tutorial video link. Unfortunately, I realized about 30 seconds into the video that it wasn't what I was looking for. It's a very nice tool for rotating an existing object's position around some arbitrary center of rotation, and possibly replicating it in a pattern around that center.

Nice, but not what I needed.

After a few frustrating attempts to rephrase the search to get what I wanted, I ended up just doing a search on what I knew is usually created as an object of rotation: a rocket.

"Sketchup rocket" yielded a couple of promising results. An amateur rocketry buff had instructions for drawing model rockets in Sketchup. The instructions for the nose cone were: how to draw an object of rotation in Sketchup.

Sketchup Follow Me Tool icon
Words Get In the Way
The tool for creating objects of rotation in Sketchup is the Follow-Me tool. In Sketchup terminology, an object of rotation is called a Lathed Object. Which makes perfect sense, if you already know it. (Thank you for the meme, Arthur Conan Doyle!)

So, to successfully search for how to create an object of rotation in Sketchup, use the terms "sketchup lathed object" or "sketchup follow me tool" to get what you want.

Hopefully this will show up when you search for "sketchup object of rotation" and save you some grief. ;)

Monday, October 3, 2011

CNC Rooster: Third Time's a Charm

In a prior post, I'd made a mistake handling the material when cutting a full 3D object using gcode files generated by Vectric's Cut3D CAM software. After that I tried again. That time things were going swimmingly until I got some gunk on a leadscrew that hung up the X axis and ruined the cut.

Well, I tried again today. After doing some preventative maintenance on my microCarve A4 CNC, testing it thoroughly and making sure of myself as well, I managed to turn out a small urethane rooster:

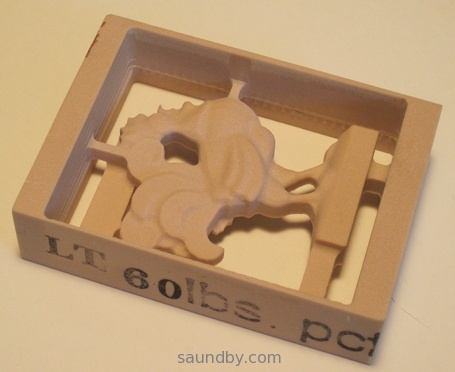
CNC 3D Rooster cut from Butter-Board using Cut3D and EMC2
Rooster, Side A


CNC 3D Rooster Back Side cut using MicroCarve A4 CNC Router
Rooster, Side B

The part turned out very well. The whole time the second side was cutting, I was fretting over how good my alignment would be. It turned out to be just fine.

The beak looks worse than it actually is because of a loose bit of plastic that'll come off when I scrape it with a thumbnail. It isn't perfect, however, because of the overcut depth I specified for the first side's cut. It's too deep for the thickness of the beak, and though the overall alignment of front and back side is excellent, the beak is at an angle, so one side is lower than the other. If I hadn't specified such a deep overcut, it would not have cut through this way.

Still, it'll clean up nicely.

Further Observations

The facets you see, particularly in areas like the chicken's breast, are part of the original 3D model. They aren't machining flaws. On the second side I cut the machining marks that are there are a little deeper than they should be because I trimmed my tab sizes down way too much, so they flexed a bit during machining.

Still, the overall quality of the part is such that I could clean it up to use as a casting master easily, if I were going to duplicate this part.


The Materials

The prior two tries were done using NC Proofboard, a urethane foam board, with densities of 60 and 48 lbs. per cubic foot. This last one was done in Butter-Board, which has a density of about 64 lbs per cubic foot. All are machinable plastics from Golden West Manufacturing.

60# NC Proofboard
The 60# proofboard was a very nice material. The cell size of the foam is very, very small and could easily be coated to smooth it enough to use a part made from it as a casting master. In fact, the mold release might be sufficient. It's very tough, and machines like a dream.

48# NC Proofboard
The 48# proofboard machines very easily as well, but tends to be a bit more brittle in thin sections than the 60# board. The cell size is about half again as large, but still small enough to be easy to coat, it'd just take more to do it--some sort of filler rather than a primer coat or a thick mold release agent.

Butter-Board
The Butter-Board machines to a fine, smooth surface. It takes a little more care in feed rates than the proofboards, which have a lot of resiliency thanks to being foamed products. But the completed part has an impeccable surface so far as the machining makes it so. It's not as tough in thin sections as the 60# proofboard, but it's stronger than the 48# board in thin sections in general, though it tends a bit toward the brittle.

I like all three materials quite a bit, and plan on getting some more of the Butter-board and 60# NC Proofboard soon for both business and hobby use.

Tooling
The rough cuts were done with a 1/8" 2 flute square end mill, the finishing cuts were done with a 1/16" 2 flute ball nose end mill. Both bits were purchased from IMService, at nice prices and the bits are very good. I was concerned that I may want to use single-flute bits, but these bits performed admirably with these materials. At some point I'll try a future cut with single-flute bits for comparison's sake, but these bits cut well, showed no propensity for clogging. They stayed sharp and cool through the cuts.

CAM Software
As to Cut3D, I'm quite happy with it so far, and I'm planning two more jobs for it in the immediate future. I'm also going to be giving MeshCAM a spin for a high relief piece of work in the near future, and I'll be reporting on that soon.

Tuesday, September 20, 2011

CNC with Vectric's Cut3D: It's Great, I'm So-So

After running through a bunch of free CAM software that didn't do what I wanted, I finally ended up where I pretty well knew I was going to end up. I downloaded a trial version of Vectric's Cut3D software.

I also happened to have some samples of machinable urethane plastics to try out, and the new software was just the thing to do that with.

I started with one of Vectric's sample files, the rooster statue. The statue is initially scaled to stand twelve inches tall. My material was about 3.5 by 2.4 by 0.9 inches in size. So I used Cut3D to scale the object, no problemo.

I positioned it in the block, added some tabs, again no problem.

Vectric Rooster Top Side Cut Into Urethane Block

Since this was my first time using Cut3D, my only concern as I went through the simple linear process of setting things up was what I would end up with in the way of files at the end. Would I get a file with some sort of pauses in it, during which I would do tool changes and material flips (to machine top and bottom), or would I have to edit these in, or what?

As it turned out, Cut3D produced four gcode files. Top rough cut, top finish cut, bottom rough cut, and bottom finish cut. For machines with tool changers, it can consolidate the files that have tool changes between them.

So this makes it easy. Load up the material, align the machine, run the rough cut for the side you start with, and wait for it to complete. Then change tools, recheck alignment, run the finish cut for that side. When that's over, flip the material, put in the correct bit for roughing, align, and run the other side's rough cut file. When that's complete, change bits and check alignment one last time then do the finish cut on the second side. Voila, you're done!

When machining a part on more than two sides, I presume that there are more files.

Well, Cut3D worked great. I didn't have the recommended post-processor file for my setup, but the Sherline inches was close enough so I tried that. I got the recommended post-processor for my setup from Vectric's support in my email today. The Sherline gcode worked fine, however.

The only thing that didn't work was me.

Here's my CNC setup. Here's what I got:

Vectric Rooster Top Side Cut Into Urethane Block
Front Side, so far so good...


Vectric Rooster Bottom Side Only Rough Cut Into Urethane Block, Upside-down from the front side.
Back side. Whoops! It's Upside-Down!


Everything started out fine, but I let myself get distracted by some visitors when I went to do the back side cut. I got the alignment right, but had it upside-down from the orientation I should have had it.

Moral of the story: put unambiguous markings on your workpiece to avoid mistakes during machining, and if a distraction gets introduced, set the work aside until it's gone. ;)

The material I'm machining out of is one of the denser varieties of NC Proofboard from Golden West Manufacturing. They're a short way away from me, and this was the first sample piece of their materials I've machined. And it machines like a dream! I may never machine wood again. Well, wood is awfully pretty so I'm sure I will, but not unless I really have to.

Their materials deserve their own article, so I'll be writing more about them once I've tried out a few more of my samples.

Upshot, Cut3D is a great program, and the price is great. I'm looking forward to doing a bunch of work with it, and possible upgrading to VCarve Pro some time later when I feel the need for more flexibility.

Tuesday, July 12, 2011

CNC Projects: 10 Basic Rules I've Learned


Here are some basic rules I use when selecting or setting up CNC projects. Let me know your rules, or any tweaks you see to mine. Thanks!

1. Don't make anything that you can buy easily, unless you have some specific reason that over-rides the extra cost, effort, and likely unforeseen problems.

2. Remove as little material as possible. Look carefully at item placement in your material stock, different ways of cutting the piece, possible design changes, etc. to reduce the amount of cutting and the amount of material to be removed.

3. Plan your cuts so that the ones that most depend on the accuracy of the bit's size are done with a fresh bit. Bits wear while cutting, if you're planning on cutting, say, a 1/4" dado with a 1/4" bit, you should do it while the bit still has a 1/4" diameter to minimize post-machining to make things accurate.

4. Test your ideas in scrap material first, unless it's a minor variation on something you've already done. Chances are you'll either find a problem you didn't anticipate, or figure out a way to do it better on the next go.

5. Be fanatical about your means of mounting the work. The accuracy and success of the machining relies on it, so think about this as much as you think about the rest of the project.

6. Once you find something that works, build on it. Once you've developed a routine for mounting, cutting, registering, or whatever that regularly produces the results you want, keep doing it. It helps to take notes and pictures for reminders in case there's a break in operations that leaves you a bit rusty on how you did it before.

7. If something isn't working quite, don't keep tolerating it. Fix it, replace it, find another way. It'll be worth the time saved later.

8. Learn from others. Watch videos online, visit other folks' websites, visit with other CNC machinists, see how it's done with different machines or in different areas than your individual interests.

9. Do "science" projects. Plan and develop projects just for the sake of trying out something new or exercising a different procedure. Just like doing a first work in scrap, they'll save you time in the end.

10. Make one complete finished item before you cut out a whole set of parts production-line style. While it costs a fair bit of time in setup to go through once for the prototype, then go back and start over for production, it's better than finding out you've got a stack of parts that won't work when you get to final assembly.

My CNC Website

Monday, June 20, 2011

microCarve CNC Project: Collectable Spoon Rack

Here's the initial results of my spoon rack projects as mentioned in prior posts:

My Spoon Rack Project Idea

Decorative Motifs for the Spoon Rack

Here's the first one:

A new spoon rack I designed and built, made with my microCarve A4 CNC

CNC cut collectable spoon rack.

Face on view of designs cut with my CNC machine.


I have parts for 3 cut out. There's a bit of manual finish work yet to do for the remaining ones. The weather has turned hot and dry, which is good for the staining work.

Tuesday, June 7, 2011

Decorative Motifs in GCode for CNC

My manual gcode workflow is getting better. Until I'm in a position to pick up some commercial CAM software (probably early fall later this year), I'm getting by with manual processes. It's not too bad, the fact is there's still a lot I'm learning about machining while I work. The lack of software doesn't mean lack of projects at this point.

I have a much better idea of how things are going to turn out when I design them now, so I'm not wasting nearly as much time designing things that aren't going to work out when I make them now. Here are my latest test cuts:

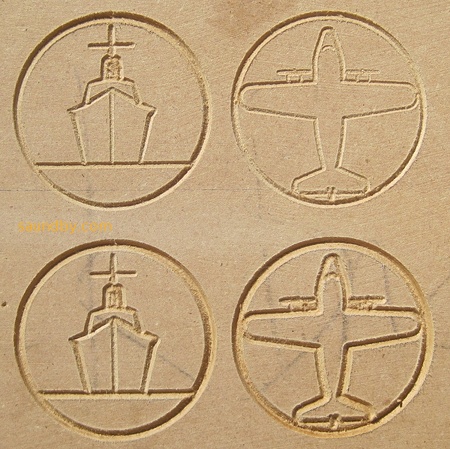
Decorative motifs for woodworking cut with microCarve A4 CNC
Testing the motifs with different depths of cut.


These are some decorative motifs for my spoon rack project. My first drawings were of designs that were far too involved for this project's scale. This set, above, turned out pretty much exactly as I drew them on the green engineering paper. In these tests I was trying out different depths of cut (set using variables in the gcode.)

The first fully complete and ready for public viewing spoon rack should be done soon. I've been going back and forth between different elements of the project, touching things up and trying to get the different parts all in sync, not only in mechanical properties but also in the coding standards I use for the files. I'm intending to publish this as a project on my website once it's done.

My present workflow goes something like this:

  1. Come up with idea.

  2. Draw it out on green engineering pad.

  3. Lay out dimensions on drawing relative to a selected origin for the piece.

  4. Open up EMC2 and a text editor.

  5. Write out gcode in the text editor, checking the work in EMC2's preview often.

  6. Transfer the file that looks good on my editing system to the CNC controller.

  7. Check dimensions and movement manually before loading a workpiece on the machine.

  8. Do an "air cut" of the file.

  9. Put some scrapwood on the CNC. Check level and positioning.

  10. Check origins and movement limits again.

  11. Do a test cut.

  12. Go back and make any design changes and repeat the test cut, if req'd.

  13. Cut the real thing. Repeat as necessary.


At this point I'd say that the guesswork that happens throughout this process is far, far less than it was even a week ago. That means I can do stuff faster. I also added a wireless router to my CNC controller computer's setup so that I can get files there from my design system in the house faster and easier, as well as do edits to the original files there rather than ending up with version control madness.

I'm also getting much better at mounting up work in the machine accurately, and in checking movement and dimensions on the machine before I start a cut. This also means the work goes faster. Which means I can make more test cuts, and still have time to make more finished pieces.

Thursday, May 26, 2011

Mount an HF Router on Your CNC, Quick and Easy

I posted my design for mounting the inexpensive Harbor Freight 1/4" trim router #44914 to a CNC on my website today. I've posted a dimensional drawing of the base plate, and given instructions for the rest (it's bone-simple, really!) Click the pic below to go right to it:

A quick and dirty spindle mount for the HF 44914 router

Tuesday, May 24, 2011

My GCode Gets a Bit Tricker: Working with the microCarve A4 CNC

We collect souvenir spoons when we travel. Unfortunately, we overflowed the little wooden rack that holds our spoons several years ago:

A pretty wooden rack for holding little silver spoons from around the world.

We have almost twice as many little spoons as will fit on the rack. So I decided that a good CNC project would be making some additional racks that will hold the additional spoons, plus any extras we acquire in the near future.


Building the Toolchain

I've been using this project as a sort of pilot for putting together an automated toolchain for my CNC. You know, draw the object in CAD, convert it to gcode, and cut on the CNC. In the past I've just used image maps as depth maps and hand-written gcode to produce things. This project seemed to have about the right level of complexity for an initial project with a new set of tools.

At first, I had already designed the rack for the spoons themselves by hand on paper, and written gcode to match. But I laid this aside and tried out several CAD tools. The CAD tool that I ended up with a decent file from in the least time was Google Sketchup, running on my Mac. Unfortunately, Sketchup doesn't write in the CAM-friendly file formats. So I pulled MeshLab, which converted a Sketchup Collabra file to STL for CAM.

close-up of the spoon rack
Close-Up of the Item that Inspired my Project


The next step was CAM. After spending over a week trying out different free CAD packages (see below for why I'm starting with no-cost software), I was getting antsy to start cutting something. After three goes with different CAM packages on three OSes, and still no results worth cutting, I just decided to pull out the gcode and give it a once-over.

GCode FTW

I did a quick third pass over my gcode program on paper, then typed it in on my EMC2 system with gedit. The EMC2 preview was, as always, very helpful. It let me catch a bogus Z-value. Once that was fixed, I plunked down a piece of MDF for the trial run and let 'er rip.

The first go at cutting my own little spoon rack.
My first go at the spoon rack's shelf, the back is another piece. But I've got an idea for improving on this...

The piece cut out very nicely. I ran it in three passes, the support for the piece was pretty minimal, so you can see where each pass cut across. A bit of sandpaper would fix this well enough.

However, I think I'd rather do the little shelf out of 1/4" stock. I used 1/2" because my prototype uses that thickness. But it's not like there's a lot of stress on the part from the spoons. So I'm going to re-build my code for a 1/4" thick piece before making the "production" units (probably three of them.) Then I may try to use the automated toolchain again for the backs of the spoon racks (all I have in gcode at this point is the little shelf.)

Why Free?
I don't have any aversion to spending money for quality software. In fact, much the opposite. However, I've already spent the money I had budgeted for the CNC. Plus I've tread on my money set aside for travel this summer because of some unexpected household expenses.

For the time being, I'm being a bit hairshirt when it comes to software.

I'm very happy with EMC2 for my CNC software at this point.

Sketchup is pretty well doing OK for me for CAD right now, though there are things I will want to do later that I'm not sure it does easily or well. When money permits, what I'd really like to do is pick up ZBrush. Hopefully within a year or so. Sooner if possible.

For CAM, I'm thinking that I'll want to pick up something like Cut3D from Vectric. It seems to have the functions I want. Cut2D is a possibility, too. I'll be doing the free trial on each in the not-too-distant future.

In the meanwhile, if you know of some free CAM software that doesn't just treat an STL object as something to be rastered over, drop me a note. I'm completely OS-agnostic. Most recently I was doing CAD in MacOS, running CAM (FreeMill, a good package but didn't do what I needed) on Windows, and I'm driving the CNC with EMC2 on Linux.

Friday, May 20, 2011

microCarve A4 CNC Assembly Instructions Online

MicroCarve A4 CNC router, base assembly

I've posted step by step instructions of how I assembled my microCarve A4 CNC router on my website:

microCarve A4 Assembly

This is the first component of a new section of my site dedicated to CNC machining. Since I've gotten the A4, I've really enjoyed spending a lot of time working with it, learning what I can do with it. I'm still a long way away from solidly competent, but it's a state I'm enjoying working toward. And the stuff I'm making along the way is fun, too.

So, as time allows, I'll be expanding the content I have from the CNC Machining home page on my site to include project info, tips and tricks I learn along the way, and links to information from others that I've found especially helpful (if I linked everything that was helpful to me, it'd overwhelm me entirely!)

Monday, May 16, 2011

Fundraising with my microCarve A4 CNC

This last weekend, my daughters went to a special SacAnime Con. It was a Japan Disaster Relief con, which raised $6556. My daughters had some space on a vendor table at the con, and last week they asked me of I could make something that they could sell to raise money for disaster relief.

I set aside my other projects, and turned out a number of little "remembrance tablets", as you see in the pictures here. The idea was that for each one we sell, we'd pass on the profits to Second Harvest Japan, Japan's first food bank. We think they do great work, whether there's been a disaster or not. So it seemed like a good cause to support.

The tablets are about 1.5 by 2.25 inches (~3.7 x 6 cm), hung on a cord so to be worn around the neck. Each design is bilingual, English and Japanese. I took a bit of a liberty with the "Prosper" tablets, the Japanese is more properly "Prosperity" but the English word was too long to fit on the tablet with the level of detail I'm able to carve at present.

Tohoku disaster remembrance: Recovery in Kanji and English.

Tohoku disaster remembrance token: Health in Kanji and English.

Tohoku disaster remembrance tablet: Prosper in Kanji and English.

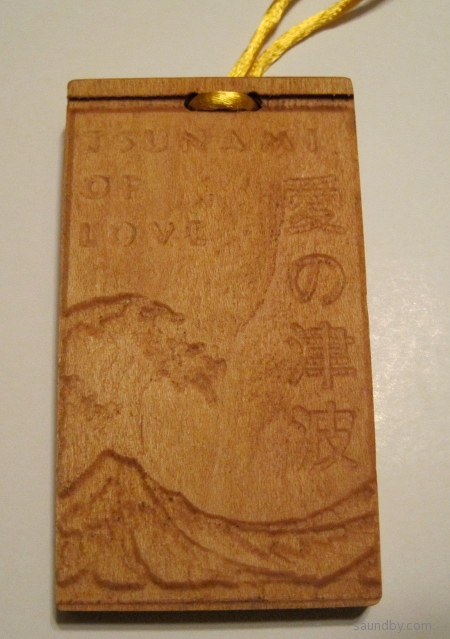
Tohoku Rememberance Tablet: Tsunami of Love in Kanji/Hirigana and English.
This tablet is larger than the others, measuring 2 x 3.5 inches (5 by 9 cm). The detail is far more striking in person than in this photo where the light from overhead washes it out.

There were some other designs that I'll try to get decent photos of soon.

Unfortunately, we weren't able to sell all of these tablets, I still have many left. If you're interested, drop me an email. I have instances of all the above plus a couple of other designs available. And it'll still benefit Japan--that's what these were made for.

Making the Tohoku Remembrances

These were made using the image-to-gcode converter included with EMC2. It's got some serious quirks to its behavior I had to overcome. When I originally set out to make these, I had two ways I could do it. I considered writing my own gcode programs by hand, and using the image converter.

I decided to go with the image converter because I thought it would allow me to make more different designs faster than writing my own programs by hand. Unfortunately, I was wrong. The time I spent learning the quirks of the image converter, with what sort of feature depth I would get, how much of a border around the image, and so on was far, far more than I expected. It would have been far more productive to hand-code the simple designs I ended up with.

My original ideas were more involved, more like the "Tsunami of Love" design, above, which was carved last of all at about midnight before the con. On each iteration I ended up simplifying my designs while trying to get the sort of features I wanted in the carving. I wanted to have the Kanji characters carved into the wood, originally, but I couldn't control the way the software managed the depth and width of the lines when doing this. The Kanji would end up barely visible, and the English characters were unreadable.

A CNC Success, in a Way
I took advantage of this project as an initial test of my ability to do some small-scale production with my new CNC. As a fundraiser, I have to say it didn't work out so well, but as a first go at some small-scale, simple production it was a success--barely.

My decision to rely on someone else's software that I don't entirely understand was a real weak point, but I still managed to turn out a decent number of pieces of work before the con. The investment of time into each one was over double what I originally expected. Still, I got them done within the time margin I provided for this project. Barely.

I'm happy with the results, particularly the Tsunami of Love item, and think I could go on to make some better stuff. Though I clearly need to work on my toolchain. In the future I need to have a tool at hand that I'm familiar with that will produce better results than the free image-to-gcode converter. And I need to have something that's more powerful than hand-written gcode programs for all but the simplest designs.

I've learned a lot over the past week, both about myself and my CNC machine. Now I'm ready for the next step.

Friday, May 6, 2011

What I Learned with My CNC Machine Today

I'm in the second day of a one day project today. Hopefully I'll finish it on Day 3.

But, at each step I'm learning new and useful things.

Yesterday I learned:


  1. There's a point where you need to stop writing gcode by hand, and use CAD/CAM.

  2. Doing tool compensation by hand is a real bear.

  3. Don't think of designs that are too much more elaborate than what you've actually made before.


Today's Lessons:


  1. When your test piece is MDF and your work piece is real wood, there are going to be differences.

  2. Grain and cutting direction matter more when using a CNC than when you route by hand, where you make all sorts of little compensations that you don't even notice.

  3. Just because this piece looks like the last piece you cut doesn't mean that it really is, even if it's a piece off the same stock. This can be really important when you're clamping your work down.


Nonetheless, I managed to avoid anything worse than some minor marring of the surface of one work piece. It's still usable for the project.

So far, I've succeeded at using the CNC as a really complicated and finicky power planer. Unlike the first time I used a power planer, it did not throw a piece of wood across the shop at barely subsonic velocities. One piece came a bit loose in the clamp is all. I shut down the machine in time, re-clamped it, and picked up where I left off.

Wednesday, May 4, 2011

First Attempt at Engraving an IC with my CNC

I decided to try doing a smaller, more precise job with my microCarve A4 CNC today. I took some of my GCode program from yesterday, scaled it down (fortunately I provided variables to do all that automatically for me) and added a chip number in characters that I hoped would show with the bit I'm using.

Here's what I got:

CNC Engraved IC. The bit isn't quite sharp enough for the level of detail.
My first shot at engraving an IC top. It's not really an 8085 microprocessor, it's a dead ROM I happened to have hanging around.


The cut widths are about 35 thousandths. Too large for the level of detail in the smaller key pattern. The single large key above is scaled three times larger than the smaller keys. The base leg length for the small keys (the smallest segment size) is 25 thousandths. So it's easy to see why it didn't quite come out.

Still, the accuracy would have been plenty good, if I'd had a sharp enough bit.

Onward and upward! :)

Learning GCode with EMC2

I'm spending a lot of time with my new microCarve A4 CNC router this week. My first couple of items were made using a handy image to gcode converter that's built into the EMC2 control software I'm using.

But the image converter simply treats the image as a depth map which is cut by raster-scanning with the cutting head. For the designs I used, this was slow, and produced rougher results than would be produced using vector cuts.

So I looked at a couple of approaches to improve things. One is using CAD software that works well with a CAM package to covert the CAD design into machine control instructions to cut out the CAD shapes. The other is to go straight to writing my own machine control programs by hand. I know that I'll want to have both methods in my toolkit, but which to use first?

After a bit of back and forth yesterday morning, I decided to start with programming by hand first. So I dove into the EMC2 documentation for gcode, the programming language more properly called RS-274-NGC. What a catchy name, eh? You can bet that the folks who picked programming language names like "python" and "Java" are kicking themselves after seeing how "RS-274-NGC" rolls off the tongue.

Results of my first gcode program on my microCarve A4 CNC.
Results of My First GCode Program.

Well, the EMC2 site has a link for a gcode tutorial, but what's there is...not much. Maybe I'll pitch in, since that's what wikis are for, right? The I went an read the EMC2 documentation, which has the standard cart-before-horse format of discussing details before generalities. Then I found the excellent LumenLabs GCode Tutorial. Much better!

I read some bits, scanned others, then hit the keyboard on my CNC control system. It's an old Athlon 800 with 768MB of RAM loaded up with the EMC2 LiveCD install for Ubuntu Hardy Heron, with EMC2 upgraded to the current version after install.

I fired up EMC2 with the SIM-Axis configuration for developing the gcode. I've got three different configurations of EMC2 on my desktop. I've got the SIM-Axis setup, and two different configurations for my microCarve A4, each with different origins for the axes.

I used gedit to create an initial gcode file, then opened it in EMC2. The gcode preview window is great. Whenever I edited the gcode file and saved, I'd click the reload button in EMC2 and immediately see the changes. Likewise, the error messages were good enough to let me find my problems, though the problems were usually typos rather than what was reported.

I used iterative development, of course. No sense writing too much code before finding out that I didn't understand some element of syntax. I started with initializing the mode settings, lifting the head to a safe traversal height, traversing to a point in space, then returning to machine zero. After fixing a couple of problems, I got what I wanted. Then I added a few additional move commands, and got the simulated CNC to follow them. At that point I could see that things would get out of hand pretty quick if I didn't learn some basic flow control.

So I read up on subroutines in gcode. I laid out a simple key pattern on graph paper, and wrote the necessary routines. That's the border you see in the picture above. That was the easy part. It's all straight lines.

Next was curves. I read up on G2 and G3. I hadn't thought about the ability to shift the depth of cut across the curve when I started reading, but by the time I was done I was thinking, "Hmmm, if I vary the depth of the cut with a V groove bit, I can vary the width of the cut just as I would vary the width of a line with a calligraphy pen."

So I broke out a fresh sheet of graph paper, and started drawing some letters. Well, it took me about three times as long to lay out the letters as it took me to lay out the key pattern, but I managed that. Not only that, but I set things up with scaling factors and variable settings that allow me to easily scale and move the letters.

Results
The results you see above are what I got from the first "live" run of my first gcode program. The cuts are a bit deeper than I'd like, and the 90 degree bit I'm using right now doesn't help. Also, the cutting was a bit fast for the plywood, causing the wood to be frayed on the cross-grain cuts. Still, the varying of "line weight" on the letters turned out well. Overall I'm happy with it, and the defects should be easy to fix when I run it again. I'm planning on building a complete alphabet for this font and throwing it into a file for later use.

Monday, May 2, 2011

microCarve A4 CNC First Cut Complete!

I got a router mounted on my microCarve A4 CNC machine this weekend. The router I'm using is an inexpensive 1/4" router from Harbor Freight. It's mounted on a base plate I made out of 3/4" plywood with a pair of muffler clamps holding the body of the router:

Harbor Freight drillmaster trim router on microCarve A4 CNC


I've got two bands wrapped around the body of the router cut out of a bicycle inner tube. They help mate up the muffler clamps to the router body. I was expecting to drill and tap a hole into the router for a screw through the base plate, but with the rubber straps everything is very firm and tight.

Today I spent some time "cutting air" to make sure the tool would run properly before I put a bit in. I had to invert the Z and Y axes in the setup I was using as it turned out. Then I tested twice more, once again with no bit or wood, then again with a bit and wood in the machine, but the Z axis set high enough the bit of the router wouldn't quite reach the wood.

Everything looked good, so I made my first cut:

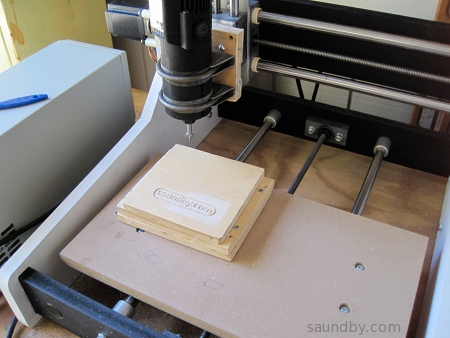
saundby.com logo cut using micrCarve A4 CNC router.

Closer look at first cut made with microCarve A4 CNC.

Close-up of saundby.com logo cut into wood using microCarve A4 CNC router.


The material is some plywood I recovered from an old failed project. As you can see, it wasn't mounted completely flat. The top piece is held by some screws that hold it from underneath.

The G-Code was a raster pattern generated by an image-to-gcode converter that comes with the EMC2 software I'm using. That's why the bottoms of the letters look kinda scrappy, if they'd been cut continuously rather than raster-cut, they'd probably look a lot better.

The bit I used is a 1/2" 90 degree bit, I don't have any really nice bits yet. Now that I've got the machine actually cutting things out, I can work on refinements.

The depth of cut is 1/8".

Now I'm looking forward to getting some better bits, getting my CAM software in order, and so on.

Edit:

Had one more go with what I've got on hand this afternoon. It's a little more ambitious. Here you go:

CNC router cut of saundby.com surrounded by a key pattern.