Spotlight
Among the tools I set for myself to try out today is Spotlight, a very powerful-looking tool featured in this impressive video. After getting the "sizzle" on Spotlight from that and some other videos, I tracked down some more pedestrian stuff that I hoped would let me see how to actually do a little of that.
For example, this great video, which takes things step by step and at a pace where you can actually see what is being done. Unfortunately, when I tried to follow along on my own, there was a missing step.
Getting the texture into Spotlight.
Which opened another can of worms...
Where is the Spotlight?
I opened my Lightbox, selected my texture, and Spotlight was nowhere to be seen. So I took a look at the Pixologic site to find some written documentation. I found what seemed to be just the thing. I read carefully through the instructions, particularly noting:
You first need to load your textures using the Texture palette or Light Box.
then, later the detailed instructions:
3. In the Texture palette, load or import a source texture with which you will paint on the model.Um, no.
4. Also in the Texture palette, click on the Add to SpotLight button. Your texture will be displayed as an overlay on the document and the SpotLight widget will appear. An alternative is to double click on a texture of your choice in Light Box.
First, double-clicking on the texture in Lightbox did not bring up the Spotlight widget. Then, looking in the Texture Palette, and in the Texture tool on the side of the screen--in case I misunderstood--revealed no "Add to Spotlight" button.
The Hidden Spotlight Button
Well, I spent a fair bit of time reading FAQs and other information trying to find out why there were no visible parts of Spotlight in my ZBrush. Finally, I found an answer well down in this thread. The "Add to Spotlight" button is there, it's just not labelled, looks like it is inactive, and the icon makes no sense:
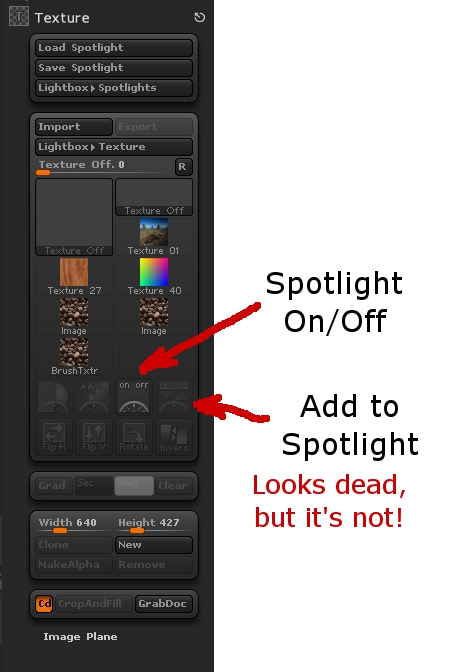
To be fair, it does say "Add to Spotlight" off to the side if you hover over it. But then, what's to induce me to hover over everything in the 90 square hectares of ZBrush's menus just to see if I can find a button by spelunking? Especially when it's greyed out so as to look dead, inactive, unavailable, and, in subtle grey-on-grey, almost invisible?
Clicking on this added the texture to Spotlight, brought up the Spotlight wheel, and let me get on with walking into a new set of frustrations. But it was progress.
Endemic Problems
This relates to several of the endemic problems with ZBrush, particularly its user interface. There's a mix of text and image icons. The image icons are seldom intuitive. The color scheme makes icons look inactive when they're not.
At a larger level ZBrush has the problem of being a huge tool box with no organization to it. There are multiple ways of doing things, with no clear way of choosing which will get the desired results, or do so in the most time-effective fashion. Likewise, the only way to determine what something will do is to experiment, experiment, experiment. And with the number of options and settings (spread through several different "palettes" or menus) there's no guarantee that you can recreate something you've seen someone else do, or even recreate your own work later if you happen to have changed a setting three menu levels down earlier then forgotten about it.
There's also the keyboard interface. It's tricky and timing-dependent. For example, if you're drawing with short strokes, say, putting a mask on in an area while zoomed in close on the geometry, it'll go along putting down short light strokes of mask then suddenly, while you're doing something that feels exactly like every other stroke, make your entire mask go *poof*! Fortunately, a Ctrl-Z (Undo) will fix that one. But when you're working with short, fast strokes you'll hit this repeatedly (like every third or fourth stroke.)
What's worse is when you are trying to do strokes across an object. It appears that if you start a stroke off of your subject (even if by a single nearly-invisible pixel) you'll end up moving and spinning it. And if you're doing something like texturing from Spotlight, the position and scale of the object is critical. You can't use Undo to fix this, because you can't Undo changes of viewpoint (which are "really" moves of the object relative to the Canvas in ZBrush, but still.) So you're hosed with one touch of the mouse (or tablet.) Go back and start over.
Overall, there are a lot of frustrations and a lack of clear structure in the program. But it is capable of some cool things. Just save your work often (saving both Projects and Tools!)
Can I recommend ZBrush? Not yet. Besides, I'm not at all conversant of what the available options are on the market right now.


 Webomator.com: Backward into the
Great :)...it solved my all issues to find spotlight......appreciating a lot....admirable.....Thanks a lot !
ReplyDeleteYour information are of great help. Thanks a lot.
ReplyDeleteThanks for this, am learning zbrush and the tutorial i was following showed the add to zbrush icon in the texture menu on the left side. I had to find it in the pull down menu as you demonstrated.
ReplyDeleteInterested to know how youre getting on with it since this post? It certainly is a bit quirky to use, especially for someone like me who has used maya/mudbox for many years.
I'm doing much better with it!
DeleteI finally hit a point where I can start to learn things piece by piece, and not worry so much about every.little.thing. ;)
Eric Keller's great book Introducing ZBrush 4 has been a great help on the things I didn't figure out (painfully) on my own.
Thanks a lot! Really useful!
ReplyDeleteThank guy... you're so awesome
ReplyDeleteThanks so much for this, I came back to zbrush after a long break and was having the worst time finding spotlight, let alone info on where it was!
ReplyDeleteI hope this works for me because I was starting off on another spelunking of many hours (love that term-- it is exactly like wandering through a cave with a torch). One of the things I hate about Zbrush is the lack of appropriate alignment tools. They would do well (as would many 3d programs) to just copy Bryce's interface-- the best one I've seen yet.
ReplyDeleteThanks so much! This was really helpful :).
ReplyDeleteGENIUS! :)
ReplyDeleteGENIUS! :)
ReplyDeleteThis was very helpful, thanks for your generosity in sharing. S. Liles
ReplyDeletedon't worry - when you get the to the temple of Maya you realize there are four iterations of every menu, making it the most cluttered, badly designed UI this side of nothing in particular . . .
ReplyDelete