UV maps are one of the places where the data is slim, and the documentation tells you nothing about what's going on with the choices you make. It's like that Sherlock Holmes quote about it making perfect sense once you already know the answer.
On top of that, there's a lot of FUD about transferring data from ZBrush to Unity. Certainly there are other programs for which Unity makes the process more or less seamless, but ZBrush is perfectly capable of providing all the same data to Unity. It's just a matter of knowing the correct process. Which is difficult with ZBrush if you're just trying it on your own, because there are so many settings for which ZBrush doesn't show you directly the effects of your choices. You have to keep going back and forth between ZBrush and Unity--does this work? Does that work? What about that? On and on. And at each stage you're guessing, because you can't look at what comes through in Unity and say, "Oh, I see the problem. I need to just do -that-!" It's just a mishmash of unmatched data.
Well, I spent two solid days experimenting. Trying out different things, getting something to work, making sure I can do it twice in a row and have it work both times. Researching on the internet to see if someone else had a better way, and so on. You don't need to hear the whole litany--getting it done was my job, now here's the results for you to take advantage of so that you can get on with your project.
I'm using Unity 4.3.4f1 and ZBrush 4R6 for this. I'm covering just exporting the object mesh and its UV texture here. A normal map works similar to the UV texture--the key point being that it has to be vertically flipped to align with the mesh in Unity. If you're interested in another post that covers normal maps specifically, email me or leave a comment and I'll do it.
You've Got an Object in ZBrush
So your object is sculpted and polypainted in ZBrush, now you want to drop it into Unity.
First, you've got to convert the polypainting into a separate image file that will wrap around your object's mesh in Unity. This is called a UV texture. What makes things confusing is that it's often called a UV Map in casual usage, but a UV map is actually something else. The UV Map is the relationship between pixels on a UV Texture and points on the mesh. In ZBrush these are separate and distinct items. In many other programs, the UV Map and UV Texture are conflated to simplify things. Which makes it seem like ZBrush has an extra step when creating UV Textures for Unity and other 3D software.
Before beginning, save your project and your tool(s) in ZBrush. There will be opportunities for things to get messed up or confused.
Create the UV Map
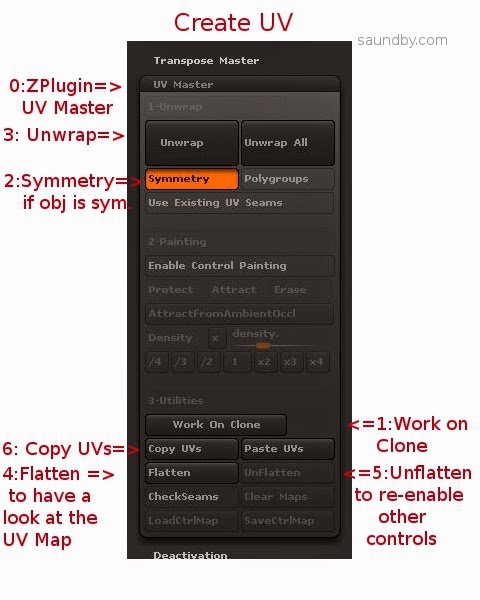
0: Open up UV Master in the ZPlugin menu.
This is where we'll create the UV Map, the Texture itself comes later.
1: Click Work on Clone
This takes care of a bunch of stuff to prepare for making the UV without disturbing your original object. I've screwed up several meshes trying to go without it. My advice is to just use it, it makes things easier.
2: Turn on Symmetry if your object is symmetrical.
Symmetry will try to make a symmetrical UV map, which results in a symmetrical UV texture that's easier to edit by hand. If your object is just sort of symmetrical, you might give it a try, too.
3: Click the big Unwrap button.
This will unwrap the current tool. My advice is to work one tool at a time, and to reduce the number of tools to the minimum necessary before getting to this point to reduce the repetition of exporting meshes and maps.
4: Click Flatten to have a look at the shape of your UV map.
You will see a wireframe of the UV map, this is the form into which your object's polypainting will be projected to make a UV texture. If you're expecting to do any hand editing of the texture's details, make sure that the forms are not too distorted and that seams are not crossing critical areas of the mesh, like across the face of a character. If they are, you can use Control Painting to get a better mesh.
I'm not going to cover that in detail, there are good videos on this at Pixologic and on YouTube, but the short form is:
- Click Unflatten to get the controls back.
- Click Enable Control Painting
- Click Protect, then draw red on the parts of your mesh where you absolutely don't want a seam in the UV map (like the face of a character.)
- Click Attract, then draw in blue the areas that you'd like the seam to be (like the back of a character's head, or under their chin.)
- Click Unwrap again and check the results using Flatten.
5: Click Unflatten to get your controls back.
6: Click Copy UVs to put your UVs from the Clone on the Clipboard.
You've now created a UV map, which you need to apply to your original object to guide the creation of a UV texture from its polypainting.
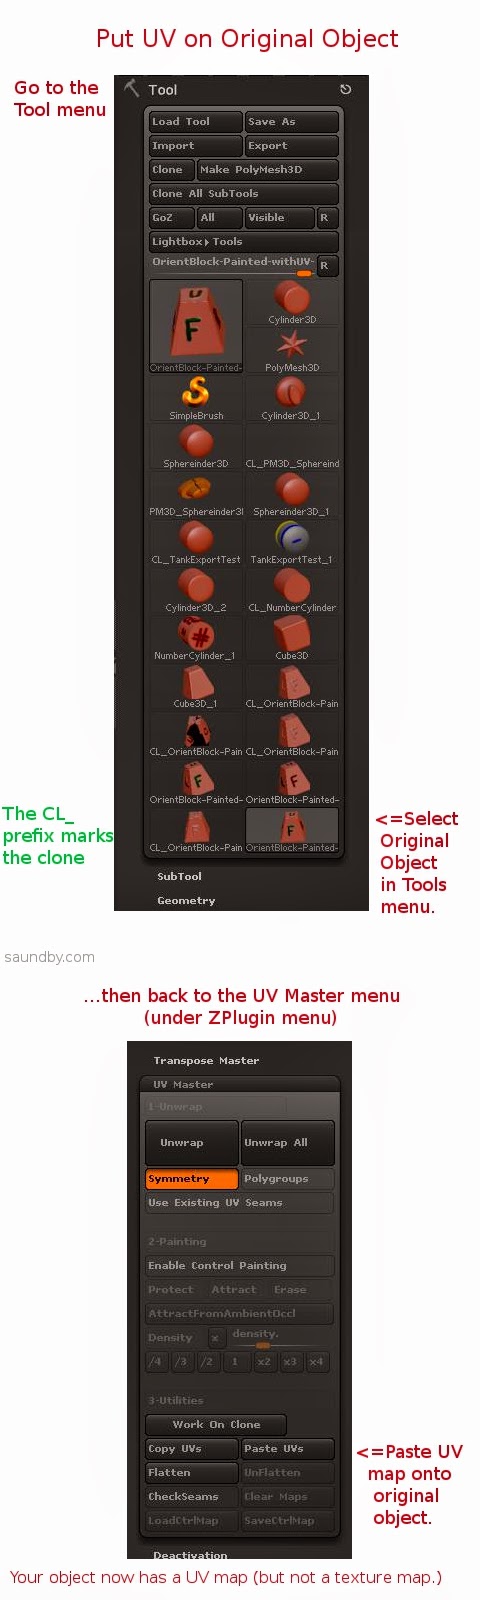
7: Select your original object from the Tool menu.
This will bring it back into the Document view and make it the active object. If something's wrong, or you can't find it, reload it using Load Tool (because you saved it before starting like I advised, right?)
8: Click Paste UVs in the UV Master menu.
This puts the UV from the Clone that's on the Clipboard on your object. It's now ready to have its texture map made from the polypaint on it.
9: Save your tool. Give it a distinctive name, like MyTool-withUVs.ztl.
10: Take a deep breath. The rest is pretty easy.
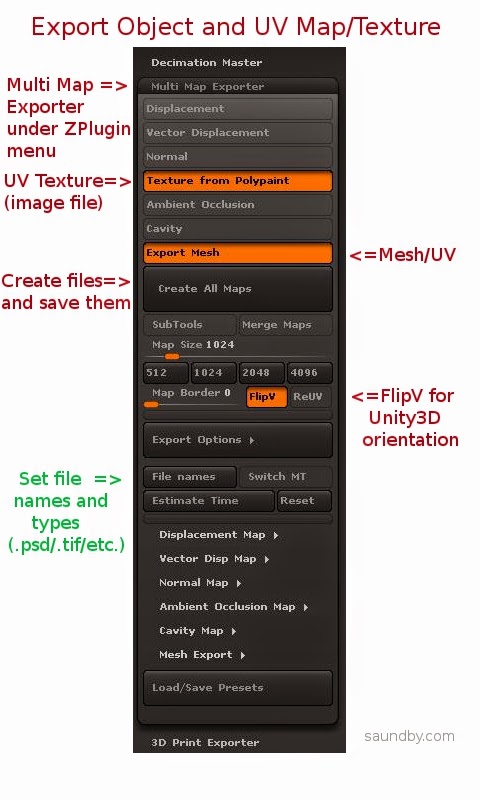
11: Open Multi Map Exporter under the ZPlugin menu.
12: Choose the things you want to export. Mesh and Texture from Polypaint for this example.
13: Choose FlipV to orient maps correctly for Unity.
If you want to have your map files in a specific format, select it in the Export Options and file names sections.
14: Click Create All Maps to create the UV texture and to save the mesh as an .OBJ file. This is one of the most poorly worded bits of button text in ZBrush. Even just "Save" would have made more sense. Oh, well, if we start talking about what's screwy with ZBrush's UI, we'll never finish.
15: Import assets into Unity (Assets=>Import New Asset...).
Gotchas
OK, that's the process. Having it all written out in detail makes it look worse than it really is, it actually happens very quickly once you know it. It's those first few passes that are a problem.
One of the things that really slowed me down in ZBrush is the fact that ZBrush doesn't tell you anything inside ZBrush about what the orientation of the UV map is relative to the base orientation of the mesh. If you open the Tools=>UV Map menu and start clicking the buttons like FlipV,


 Webomator.com: Backward into the
How do I disable smoothing for MME? Here's an example:
ReplyDeletehttp://i.snag.gy/FBXcO.jpg
Left one is from MME, the other manually exported from the texture tab.
When I export with MME, my uvs seems to get smoothed even though I've disabled SUV in the geometry tab in the tools menu and SmoothUV and SNormals in the Normal map tab in the MME menu.
I don't know. For myself, my maps came out the same both ways--I tried to see if the Texture export would fix the problem with seams appearing in the UV map, and my maps came out identical both ways.
DeleteMy best guess is that it's one of those ZBrush settings that's buried somewhere you'd never know to look, probably attached to something else, like the mesh or the draw style.
If you are getting good UVs from Texture Export, that's probably the way to go for now.
Thanks. Very informative article as well.
DeleteHave you figured out what exactly the SNormals button does in the MME-> Normal map tab?
Thanks, really helpful post..I was using FBXExporter to export .fbx file to the Unity game and the game loads really slow. This method exports .obj file and meanwhile you could choose resolution of the texture.
ReplyDeleteGreat article! Very helpful. Thank you.
ReplyDelete