My manual gcode workflow is getting better. Until I'm in a position to pick up some commercial CAM software (probably early fall later this year), I'm getting by with manual processes. It's not too bad, the fact is there's still a lot I'm learning about machining while I work. The lack of software doesn't mean lack of projects at this point.
I have a much better idea of how things are going to turn out when I design them now, so I'm not wasting nearly as much time designing things that aren't going to work out when I make them now. Here are my latest test cuts:
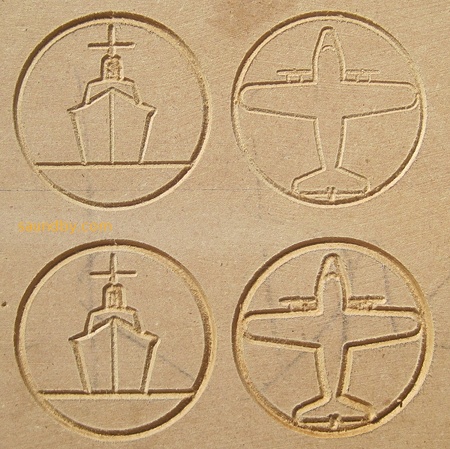
Testing the motifs with different depths of cut.
These are some decorative motifs for my
spoon rack project. My first drawings were of designs that were far too involved for this project's scale. This set, above, turned out pretty much exactly as I drew them on the green engineering paper. In these tests I was trying out different depths of cut (set using variables in the gcode.)
The first fully complete and ready for public viewing spoon rack should be done soon. I've been going back and forth between different elements of the project, touching things up and trying to get the different parts all in sync, not only in mechanical properties but also in the coding standards I use for the files. I'm intending to publish this as a project on
my website once it's done.
My present workflow goes something like this:
- Come up with idea.
- Draw it out on green engineering pad.
- Lay out dimensions on drawing relative to a selected origin for the piece.
- Open up EMC2 and a text editor.
- Write out gcode in the text editor, checking the work in EMC2's preview often.
- Transfer the file that looks good on my editing system to the CNC controller.
- Check dimensions and movement manually before loading a workpiece on the machine.
- Do an "air cut" of the file.
- Put some scrapwood on the CNC. Check level and positioning.
- Check origins and movement limits again.
- Do a test cut.
- Go back and make any design changes and repeat the test cut, if req'd.
- Cut the real thing. Repeat as necessary.
At this point I'd say that the guesswork that happens throughout this process is far, far less than it was even a week ago. That means I can do stuff faster. I also added a wireless router to my CNC controller computer's setup so that I can get files there from my design system in the house faster and easier, as well as do edits to the original files there rather than ending up with version control madness.
I'm also getting much better at mounting up work in the machine accurately, and in checking movement and dimensions on the machine before I start a cut. This also means the work goes faster. Which means I can make more test cuts, and still have time to make more finished pieces.


 Webomator.com: Backward into the