My apologies to those who follow my posts, but who've had nothing much to follow lately. Google has been "upgrading" their services lately--that is, making them unusable for my purposes--by rolling everything into the cobbled-together stinking heap they call Google Plus. That means I haven't been able to build posts with images in my usual way. So I've been hung up waiting for a chunk of time to appear when I can try to sit calmly at the computer and put together a new process.
Hopefully I can manage it now, as I've got a backlog of posts that have been waiting on this.
I tell ya, though, Google 2013 is looking a terrible lot like Yahoo 1999. Services are poorly integrated, changes only make things worse, search results stink. *sigh* I don't want to have to shift everything off their services, but they're darn well pushing me that direction.
Enough of that, let's get back to the fun stuff...
New article coming online in 3...2...1...
Showing posts with label logistics. Show all posts
Showing posts with label logistics. Show all posts
Tuesday, May 7, 2013
Tuesday, April 23, 2013
Derailed: An Order of Amateur Radio Parts Goes Awry

Perhaps Hiram Percy Maxim had an order on this train.
I put in an order to one of my favorite ham radio outlets, Universal Radio a few days ago for parts to put a first-class feedthrough in for my antennas. It was supposed to arrive today. I was looking forward to taking advantage of the nice weather tomorrow to do the installation.
Unfortunately, it didn't arrive. The UPS status is "exception, train derailment." Yeah, that's a problem. According to the news it was hopper cars filled with corn that went off the rails near Albuquerque. Since I didn't order several tons of corn, I'm hoping either the car with my order didn't follow the corn off the rails, or that it was on a different train sitting in a railyard held up by the clean-up and all.
My order was mostly hardware that wouldn't be bothered by a tip sensor sort of event, but I also had a gift for a friend in there that I hope arrives in good condition. A radio, as it happens.
If it arrives coated in corn dust but otherwise OK, I'll try to make that a "feature". Like a corn-dusted Kaiser roll. Must be good, right?
Albuquerque Train Derailment
Update: The order has arrived, a day late, and with minor smushing of one corner of the box. Hopefully all is well inside and I can still get the feedthrough in this afternoon.
Wednesday, April 3, 2013
Amateur Radio Desk Complete!
I've finished the rolltop desk that I started restoration work on this weekend.
Long story short, I needed a real place to put my amateur radio equipment. It's been perched on a short bookshelf behind my desk for months now. Before that it was in the living room on an end table beside my easy chair. Neither were great set-ups, of course. Now I've got a proper place for my radio station to stay, and I can protect it from dancing cats with the roll-down top. Here's the desk in its place:
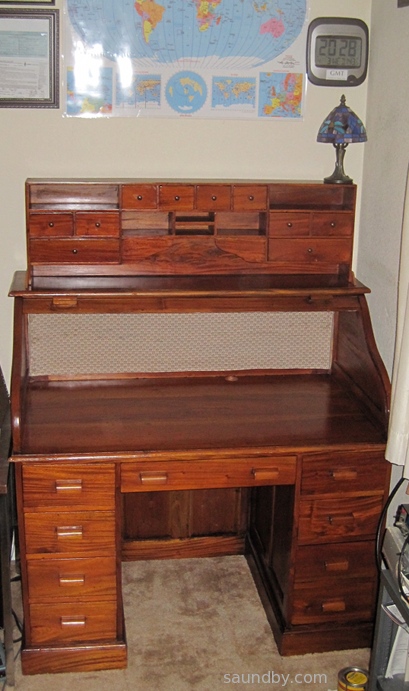
As you can see, I've already got some amateur radio paraphernalia on the walls around the desk. A world map formerly owned by KA6C (sk) passed on to me by George, KG6LSB along with a really cool collection of KA6C's QSL cards (which will be taking up residence in this desk.) The clock is not atomic, but it's set to within a minute of GMT so that I can keep track of world time properly. I have my old completion certificates, including one of my code completion certificates from the 70s, and my three licenses on the wall as well (KD6KGV, AG6HU, and my present call, W8BIT.)
Today the oil should be dry enough for me to start fitting out the desk with power strip and a mass of equipment, so it'll never look this nice again. Until I put the top down. That's the nice thing about a roll top desk.
I will probably have to wait until next week to route my antenna cables into the house through the crawlspace and up through the floor under the desk. I won't be able to get to it today, and we've got weather blowing in tomorrow and through the weekend. Fortunately the desk is next to the window where my temporary feedthrough brings the cables in, so I'll be able to operate until I get the cables re-routed through the new feedthrough.
Tweet
Long story short, I needed a real place to put my amateur radio equipment. It's been perched on a short bookshelf behind my desk for months now. Before that it was in the living room on an end table beside my easy chair. Neither were great set-ups, of course. Now I've got a proper place for my radio station to stay, and I can protect it from dancing cats with the roll-down top. Here's the desk in its place:
As you can see, I've already got some amateur radio paraphernalia on the walls around the desk. A world map formerly owned by KA6C (sk) passed on to me by George, KG6LSB along with a really cool collection of KA6C's QSL cards (which will be taking up residence in this desk.) The clock is not atomic, but it's set to within a minute of GMT so that I can keep track of world time properly. I have my old completion certificates, including one of my code completion certificates from the 70s, and my three licenses on the wall as well (KD6KGV, AG6HU, and my present call, W8BIT.)
Today the oil should be dry enough for me to start fitting out the desk with power strip and a mass of equipment, so it'll never look this nice again. Until I put the top down. That's the nice thing about a roll top desk.
I will probably have to wait until next week to route my antenna cables into the house through the crawlspace and up through the floor under the desk. I won't be able to get to it today, and we've got weather blowing in tomorrow and through the weekend. Fortunately the desk is next to the window where my temporary feedthrough brings the cables in, so I'll be able to operate until I get the cables re-routed through the new feedthrough.
Monday, April 1, 2013
Rolltop Desk Restoration for Amateur Radio
I needed a place to put my amateur radio stuff. Power supplies, radios, microphones, QSL cards, and so on. Through great effort, I was able to clear a four foot space in our "computer room", a spare room given over to computers and my electronics desk. But I needed a new desk to fill that space. The two I have available in the garage are both too large.
This Saturday was our amateur radio club's monthly breakfast. Afterward would be a perfect time to see what the local thrift stores have to offer. The closest thrift store to the restaurant where we hold the breakfast is also our family's favorite. But when my daughter and I stopped by, they weren't open yet. So we crossed town to fill the car's tank with gas, then swung by another thrift store. The door was open.

We walked in and had a look around. Then one of the workers told us they weren't open yet. We made our way to the door, then he told us it'd be OK. We were about 20 minutes early. There was a beautiful, if a bit well-used, rolltop desk there. I borrowed a tape measure, and sure enough, it's four feet long. The question was whether I could get it home. After a bit I discovered that the whole desktop would lift off. A few measurements, and it looked like it would fit in the car. So we bought it.
It was a tight fit in the car. The fellow at the Salvation Army Thrift Store was a great help. We got it in, and home.
My daughter helped me clean it up. I had her take some oil to it. The beauty of the wood started to show. After a bit, I realized that this desk would really look good with a bit of work. As much as I wanted to just get it in place and start loading it up with amateur radio stuff (and get the walkways in the computer room clear enough to get through), I decided to do some refinishing on the desk.
And what results! The desk is made of real hardwood. The color is natural. All it takes is some linseed oil to bring it out. I used a mild stain as well, but it only enhances the wood's natural color, it doesn't change it.

I also put some new fabric on the rolltop. The old fabric was pretty awful looking. It's been hidden behind the cubbyhole insert, but I'm pulling that out and putting it on top of the desk to make room for the radios on the desktop. I picked out a fabric with a look to match the period appearance of the desk itself. It was a struggle to install the new cloth, but I managed, and the rolltop goes up and down well, still, though I'm planning on a little more tuning before all is done, there.
Now I'm looking at my power supplies and thinking I need to put some sort of veneer face panel on to keep them from looking too ugly for the desk. Next thing you know, I'm going to have to get another desk for my ordinary ham radio gear, and fill this one with beautiful vintage equipment!
It's going to be a couple more days, I'm guessing, before I can actually put this desk into service. But the work is well along, and having such a beautiful new desk is going to be reward enough for the sacrifice of walking around boxes for a few extra days.
Tweet
This Saturday was our amateur radio club's monthly breakfast. Afterward would be a perfect time to see what the local thrift stores have to offer. The closest thrift store to the restaurant where we hold the breakfast is also our family's favorite. But when my daughter and I stopped by, they weren't open yet. So we crossed town to fill the car's tank with gas, then swung by another thrift store. The door was open.
The New Desk's Base and Cubbyholes, So Far:
Use "View Image" to see full size original.
We walked in and had a look around. Then one of the workers told us they weren't open yet. We made our way to the door, then he told us it'd be OK. We were about 20 minutes early. There was a beautiful, if a bit well-used, rolltop desk there. I borrowed a tape measure, and sure enough, it's four feet long. The question was whether I could get it home. After a bit I discovered that the whole desktop would lift off. A few measurements, and it looked like it would fit in the car. So we bought it.
It was a tight fit in the car. The fellow at the Salvation Army Thrift Store was a great help. We got it in, and home.
My daughter helped me clean it up. I had her take some oil to it. The beauty of the wood started to show. After a bit, I realized that this desk would really look good with a bit of work. As much as I wanted to just get it in place and start loading it up with amateur radio stuff (and get the walkways in the computer room clear enough to get through), I decided to do some refinishing on the desk.
And what results! The desk is made of real hardwood. The color is natural. All it takes is some linseed oil to bring it out. I used a mild stain as well, but it only enhances the wood's natural color, it doesn't change it.
The Top, So Far:
Use "View Image" to see full size original.
I also put some new fabric on the rolltop. The old fabric was pretty awful looking. It's been hidden behind the cubbyhole insert, but I'm pulling that out and putting it on top of the desk to make room for the radios on the desktop. I picked out a fabric with a look to match the period appearance of the desk itself. It was a struggle to install the new cloth, but I managed, and the rolltop goes up and down well, still, though I'm planning on a little more tuning before all is done, there.
Now I'm looking at my power supplies and thinking I need to put some sort of veneer face panel on to keep them from looking too ugly for the desk. Next thing you know, I'm going to have to get another desk for my ordinary ham radio gear, and fill this one with beautiful vintage equipment!
It's going to be a couple more days, I'm guessing, before I can actually put this desk into service. But the work is well along, and having such a beautiful new desk is going to be reward enough for the sacrifice of walking around boxes for a few extra days.
Friday, February 3, 2012
Ongoing New Ham Progress: Antenna Work Today
Since obtaining my amateur radio license 73 days ago, I've made it a point to do something to get my station established every single day. Even on the days when I took a short get-away vacation with my wife, I took a little time each day to look at Craig's List for HF rigs, and on our last evening we went and bought a rig near where we were staying.
Some days it's been hanging dipoles and burying ground rods, other days it's been drawing QSL cards and applying for vanity call signs.
Today was one of the more active days, and it was a good day, too.
Pick and Choose
I've got several different projects going all at once. There's a lot to do. I'm still reorganizing the garage to make room for my planned shack location. I've got a dodgy short term 40m dipole up, a new 2m J Pole thanks to W6WEM, a nearly-done 10m loop, and prep work to do for a planned skywire loop for either 80 or 160m. Plus I'd like to order myself a new 2m rig and a 2m HT for my daughter, KJ6TFT--her birthday is this month.
Antenna Work
For today I decided to go with antennas. Exactly what was the next question. It's tough to pick if you have several possible directions you can go, each with different amounts of money and effort involved. Plus knowing that at the end of the work and money spent you may have ruined what did sorta work and replaced it with something new and expensive that doesn't work at all.
Ah, the joys of technical hobbies!
First I decided I should focus on what I had on hand rather than taking the time to leave the house and buy more parts. Feedlines was what I was thinking of buying today, from a local communications company. I figure I'll even pay them to put the connectors on for me.
But I've been dragging my feet on this. Without knowing where the antennas are going to be when I get them in a place where they work well, it's hard to know how long to make the feedlines. Too short creates an obvious problem--it won't reach from the antenna to the radio. Too long and I'm losing signal to line losses. Just to be clear, I'm not looking at ten or twenty feet too long, but at possibly 50 to 100 feet longer than may turn out to be required.
So...
I wanted to get the jpole up, so I can hopefully check into the local club nets without a broomstick in the driveway My feedlines on hand are a 70' length of RG-8, a 90' length of RG-58, and a 30' length of RG-58. While the RG-58 is fairly low loss foil shield type, a check with the MFJ-259B told me it's still going to lose about 2dB of signal over the length of the longer piece, which I'd need to get the jpole up where I want it, much more than the RG-8.
And the RG-8 was inconveniently located on my 40m dipole.
So I decided my first task would be bringing down the dipole. It's not easy making your first task taking something apart before getting something else working. I had to fight off the temptation to change gears to work on the 10m loop antenna.
I went up planning to drop the mast on my roof that supports one end of my 40m dipole. When I got there I saw that I could make the job easier by cutting the current mast into sections. Then later I could insert an extension to make it taller. In part, the height of the 40m antenna is limited by the RG-8 feedline's length. a feedline that's longer, and lighter, would allow me to raise the antenna. So I climbed down, got a different set of tools, and creatively cut the mast to bring it down without disturbing the original support.
Once down, I disconnected the RG-8 and decided to make some changes to the center of the dipole. Since it's still a temporary antenna, I didn't want to get too carried away, but I felt I could make some quick improvements that would pay off until I get either of the two loops up. I spent about half an hour on that, then returned to working on the jpole.
I fished out the fiberglass pole I'd originally used with my 2m ground plane (which got me nowhere until I put it on a broomstick). I checked to make sure it'd support the jpole well, adapted the jpole to the fiberglass pole so that it'd stay put and not come loose or move freely.
Then I took it up on the roof, and refurbished the fascia mount I'd used before. Fortunately I was able to get it to where it'd support the jpole and its mast safely, then took it down and added the feedline to the mix. The support was still sturdy with the weight and strain of the feedline, fortunately.
In the home stretch, I dithered about whether to add an "ugly balun" in the few extra feet of feedline. I've heard both ways for jpoles. Finally I decided to wind a choke in the feedline near the base of the mast, well below the bottom of the 'j'. So if the feedline's braid is forming part of the radiator, there's about 2.5m of it free to do so. But there's also an inline RF choke to limit RF coming back into the house.
Checking the New Antenna
I went inside and hooked up the MFJ-259B to the RG-8. The antenna looked good. Its SWR was good across the 2m band. Its resonant frequency is a little low for FM phone, it's near the top of the CW-RTTY section of the band. So I may see if I can retune it a bit before it goes to its eventual permanent location (more on that later.)
OK, I have antenna and feedline. Now, the rig! An HT...?
When I bought my HT, I thought to get an antenna adapter for it, too. The HT takes an SMA male connector on its antenna, I got an SMA to BNC adapter since I'd used BNC connectors on several of my 2m antennas in the 90s.
Now I put on the SMA to BNC adapter, then hooked up a BNC to SO-239 adapter. Then screwed the rig into the feedline. Well, a few feet of RG-8 are heavier and harder to move than a little HT, after all.
I tuned around a bit, and heard a conversation on a repeater in Vacaville, a bit over 80 miles away. Woohoo! I tuned to the frequency of W6EK, the repeater for the Sierra Foothills Amateur Radio Club and gave it a try, asking for a signal report. Nothing. No courtesy tone, no repeater waking up and identifying itself. I tried again, with the same result.
Then I moved over to the frequency for the Nevada County ARC repeater, W6DD and had another try. Success! I got back a reply of "5 but scratchy". I could at least keep checking in to that net without standing outside.
The scratchy bit concerned me, though. I was holding both the HT and the feedline because I didn't want to support the HT by the feedline but I also don't want to strain the HT's antenna connector with the stiff, heavy RG-8 cable. After listening for a while, I realized I was getting some dropouts on my end. The BNC connection wasn't as secure as it should be.
I tried another adapter and an old PL-259 to BNC cable with an SO-239 union in the line. It was even worse. So I filed that problem away mentally and went back outside to finish dealing with my HF antenna before the brief winter daylight was gone.
Restoring the "Old" Antenna
Half a dozen trips between roof and garage got the right tools and parts for a mast extension up there. As I worked, I was adding refinements. I decided to add a halyard arrangement to the mast. Before, it took bringing down the mast to get at the antenna. One eyebolt and a bit of rope now let me run it up and down with the mast in place.
The new mast came out about 8 feet taller than the old one. I'd sort of hoped for 12, but I didn't want to push its stability too far yet. I think I know what I need to do to get a 40-50 foot mast stable now using purpose-bought parts rather than whatever's in the shop. And the halyard is sweet. I had to rearrange the end support for the antenna to accommodate the changes, but thanks to the halyard the mast stayed up while I did it. And I erected the mast without the antenna pulling on it.
I also have a plan to raise the other end a bit, if I get back to it. But the antenna is laying much flatter than before. thanks to the higher mast, better adjustability with the halyard, and lighter feedline. I just had time to go inside and get a quick look with the antenna analyzer once it was back up. I had a dinner date with my wife tonight, with plans for a family game night once we returned home.
The antenna analyzer shows the reworked antenna at resonance at 7200kHz, with a 1.0 SWR. The SWR across the band peaks at 1.2. 15 meters looks better, too, and almost as good as 40. I went quickly through the spectrum, and I may be able to work in part of the 20m band with this antenna now, but the other bands didn't look promising. I'll take a better look tomorrow, and see if I can arrange a contact on 40m. I've had a few folks offer to help me out there.
Gaining Experience and Perspective
As I worked today I had an eye toward my future skywire installation. One of the tasks I laid aside today was walking around with a tape measure and a kid to plot the distances of trees on my property. I've been thinking in terms of a 160m loop, but today helped me see that I'm already halfway to an 80m loop. One leg of a square 80m loop is about 62 feet, not too far off from the length of my 40m dipole. Knowing that, I can eyeball the distances to two other possible supports.
So an 80m loop is what it'll be. No sense trying for a "bridge too far" when something good and not too difficult is right at hand. With an 80m loop, I can see not only the generalities of what I'd like to do, but also the details of what I actually can do to get it up and running. I'll probably do a "science experiment" on the upper part of the 40m dipole to make sure I know what I'm doing, but if I am, I could possibly have the loop up that day if I have the parts on hand. And part of the idea gets me a pair of 2m antennas (1 vertical, 1 horizontal) up where they may get a signal out to the south of me.
But more about that at a later date.
When my wife and I went to dinner we made a brief stop at W6WEM's house to take the pictures of his loop that I couldn't get on my first visit. It gave her a chance to see firsthand what sort of thing I'm planning to erect at our house. I think she was pleased by how subtle it was. I had to point it out to her, and she remarked "Oh, that's not bad at all!" with a pleased tone to her voice. I expect she'd already steeled herself to some sort of wire basket monstrosity weaving from tree to tree with dead condors caught in its arcing sections and lots of spiky bits to catch lightning and direct it at our house.
After dinner we made a brief stop at Radio Shack, where I may have found the solution to my bad 2m connection between tiny handheld and heavy hose feedline. Tomorrow will tell.
This is why I put so much effort into temporary stuff. The temporary stuff teaches me what I need to know to make good permanent stuff. And to have a realistic perspective on the resources and effort it'll take to build it, maintain it, and be effective with it. I've heard a lot of stories about stringing up some ad-hoc antenna and working DX the first night. I don't doubt them, but I always suspect there are far more stories about putting in a bunch of effort and getting nothing. Those stories aren't as much fun to tell.
I decided to talk about both my successes and my failures. Keeping astronomy observing logs since I was a kid taught me how much I learn from recording the nights where I go out and don't see a thing. But I learned. Now I hardly think about some of the lessons I've learned. Going out and seeing all, most of, or more than what I planned when observing is the norm now. But I had to learn some things along the way. Often through a bit of reality hitting me in the unrealistic hopes or poorly prepared plans.
I'm still learning a lot in amateur radio. Some of I have yet to learn is implied in what my fellow hams say to me that I've yet to learn to appreciate fully. Some is just incrementally working my way through the stages I'm in now.
I definitely have much more of an appreciation for what it takes to set up a solid station. And I'm also much more confident that I'm going to have something I can manage and keep on the air soon.
Tweet
Some days it's been hanging dipoles and burying ground rods, other days it's been drawing QSL cards and applying for vanity call signs.
Today was one of the more active days, and it was a good day, too.
Pick and Choose
I've got several different projects going all at once. There's a lot to do. I'm still reorganizing the garage to make room for my planned shack location. I've got a dodgy short term 40m dipole up, a new 2m J Pole thanks to W6WEM, a nearly-done 10m loop, and prep work to do for a planned skywire loop for either 80 or 160m. Plus I'd like to order myself a new 2m rig and a 2m HT for my daughter, KJ6TFT--her birthday is this month.
Antenna Work
For today I decided to go with antennas. Exactly what was the next question. It's tough to pick if you have several possible directions you can go, each with different amounts of money and effort involved. Plus knowing that at the end of the work and money spent you may have ruined what did sorta work and replaced it with something new and expensive that doesn't work at all.
Ah, the joys of technical hobbies!
First I decided I should focus on what I had on hand rather than taking the time to leave the house and buy more parts. Feedlines was what I was thinking of buying today, from a local communications company. I figure I'll even pay them to put the connectors on for me.
But I've been dragging my feet on this. Without knowing where the antennas are going to be when I get them in a place where they work well, it's hard to know how long to make the feedlines. Too short creates an obvious problem--it won't reach from the antenna to the radio. Too long and I'm losing signal to line losses. Just to be clear, I'm not looking at ten or twenty feet too long, but at possibly 50 to 100 feet longer than may turn out to be required.
So...
I wanted to get the jpole up, so I can hopefully check into the local club nets without a broomstick in the driveway My feedlines on hand are a 70' length of RG-8, a 90' length of RG-58, and a 30' length of RG-58. While the RG-58 is fairly low loss foil shield type, a check with the MFJ-259B told me it's still going to lose about 2dB of signal over the length of the longer piece, which I'd need to get the jpole up where I want it, much more than the RG-8.
And the RG-8 was inconveniently located on my 40m dipole.
So I decided my first task would be bringing down the dipole. It's not easy making your first task taking something apart before getting something else working. I had to fight off the temptation to change gears to work on the 10m loop antenna.
I went up planning to drop the mast on my roof that supports one end of my 40m dipole. When I got there I saw that I could make the job easier by cutting the current mast into sections. Then later I could insert an extension to make it taller. In part, the height of the 40m antenna is limited by the RG-8 feedline's length. a feedline that's longer, and lighter, would allow me to raise the antenna. So I climbed down, got a different set of tools, and creatively cut the mast to bring it down without disturbing the original support.
Once down, I disconnected the RG-8 and decided to make some changes to the center of the dipole. Since it's still a temporary antenna, I didn't want to get too carried away, but I felt I could make some quick improvements that would pay off until I get either of the two loops up. I spent about half an hour on that, then returned to working on the jpole.
I fished out the fiberglass pole I'd originally used with my 2m ground plane (which got me nowhere until I put it on a broomstick). I checked to make sure it'd support the jpole well, adapted the jpole to the fiberglass pole so that it'd stay put and not come loose or move freely.
Then I took it up on the roof, and refurbished the fascia mount I'd used before. Fortunately I was able to get it to where it'd support the jpole and its mast safely, then took it down and added the feedline to the mix. The support was still sturdy with the weight and strain of the feedline, fortunately.
In the home stretch, I dithered about whether to add an "ugly balun" in the few extra feet of feedline. I've heard both ways for jpoles. Finally I decided to wind a choke in the feedline near the base of the mast, well below the bottom of the 'j'. So if the feedline's braid is forming part of the radiator, there's about 2.5m of it free to do so. But there's also an inline RF choke to limit RF coming back into the house.
Checking the New Antenna
I went inside and hooked up the MFJ-259B to the RG-8. The antenna looked good. Its SWR was good across the 2m band. Its resonant frequency is a little low for FM phone, it's near the top of the CW-RTTY section of the band. So I may see if I can retune it a bit before it goes to its eventual permanent location (more on that later.)
OK, I have antenna and feedline. Now, the rig! An HT...?
When I bought my HT, I thought to get an antenna adapter for it, too. The HT takes an SMA male connector on its antenna, I got an SMA to BNC adapter since I'd used BNC connectors on several of my 2m antennas in the 90s.
Now I put on the SMA to BNC adapter, then hooked up a BNC to SO-239 adapter. Then screwed the rig into the feedline. Well, a few feet of RG-8 are heavier and harder to move than a little HT, after all.
I tuned around a bit, and heard a conversation on a repeater in Vacaville, a bit over 80 miles away. Woohoo! I tuned to the frequency of W6EK, the repeater for the Sierra Foothills Amateur Radio Club and gave it a try, asking for a signal report. Nothing. No courtesy tone, no repeater waking up and identifying itself. I tried again, with the same result.
Then I moved over to the frequency for the Nevada County ARC repeater, W6DD and had another try. Success! I got back a reply of "5 but scratchy". I could at least keep checking in to that net without standing outside.
The scratchy bit concerned me, though. I was holding both the HT and the feedline because I didn't want to support the HT by the feedline but I also don't want to strain the HT's antenna connector with the stiff, heavy RG-8 cable. After listening for a while, I realized I was getting some dropouts on my end. The BNC connection wasn't as secure as it should be.
I tried another adapter and an old PL-259 to BNC cable with an SO-239 union in the line. It was even worse. So I filed that problem away mentally and went back outside to finish dealing with my HF antenna before the brief winter daylight was gone.
Restoring the "Old" Antenna
Half a dozen trips between roof and garage got the right tools and parts for a mast extension up there. As I worked, I was adding refinements. I decided to add a halyard arrangement to the mast. Before, it took bringing down the mast to get at the antenna. One eyebolt and a bit of rope now let me run it up and down with the mast in place.
The new mast came out about 8 feet taller than the old one. I'd sort of hoped for 12, but I didn't want to push its stability too far yet. I think I know what I need to do to get a 40-50 foot mast stable now using purpose-bought parts rather than whatever's in the shop. And the halyard is sweet. I had to rearrange the end support for the antenna to accommodate the changes, but thanks to the halyard the mast stayed up while I did it. And I erected the mast without the antenna pulling on it.
I also have a plan to raise the other end a bit, if I get back to it. But the antenna is laying much flatter than before. thanks to the higher mast, better adjustability with the halyard, and lighter feedline. I just had time to go inside and get a quick look with the antenna analyzer once it was back up. I had a dinner date with my wife tonight, with plans for a family game night once we returned home.
The antenna analyzer shows the reworked antenna at resonance at 7200kHz, with a 1.0 SWR. The SWR across the band peaks at 1.2. 15 meters looks better, too, and almost as good as 40. I went quickly through the spectrum, and I may be able to work in part of the 20m band with this antenna now, but the other bands didn't look promising. I'll take a better look tomorrow, and see if I can arrange a contact on 40m. I've had a few folks offer to help me out there.
Gaining Experience and Perspective
As I worked today I had an eye toward my future skywire installation. One of the tasks I laid aside today was walking around with a tape measure and a kid to plot the distances of trees on my property. I've been thinking in terms of a 160m loop, but today helped me see that I'm already halfway to an 80m loop. One leg of a square 80m loop is about 62 feet, not too far off from the length of my 40m dipole. Knowing that, I can eyeball the distances to two other possible supports.
So an 80m loop is what it'll be. No sense trying for a "bridge too far" when something good and not too difficult is right at hand. With an 80m loop, I can see not only the generalities of what I'd like to do, but also the details of what I actually can do to get it up and running. I'll probably do a "science experiment" on the upper part of the 40m dipole to make sure I know what I'm doing, but if I am, I could possibly have the loop up that day if I have the parts on hand. And part of the idea gets me a pair of 2m antennas (1 vertical, 1 horizontal) up where they may get a signal out to the south of me.
But more about that at a later date.
When my wife and I went to dinner we made a brief stop at W6WEM's house to take the pictures of his loop that I couldn't get on my first visit. It gave her a chance to see firsthand what sort of thing I'm planning to erect at our house. I think she was pleased by how subtle it was. I had to point it out to her, and she remarked "Oh, that's not bad at all!" with a pleased tone to her voice. I expect she'd already steeled herself to some sort of wire basket monstrosity weaving from tree to tree with dead condors caught in its arcing sections and lots of spiky bits to catch lightning and direct it at our house.
After dinner we made a brief stop at Radio Shack, where I may have found the solution to my bad 2m connection between tiny handheld and heavy hose feedline. Tomorrow will tell.
This is why I put so much effort into temporary stuff. The temporary stuff teaches me what I need to know to make good permanent stuff. And to have a realistic perspective on the resources and effort it'll take to build it, maintain it, and be effective with it. I've heard a lot of stories about stringing up some ad-hoc antenna and working DX the first night. I don't doubt them, but I always suspect there are far more stories about putting in a bunch of effort and getting nothing. Those stories aren't as much fun to tell.
I decided to talk about both my successes and my failures. Keeping astronomy observing logs since I was a kid taught me how much I learn from recording the nights where I go out and don't see a thing. But I learned. Now I hardly think about some of the lessons I've learned. Going out and seeing all, most of, or more than what I planned when observing is the norm now. But I had to learn some things along the way. Often through a bit of reality hitting me in the unrealistic hopes or poorly prepared plans.
I'm still learning a lot in amateur radio. Some of I have yet to learn is implied in what my fellow hams say to me that I've yet to learn to appreciate fully. Some is just incrementally working my way through the stages I'm in now.
I definitely have much more of an appreciation for what it takes to set up a solid station. And I'm also much more confident that I'm going to have something I can manage and keep on the air soon.
Tuesday, July 12, 2011
CNC Projects: 10 Basic Rules I've Learned

Here are some basic rules I use when selecting or setting up CNC projects. Let me know your rules, or any tweaks you see to mine. Thanks!
1. Don't make anything that you can buy easily, unless you have some specific reason that over-rides the extra cost, effort, and likely unforeseen problems.
2. Remove as little material as possible. Look carefully at item placement in your material stock, different ways of cutting the piece, possible design changes, etc. to reduce the amount of cutting and the amount of material to be removed.
3. Plan your cuts so that the ones that most depend on the accuracy of the bit's size are done with a fresh bit. Bits wear while cutting, if you're planning on cutting, say, a 1/4" dado with a 1/4" bit, you should do it while the bit still has a 1/4" diameter to minimize post-machining to make things accurate.
4. Test your ideas in scrap material first, unless it's a minor variation on something you've already done. Chances are you'll either find a problem you didn't anticipate, or figure out a way to do it better on the next go.
5. Be fanatical about your means of mounting the work. The accuracy and success of the machining relies on it, so think about this as much as you think about the rest of the project.
6. Once you find something that works, build on it. Once you've developed a routine for mounting, cutting, registering, or whatever that regularly produces the results you want, keep doing it. It helps to take notes and pictures for reminders in case there's a break in operations that leaves you a bit rusty on how you did it before.
7. If something isn't working quite, don't keep tolerating it. Fix it, replace it, find another way. It'll be worth the time saved later.
8. Learn from others. Watch videos online, visit other folks' websites, visit with other CNC machinists, see how it's done with different machines or in different areas than your individual interests.
9. Do "science" projects. Plan and develop projects just for the sake of trying out something new or exercising a different procedure. Just like doing a first work in scrap, they'll save you time in the end.
10. Make one complete finished item before you cut out a whole set of parts production-line style. While it costs a fair bit of time in setup to go through once for the prototype, then go back and start over for production, it's better than finding out you've got a stack of parts that won't work when you get to final assembly.
My CNC Website
Monday, March 28, 2011
CNC Machine: Microcarve A4
I've been looking at setting up my own CNC machine for about ten years now. I've worked with CNC and CMM machines off and on since the early 80s. I remember hooking up a CP/M computer to a CMM machine, wowing the lab with its ability to automatically record measurements then produce a compliance report on each part as it was inspected. The next day we went back to doing it manually. Everyone was impressed, but they weren't prepared to add computer infrastructure to the lab at that point.
In my case, I wasn't looking to add supporting a CNC machine to my workload before now. Whenever I read the online forums for adding computer control to milling machines, or building up simple hobbyist CNCs, it looked like working on the CNC itself became the prime object of the effort, rather than using the low-cost CNC for production.
There are a lot of bits and pieces to a CNC. There's also a lot of work represented by the physical machine's construction. I'm aware of this from the professional CNCs I've seen at work. They're high precision equipment, with a team of skilled people supporting their operation. Like a machinist, a machinist's assistant, an electronics tech, a programmer at least part time, and a metrology tech or two checking up on it periodically.
As a hobbyist, I have to do bits of all their jobs, plus the jobs of the design engineers, manufacturing engineers, materials engineers, and their technicians to produce things with a home CNC. Needless to say, I won't be trying to do quite the same thing.
I've started by purchasing an existing CNC machine bed rather than trying to design and build my own. I'm also purchasing a commercial motor controller system. My engineer ego is not in the least bit challenged. My engineer superego knows well the tremendous value of the design work that's gone into the pieces. Cookbook integration is good enough for me here. It's the stuff I make with it that I'll set my ego loose on.
The machine I've purchased is a Microcarve A4. The designer did the commercial Fireball V90 previously. The Microcarve A4 is a smaller unit built for high precision. Which suits me perfectly--a specialized machine is just what I'm looking for.
The controller I've purchased is the Gecko 540. It looks like a well integrated unit with a lot of design fine-tuning in it.
Both should arrive soon, the controller (driver in CNC terms) may come tomorrow if the USPS package tracker is telling me what I think it is. I've got a computer running EMC2 that I've been learning how to use to some degree, that I'll hook up the Gecko and motors to once they're here to shake out that element.
I've got some decent software for 2.5 dimensional conversion of images and such (including the image to gcode software included with EMC2), I'm still trying out CAD packages for real 3D work and CAM programs for converting those designs to tool control instructions on the CNC machine. I want to get that all shaken out to make for as little obstruction between idea and finished part as possible.
It'll be an exciting next couple of weeks. I'm looking forward to getting things assembled, functional, calibrated, and churning out parts. With breaks for infrastructure work (like dust/chip collection and an enclosure) between production runs..
Tweet
In my case, I wasn't looking to add supporting a CNC machine to my workload before now. Whenever I read the online forums for adding computer control to milling machines, or building up simple hobbyist CNCs, it looked like working on the CNC itself became the prime object of the effort, rather than using the low-cost CNC for production.
There are a lot of bits and pieces to a CNC. There's also a lot of work represented by the physical machine's construction. I'm aware of this from the professional CNCs I've seen at work. They're high precision equipment, with a team of skilled people supporting their operation. Like a machinist, a machinist's assistant, an electronics tech, a programmer at least part time, and a metrology tech or two checking up on it periodically.
As a hobbyist, I have to do bits of all their jobs, plus the jobs of the design engineers, manufacturing engineers, materials engineers, and their technicians to produce things with a home CNC. Needless to say, I won't be trying to do quite the same thing.
I've started by purchasing an existing CNC machine bed rather than trying to design and build my own. I'm also purchasing a commercial motor controller system. My engineer ego is not in the least bit challenged. My engineer superego knows well the tremendous value of the design work that's gone into the pieces. Cookbook integration is good enough for me here. It's the stuff I make with it that I'll set my ego loose on.
The machine I've purchased is a Microcarve A4. The designer did the commercial Fireball V90 previously. The Microcarve A4 is a smaller unit built for high precision. Which suits me perfectly--a specialized machine is just what I'm looking for.
The controller I've purchased is the Gecko 540. It looks like a well integrated unit with a lot of design fine-tuning in it.
Both should arrive soon, the controller (driver in CNC terms) may come tomorrow if the USPS package tracker is telling me what I think it is. I've got a computer running EMC2 that I've been learning how to use to some degree, that I'll hook up the Gecko and motors to once they're here to shake out that element.
I've got some decent software for 2.5 dimensional conversion of images and such (including the image to gcode software included with EMC2), I'm still trying out CAD packages for real 3D work and CAM programs for converting those designs to tool control instructions on the CNC machine. I want to get that all shaken out to make for as little obstruction between idea and finished part as possible.
It'll be an exciting next couple of weeks. I'm looking forward to getting things assembled, functional, calibrated, and churning out parts. With breaks for infrastructure work (like dust/chip collection and an enclosure) between production runs..
Wednesday, February 16, 2011
R.I.P. HFE Electronics, Sac's Electronic Part Source
I wrote a post about the HFE Electronics Store last year. They took over the former HSC Electronics store here in the Sacramento area. I drove by today, and the store was empty.

It looks like they went out of business two or three months ago, based on their Facebook discussion page. I only got down there four or five times a year, but I usually stocked up on parts, tools, and supplies on each trip.
Unfortunately this leaves me without a local storefront supplier for electronics. Our local Fry's Electronics carries enough in the way of components and such to make up for what Radio Shack dropped from their line a few years ago. But the selection of parts like interconnects, switches, and prototyping components they had at HFE was far greater than I'd expect to find anywhere other than an old-fashioned electronics store.
I do buy a lot of parts online now, I'll admit. I have about two shopping sprees a year for parts from places like The Electronic Goldmine and BG Micro. Not to mention frequent buys of parts from regular suppliers like Jameco, Mouser Electronics, All American Semiconductor.
But there's a difference.
At a local storefront, the parts are in my hands today. Plus, I can see them and handle them. With items like switches this is extremely important. I can also buy parts in small quantities speculatively then come back the next day if they work out and I need more (I've done this several times over the years at HFE/HSC. I remember once buying over $100 more in components on both days than I had planned on buying on each of two consecutive days. As I recall, the main culprit was some displays one the first day, and some uP support chips the second.)
Another thing that's important about local stores is their accessibility to youngsters getting into the electronics hobby. I know that for me when I was young, and now my daughters, fishing through boxes of parts and imagining what could be done with them is very inspirational. A couple of the fellows at the shop I haunted in my teens (Wenger's Electronics in Walnut Creek, CA) mentored me on several of my early projects. Plus there was advice I picked up from other customers. Not to mention that Wengers had a rack of bubble pack parts from Jameco, where I got my first 8080A.
A Long Time Since
I've been shopping at what was HSC and became HFE since I moved to the Sacramento almost exactly 25 years ago. Back then, I lived just a few blocks away. I not only stopped by in the evenings (if I had to run out in the evening for something, hey, HSC was next door to a Circle K store. How convenient is that? Pick up milk and potentiometers on the same trip out!) They had great flea markets on the weekends. You could pick up most of an Altair or IMSAI for a song back back then, enough that a little TLC would get you there (I wish I'd picked up an IMSAI for the front panel.)
There were other electronics stores* in Sac back then, plus I was right at the north end of town so it was easier to get to places like Natomas and Del Paso Heights for those stores. Since I moved to the foothills, HFE has been where I go.
This is where I met Dave Baldwin. I followed him home to get a treasure trove of old computer and parts he was seeking a home for. It's where I picked up about half of my test instruments, in various states of operability, that I use regularly today. It's where I've picked up interesting bits for many projects, and bits that still inhabit my parts drawers awaiting future fun projects.
I'll miss it.
----------------------------------------------------------------------------
Note: If you know something else in the area that I don't seem to know about (I already know about Fry's and Radio Shack, obviously), then drop a comment or an email, please!
*I'm using the term "electronics store" to refer to what I consider to be an electronics store, which is not a place that primarily sells consumer electronics. We used to call those "TV shops" or "Stereo Stores". I'm rather perturbed by such places moving in on the term "electronics store" (though many old-line electronics stores were once TV stores or repair shops.)
Tweet
HFE Electronics. A Valiant Effort, but Now It's Gone.
It looks like they went out of business two or three months ago, based on their Facebook discussion page. I only got down there four or five times a year, but I usually stocked up on parts, tools, and supplies on each trip.
Unfortunately this leaves me without a local storefront supplier for electronics. Our local Fry's Electronics carries enough in the way of components and such to make up for what Radio Shack dropped from their line a few years ago. But the selection of parts like interconnects, switches, and prototyping components they had at HFE was far greater than I'd expect to find anywhere other than an old-fashioned electronics store.
I do buy a lot of parts online now, I'll admit. I have about two shopping sprees a year for parts from places like The Electronic Goldmine and BG Micro. Not to mention frequent buys of parts from regular suppliers like Jameco, Mouser Electronics, All American Semiconductor.
But there's a difference.
At a local storefront, the parts are in my hands today. Plus, I can see them and handle them. With items like switches this is extremely important. I can also buy parts in small quantities speculatively then come back the next day if they work out and I need more (I've done this several times over the years at HFE/HSC. I remember once buying over $100 more in components on both days than I had planned on buying on each of two consecutive days. As I recall, the main culprit was some displays one the first day, and some uP support chips the second.)
Another thing that's important about local stores is their accessibility to youngsters getting into the electronics hobby. I know that for me when I was young, and now my daughters, fishing through boxes of parts and imagining what could be done with them is very inspirational. A couple of the fellows at the shop I haunted in my teens (Wenger's Electronics in Walnut Creek, CA) mentored me on several of my early projects. Plus there was advice I picked up from other customers. Not to mention that Wengers had a rack of bubble pack parts from Jameco, where I got my first 8080A.
A Long Time Since
I've been shopping at what was HSC and became HFE since I moved to the Sacramento almost exactly 25 years ago. Back then, I lived just a few blocks away. I not only stopped by in the evenings (if I had to run out in the evening for something, hey, HSC was next door to a Circle K store. How convenient is that? Pick up milk and potentiometers on the same trip out!) They had great flea markets on the weekends. You could pick up most of an Altair or IMSAI for a song back back then, enough that a little TLC would get you there (I wish I'd picked up an IMSAI for the front panel.)
There were other electronics stores* in Sac back then, plus I was right at the north end of town so it was easier to get to places like Natomas and Del Paso Heights for those stores. Since I moved to the foothills, HFE has been where I go.
This is where I met Dave Baldwin. I followed him home to get a treasure trove of old computer and parts he was seeking a home for. It's where I picked up about half of my test instruments, in various states of operability, that I use regularly today. It's where I've picked up interesting bits for many projects, and bits that still inhabit my parts drawers awaiting future fun projects.
I'll miss it.
----------------------------------------------------------------------------
Note: If you know something else in the area that I don't seem to know about (I already know about Fry's and Radio Shack, obviously), then drop a comment or an email, please!
*I'm using the term "electronics store" to refer to what I consider to be an electronics store, which is not a place that primarily sells consumer electronics. We used to call those "TV shops" or "Stereo Stores". I'm rather perturbed by such places moving in on the term "electronics store" (though many old-line electronics stores were once TV stores or repair shops.)
Wednesday, October 20, 2010
Repairing the "Unrepairable" Microscope
The school I teach at has a small number of microscopes used by our science classes. I also use them once a year for a lesson where I bring in a bunch of microcircuits made visible to let my students see what's on a chip directly. I also bring in a wafer and some dice (the microcircuit variety, not the Yahtzee variety) for the kids to see and handle.
The exhibits themselves range from a 1959 transistor with the top of the can cut off to reveal the chip and a 1965 dual op-amp similarly prepared to a 1st generation microprocessor to late 80's memory circuits. All together I have about six to eight things I can put under the microscopes that would be interesting to look at.
Since I've been with the school, one of the microscopes has had a label on it reading "Broken, Save for Parts" on it. Since there are only six microscopes, including this one, it means I have to spend time in class changing over each scope from one object to another. Fortunately I've gotten good at talking while focusing a scope and shifting the light and indicator around to the best position. But it would be awfully nice to have at least one more scope. Recently another of the scopes got damaged, reducing us to only four scopes. This is really too few, especially for our science classes.
I Can Fix That
Our science teacher found out I work on optics (I build telescopes as a hobby, in addition to my work with sensor systems professionally.) She asked if I'd be willing to take a look at our newly broken scope. I agreed, and suggested that I might take a look at the "parts only" scope as well, since neither of us knew what was wrong with it.
The office staff let us know that the other scope had been declared "unrepairable" by a scientific instrument repair service that had looked at it several years ago.
When I took a look at the "unrepairable" scope, the optics appeared to be in perfectly good condition. The adjustments and controls were likewise all in good condition. All I found was that the light built into the base did not turn on. I had a light handy, for my own scopes I prefer a light that isn't built into the base, that way I can just grab another light if one of the bulbs burns out when I'm in the middle of a job. More than half the time I'm looking at something opaque anyway, and when I do look at translucent samples I use a mirror as often as I use a lamp for a backlight.
I opened the base to the "unrepairable" scope, wondering what would prevent the light from being fixed. Perhaps a small fire from a prior fixture?
Since When Is A Bulb Replacement "Unrepairable"?
When I got inside there was nothing worse than an empty light socket. The previous light had burned out, been removed, and not been replaced. I could see why, in part. It was an odd sort of bulb. The base style is the same as that for an automotive type "1004" bulb. It's a bayonet mount with two contacts at the tip of the base rather than the usual one. The designation is BA15D. It's an unusual type of bulb, especially for 120V. They run from about $5 to $35 depending on how specialized your supplier is. But they're not unavailable, by any means.
Still, they're hard to come by for people used to picking up light bulbs at hardware and grocery stores, so I decided to replace the base with a more common screw base. A standard medium size screw base, as used on most incandescent lamps around the home, would be too large to fit in the microscope's base. A small "candelabra" base would fit handily, but I wanted to make sure it'd be easy to get lamps in the right range of brightness. Candelabra base bulbs of up to about 15W are easy to come by in a size that would fit. But above that they tend to be the larger "flame" shaped bulbs in the 25 to 40W range, which wouldn't fit properly.
So it came down to an "intermediate" size screw base. Bulbs for these are common at hardware stores and such, as "high intensity" lamp bulbs (in 40W), and as lamps for vacuum cleaners, appliances, and such. 20W to 40W are common.
You Can Get the Bulb, But Not Its Base
Now the problem was finding such a base. I checked several hardware stores and lighting stores, with no luck. They all sold bulbs to fit an intermediate base, but no actual lamp bases in that size. I checked Radio Shack, just on the off chance, and my prejudices about their current parts stocking were confirmed. I even considered using the halogen lamps with the loop and straight leads on them. While the lamps are readily available, once again the bases are not.
I went to several stores and looked at cheap lamps, looking for one I could cannibalize without paying too much for the privilege. No luck, the LED lamp rules there, and none were suitable for a microscope. Neither the light pattern nor the size would work.
Finally I tried yet another hardware store while I was in another nearby town. I was ready to give up on intermediate size and go with candelabra, and hope to find a 20 or 25W bulb to fit. They had a single bulb wired fixture with a candelabra screw base. It looked perfect. The fellow minding the shop floor mentioned a lighting store nearby that I hadn't been to, as well. So I bought the candelabra fixture, a 15W bulb that would fit it, and headed over to the other store.
There they had lamp components in parts drawers, a very promising sign! I found several different types of base, but all in candelabra or medium size. One of the workers there helped me look, but we didn't turn up an intermediate base. We did turn up an adapter to go from a candelabra base to an intermediate base, though. I got that and a 25W bulb to fit, then went home with the lot.
Once home, I test fit the new fixture in the base with duct tape. I pulled out a selection of slides, and selected one with a nice thick feather sample on it to test the light level. I started with the 15W bulb and a thick section of the feather. The 15W bulb illuminated it, but not as well as I would like for students. Student's eyes aren't trained to pick out details yet. They need things well illuminated to help them see what they're supposed to see.
Putting It Together
I put in the adapter and the 25W bulb. That worked perfectly. Bright enough, without being too bright, even with a bacterial sample on a slide. In fact, the bulb aligned with the reflector in the base better with the intermediate base adapter. So I removed the old fixture from its bracket. Prepped the bracket and plastic welded the new base's fixture into place. I cut out the old fixture's wires, desoldered one end from the light switch, soldered and spliced the new fixture in. When it was all done, it looked like it was supposed to be that way. I tested everything to check for operation and safety afterward.
Then I added some labels to describe how to change the bulb to the outside of the case, and what bulb to use.
Now the "unrepairable" microscope not only works great, but can be maintained by an ordinary person without calling the "scientific instrument repair" service.
Tweet
The exhibits themselves range from a 1959 transistor with the top of the can cut off to reveal the chip and a 1965 dual op-amp similarly prepared to a 1st generation microprocessor to late 80's memory circuits. All together I have about six to eight things I can put under the microscopes that would be interesting to look at.
Since I've been with the school, one of the microscopes has had a label on it reading "Broken, Save for Parts" on it. Since there are only six microscopes, including this one, it means I have to spend time in class changing over each scope from one object to another. Fortunately I've gotten good at talking while focusing a scope and shifting the light and indicator around to the best position. But it would be awfully nice to have at least one more scope. Recently another of the scopes got damaged, reducing us to only four scopes. This is really too few, especially for our science classes.
I Can Fix That
Our science teacher found out I work on optics (I build telescopes as a hobby, in addition to my work with sensor systems professionally.) She asked if I'd be willing to take a look at our newly broken scope. I agreed, and suggested that I might take a look at the "parts only" scope as well, since neither of us knew what was wrong with it.
The office staff let us know that the other scope had been declared "unrepairable" by a scientific instrument repair service that had looked at it several years ago.
When I took a look at the "unrepairable" scope, the optics appeared to be in perfectly good condition. The adjustments and controls were likewise all in good condition. All I found was that the light built into the base did not turn on. I had a light handy, for my own scopes I prefer a light that isn't built into the base, that way I can just grab another light if one of the bulbs burns out when I'm in the middle of a job. More than half the time I'm looking at something opaque anyway, and when I do look at translucent samples I use a mirror as often as I use a lamp for a backlight.
I opened the base to the "unrepairable" scope, wondering what would prevent the light from being fixed. Perhaps a small fire from a prior fixture?
Since When Is A Bulb Replacement "Unrepairable"?
When I got inside there was nothing worse than an empty light socket. The previous light had burned out, been removed, and not been replaced. I could see why, in part. It was an odd sort of bulb. The base style is the same as that for an automotive type "1004" bulb. It's a bayonet mount with two contacts at the tip of the base rather than the usual one. The designation is BA15D. It's an unusual type of bulb, especially for 120V. They run from about $5 to $35 depending on how specialized your supplier is. But they're not unavailable, by any means.
Still, they're hard to come by for people used to picking up light bulbs at hardware and grocery stores, so I decided to replace the base with a more common screw base. A standard medium size screw base, as used on most incandescent lamps around the home, would be too large to fit in the microscope's base. A small "candelabra" base would fit handily, but I wanted to make sure it'd be easy to get lamps in the right range of brightness. Candelabra base bulbs of up to about 15W are easy to come by in a size that would fit. But above that they tend to be the larger "flame" shaped bulbs in the 25 to 40W range, which wouldn't fit properly.
So it came down to an "intermediate" size screw base. Bulbs for these are common at hardware stores and such, as "high intensity" lamp bulbs (in 40W), and as lamps for vacuum cleaners, appliances, and such. 20W to 40W are common.
You Can Get the Bulb, But Not Its Base
Now the problem was finding such a base. I checked several hardware stores and lighting stores, with no luck. They all sold bulbs to fit an intermediate base, but no actual lamp bases in that size. I checked Radio Shack, just on the off chance, and my prejudices about their current parts stocking were confirmed. I even considered using the halogen lamps with the loop and straight leads on them. While the lamps are readily available, once again the bases are not.
I went to several stores and looked at cheap lamps, looking for one I could cannibalize without paying too much for the privilege. No luck, the LED lamp rules there, and none were suitable for a microscope. Neither the light pattern nor the size would work.
Finally I tried yet another hardware store while I was in another nearby town. I was ready to give up on intermediate size and go with candelabra, and hope to find a 20 or 25W bulb to fit. They had a single bulb wired fixture with a candelabra screw base. It looked perfect. The fellow minding the shop floor mentioned a lighting store nearby that I hadn't been to, as well. So I bought the candelabra fixture, a 15W bulb that would fit it, and headed over to the other store.
There they had lamp components in parts drawers, a very promising sign! I found several different types of base, but all in candelabra or medium size. One of the workers there helped me look, but we didn't turn up an intermediate base. We did turn up an adapter to go from a candelabra base to an intermediate base, though. I got that and a 25W bulb to fit, then went home with the lot.
Once home, I test fit the new fixture in the base with duct tape. I pulled out a selection of slides, and selected one with a nice thick feather sample on it to test the light level. I started with the 15W bulb and a thick section of the feather. The 15W bulb illuminated it, but not as well as I would like for students. Student's eyes aren't trained to pick out details yet. They need things well illuminated to help them see what they're supposed to see.
Putting It Together
I put in the adapter and the 25W bulb. That worked perfectly. Bright enough, without being too bright, even with a bacterial sample on a slide. In fact, the bulb aligned with the reflector in the base better with the intermediate base adapter. So I removed the old fixture from its bracket. Prepped the bracket and plastic welded the new base's fixture into place. I cut out the old fixture's wires, desoldered one end from the light switch, soldered and spliced the new fixture in. When it was all done, it looked like it was supposed to be that way. I tested everything to check for operation and safety afterward.
Then I added some labels to describe how to change the bulb to the outside of the case, and what bulb to use.
Now the "unrepairable" microscope not only works great, but can be maintained by an ordinary person without calling the "scientific instrument repair" service.
Wednesday, November 5, 2008
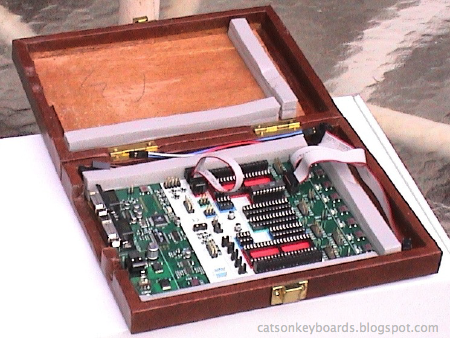
Improving the Atmel STK500
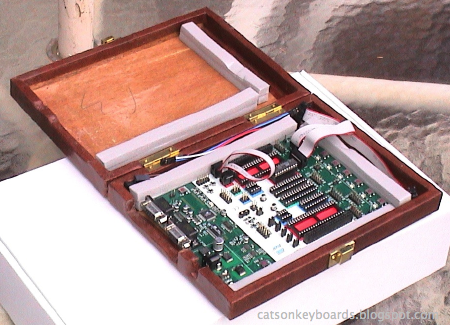
One of my new STK-500 boards inside the case I modded for it.
I recently bought two new STK-500 development boards from Atmel. I've had one for years, and it's been very useful to me when working with AVR microcontrollers. There are a few faults with the STK-500 however. One is that it doesn't provide for mounting in a case. There are no mounting holes, and the components on the board run out to within a millimeter or so of the edge, so there's not even room to put the board on rails.

The components don't provide enough clearance at the edge of the board for mounting rails, and there are no mounting holes on the STK-500 board.
My old STK-500 lives in a cardboard box for a 5-1/4" hard disk drive. It's worked out well, even if it's not very attractive. It lets me keep dust off the board, and it keeps people's fingers away when I take it out in the living room to program chips while I'm in my easy chair. It also lets me put it on a shelf safely when I'm not using it.

My old STK-500 inside its box. The markings on the side keep me from thinking it's an empty box that belongs in the trash.

Here are the cutouts at the end of the box to let me get at the connectors on the STK-500.

The STK-500 inside the box.
I have to open up the box to turn the STK-500 on and off, but that hasn't been a problem. It usually only happens a couple of times a session.
When I got two new STK-500s recently, I originally figured I'd do the same thing with them. When I went looking for boxes, though, I couldn't find anything of the correct size. I haven't bought any hard disks this large for long enough that I've either used or thrown out the boxes of this size.
A trip to the local thrift store turned up a travelling backgammon game set that was just the right size. The plastic moldings for the game pieces and the metallic game boards came out easily. If the STK-500 had fit in alongside the game piece holders I probably would have left them as storage space for cables, but they were a bit too wide.
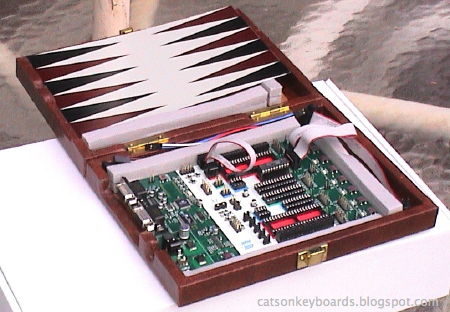
The case started life as a backgammon set.
The adhesive on the vinyl covering was pretty dried out, so it wasn't hard to pull it up and away from the wood underneath. I set the STK-500 inside and marked the power and RS-232 connector locations on the wood with a pencil. A couple of sessions with a Dremel milling bit and test-fits later, I had the connector cutouts where I wanted them in the wood. The next step was fitting the vinyl to the new shape of the wood.

The connector cutouts.
I started by cutting the vinyl for the big cutout first, with yielded a sizable scrap of left over vinyl to use to cover up gaps and mistakes elsewhere. To attach the vinyl back to the box, I used the tail end of a can of spray-on contact cement that was sitting on the shelf going to waste. Brush-on contact cement would have worked just as well. I cut and folded the vinyl pretty much the same way as I would gift wrap around the wood. The results aren't perfect, but they're good enough for someone who's looking for something more classy than a cardboard box.
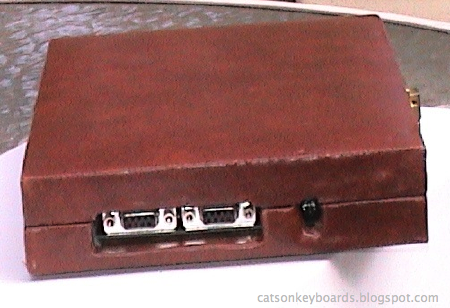
The business end of the case. If I plug cables into the connectors I can cover up any flaws in my work before the guests arrive.
The board safely held by the foam strips, with extra jumper cables stored safely along the sides.
Now I'm going to have to hit some more thrift stores. I've still got one more board to house, and I think my old one will get jealous if I don't find it a nicer home, too.

The finished case. Too stylish for the laboratory?
Wednesday, October 22, 2008
New Bookshelves for the Computer Room
I went shopping for a couple of bookcases for my computer/electronics room this week. I wanted a pair of sturdy six foot tall shelves to replace some four foot stacks of cardboard boxes along one wall. I wanted to pay about $100 per shelf, but was prepared to pay up to $140 apiece for decent shelves. My requirements included a depth of no more than 14 inches if possible with a hard limit of 16 inches to avoid cutting into a walkway, sturdy construction and a reasonably professional appearance. If at all possible I wanted something on feet to allow vacuuming underneath and behind, and 2 or 3 drawers in the bottom would be awfully nice.
Sturdy is important to me. I'm a practiced abuser of bookcases, with more than a few exploded cases and collapsed shelves to my credit (so to speak.) I'm a packrat of data books, journals on glossy stock, and I top-stack and double stack when unsupervised. I try to fight the worst of these habits, if nothing else because they work against my using my books.
When I looked in at our local oak furniture store I found that seven-foot shelves of the sort I bought for our living room last year had jumped over $100 in price. The six footers that came closest to what I wanted were priced at $210 apiece. Even if the store had been willing to dicker, the shelves sat with the bottom shelf on the floor so they weren't really what I wanted even if we could get closer to my price.
I then stopped at our only other dedicated furniture store in the area. It's a nice, friendly discount place in a sort of quonset hut warehouse. Most of their stock is in living room furniture--over half the floorspace is covered with sofas--but they carry a few nice pieces of office furniture so figured I'd give them a look.
Unfortunately, all they had was either cases like those at the oak store (in a wider range of finishes), and large deep heavy pieces like display cabinets for living rooms. The prices on the straight bookcases were the same as at the oak store.
I walked out sarting to assemble a list of lumber, fasteners, and finishes to buy at the hardware store. I really didn't want to make my own, especially when I considered how much time it'd take away from other current work. But I sure wasn't going to pay double for something that wasn't even what I wanted.
More to kill time while I thought than with any expectation of finding something, I stopped in at our nearest Target store. I figured I could think through my budget again, and plan out where else I might go looking further afield. When I got to the furniture section I saw a couple of different shelves along the lines of what I was looking for. One was at the top end of my planned price range, the other on sale at my preferred price. Neither had drawers in the bottom, but otherwise they met my requirements and desires.
I ended up getting a pair of the cheaper ones. Six foot "honey" colored (sort of a maple finish) bookcases. Unlike the ones from the furniture stores they're assemble-yourself, but that's better than design-and-fabricate-yourself as far as time and effort is concerned.
They went together easily, about ninety minutes each. The stain job isn't perfect, but it's good enough for working furniture. Good enough that I didn't bother touching it up. There's a fixed shelf in the middle that adds a lot of strength and stability, I'd have a hard time exploding these. Also, the carcase--the structural parts of the case--is made of hardwood, not pressboard. This makes the case stronger, lighter, and more dimensionally stable.
The shelves are pressboard, but they're reinforced with hardwood to prevent warping and sagging.
Assembly was easy, even easier because I didnt follow the order given in the instructions. I installed the lintel ornament before putting on the top, and the top before the back panels. In both cases I had better light and access to the work than if I'd followed the given order.
The shelves also came with restraint cables to attach them to the wall. I didn't realize this. So I stopped at the hardware store and bought two kits on the way home from Target. Oh, well. I've got one other shelf at home that I'd like to change out the restraint on, then I'll take the other kit back.
The bookcases are in place and loaded up. They look great and they're proving to be as strong as I hoped. They'll also save me from worrying about cardboard box collapses this winter, and let me focus on my various electronic projects.
Subscribe to:
Posts (Atom)


 Webomator.com: Backward into the