Friday, April 22, 2011

8085 Microprocessor Reference Card Posted

8085 processor reference card

I put up a downloadable PDF of my own 8085 reference card on my website:
8085 Microprocessor Reference Card

I've added a bunch of information that I often use that's not on the original Intel reference card. This includes the undocumented 8085 instructions, timing for all instructions in T-States, a pinout and basic electrical reference, and a little more detail on the additional interrupts the 8085 adds to the 8080A design. Such as the fact that they're off by default, which I've forgotten at least a couple of times when writing test routines.

The card is laid out so that it can be printed on either a single-sided sheet or double sided to make two cards laid out with a front and back. The finished card looks great on a good cover stock paper, and folds to fit nicely into a pocket.

Friday, April 8, 2011

microCarve A4 CNC Assembly Complete!

I finished my motor controller box day before yesterday, as described in Gecko G540 Power Up! as I build my microCarve A4 CNC router. Just take a look at the past several articles in my archive for more background and pictures of the A4.

Gecko G540 Motor Controller Enclosure made from UPS, back
Completed Controller Box with Improved Fan Cutouts


Gecko G540 Motor Controller Enclosure made from UPS, front
Front with Big Red Switch and Power Light. Needs personalized stickers.


Microcarve A4 CNC router fully assembled without stepper motors
Completed MicroCarve A4 without Motors.


MicroCarve A4 CNC router with stepper motors attached, ready for testing.
Completed MicroCarve A4 CNC with stepper motors in place.


Tomorrow I start testing without a spindle. If all goes well, I'll start assembling a spindle mount.

More at: my CNCZone Build Thread

Monday, April 4, 2011

Gecko G540 Power-Up!

I finished the enclosure for the power supply and Gecko motor controller today!

I changed my fan layout a bit. I put all four fans to work at the back of the box. Two are intake fans, the ones on the opposite side are outlet fans. They blow across the back of the Gecko. They make a pretty good stream of air. The fans are all the same type now, unlike yesterday's picture. They're all the larger variety of CPU fan. 75mm or thereabouts.

I used CPU fans for their low profile, I've only got about 3/8" clearance on each side of the inside. I've paired them up side by side to increase airflow.

This also meant adding a pair of fan cutouts to the back end of the box. So that was added work over what I'd anticipated.

Nevertheless, I got the holes cut, the fans mounted, wired, and a connector on them with a mating connector on the power supply.

I wrangled the wires and got the box closed. I had the Gecko pulled (I'd taken it out after the initial test fit. I pulled the power leads for the Gecko out of the box and hooked them up to the Gecko.

When I plugged in and powered on, I got Power and Fault lights (there's still no E-Stop wired to the Gecko, just power at this point.) That's a good test.

Off to bed for me. Pics tomorrow.

Sunday, April 3, 2011

MicroCarve A4 CNC Build Progress: Driver Enclosure

I'm getting closer to having a working CNC mill. I've been taking long as necessary to get the job done right the first time as much as possible, and to put on some polish at the outset.

My current work is to convert an old UPS into the power supply and motor driver enclosure for my CNC mill.

I started with this:

Empty Emerson UPS Case

And cut the back panel to hold my Gecko G540 motor controller like this:

Gecko G540 Panel Mount


I go into more detail on these steps in an earlier article.

One of the problems with this enclosure is the airflow. I want to make sure there's plenty of it for the current electronics. I got another metal nibbler and made some cut outs this morning for the power supply:

Cutouts for power supply airflow.
I didn't worry about cosmetics here, I just wanted to get on with the job. As long as I won't cut myself, I don't care how the cutouts look.


Cutouts for power supply airflow.
You can see that the cutouts line up well with the power supply vents.


Test fit of power supply to check airflow.
There's room for some airflow around the power supply inside the cabinet.


I wanted to take advantage of the big red power switch the original UPS had, so I chopped of the section of the original PCB with the switch, then mounted it on the original mounting hardware with some minor mods to make it stay in place without the rest of the board.

Chopped off PCB with switch.


Original Switch Specifications: 125V, 7.5A
The original switch's specs are good enough to wire it directly into the AC power line for the new circuit.


I thought I might have to use the switch to pull a relay on the AC line for the power supply, but as it turns out it's adequate for passing the AC directly. Whew! That saved some work.

AC Wiring of DC Power Supply for CNC
Finished AC Wiring


Unit tested for DC Power Output, Multimeter shows 48.1VDC
Power On, Looking Good!


Then I wanted to have a power indication LED. I made up a resistor divider both to feed a lower voltage to the LED than the power supply's 48V nominal output, and to limit current to the LED. I planned on 6V at about 10mA, and made a divider. The original two-color LED didn't light up very bright at 10mA (I should have built the divider for 20mA), so I put in a red LED that's daylight visible at 10mA.

A pair of resistors on spade lugs, 4700 and 690 ohms.
The divider/current limiter.


A red power LED under shrinkwrap hooked to a light pipe in the CNC power supply cabinet.
The new red LED, held up to the light pipe with shrink wrap so I can see how bright it'll be. I later removed the unshrunken shrink wrap, hot-glued the LED to the PCB, and it fits up to the light pipe inside the cabinet perfectly.


My last item on this cabinet will be finished tomorrow. Since the power supply puts out 48V and all my available fans are 12V, I put four fans in series. I'll have two fans drawing air in from the sides of the cabinet across the back of the G540. A third fan will exhaust air out the front of the cabinet. The fourth will try to stay out of the way. I marked out a place for the last fan to draw air into the cabinet from below the Gecko, but didn't cut it. If it gets warm inside the case while I'm testing it with motors attached and driving a CNC table around, I'll put in the hole for the fourth fan.

Four 12V fans wired in series, and one side of the cabinet with enlarged air vents.
The fans, and an enlarged air vent for one of the fans in the side of the cabinet cover.

When I'm not working out in the shop, I'm personalizing my microCarve A4's paint job a little:
microCarve A4 CNC side panels, one is as original, one has the logo painted in with Harvest Gold paint.

Friday, April 1, 2011

Microcarve A4 CNC Build-Up Progress:Controls

I'm the proud new owner of a microCarve A4 CNC machine. I'm still getting it built up--I got my motors and motor driver three days ago and the A4 just arrived yesterday.

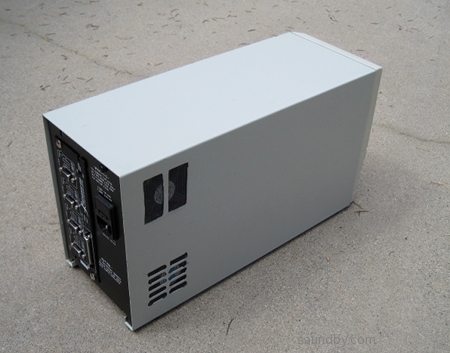
Yesterday and today I was working on an enclosure for my Gecko G540 driver and the power supply for it and the motors. After looking around at what I had on hand, I decided to "repurpose" an old UPS's enclosure:

Old Emerson UPS, repurposed as a CNC driver enclosure.
The Enclosure, after the guts were removed.

Back Plate of the enclosure, before being cut for the Gecko G540.
The original back plate.

Inside the UPS Backplate
And the Inside

Fused Mains Plug for the UPS.
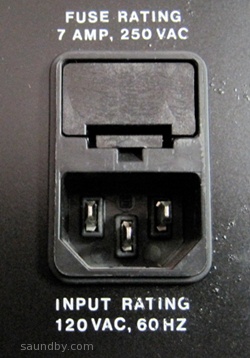
A Fused Mains Plug--Very Handy!

Gecko G540 Laid on the Plate
Here's where the Gecko will fit, more or less.


My original plan was just to use a nibbler, starting at the hole for the phone jack for the UPS. I scribed my cut lines, then started cutting with the nibbler. About an inch into the work, the nibbler broke. Did I mention that I'd modified this nibbler in the past to cut plastic? I made it so that its jaw would open wider. This weakened the nibbler a bit, but hey, who needs strength for cutting plastic?

Then I went and cut some metal with it. It wasn't up to that job any more.

I spent much of the day yesterday trying to buy a new nibbler. I went to five different places nearby. Four of those places had never heard of a nibbler, at least three seemed to think I was making it up. The last had heard of nibblers, but they didn't have any.

So I came back home and got to work with other tools. I finished the job about noon today. It was a lot more work, but the results are decent, even if they're not quite as clean as I can get with a nibbler. Plus it made a lot of steel filings. Dremel, cutoff wheels, cold chisel, files, grinding stone and hammer were among the tools used.

Gecko 540 4-axis driver mounted in plate
The Gecko, in its new home.

Back of Gecko G540 mounted in plate
The Gecko from the back.


Since I had to take care of all those filings, I did a pretty thorough cleaning of my bench so that I'd have a place to assemble the A4 without any further delays. My next image reveals wood which seldom sees the light of day:

cleared workbench top
The top of my bench. Stains are just Tapmatic fluid that hasn't dried yet.


It looks like it's outside because of the window. In fact, it's in a second garage that was added outside the house's original garage. The original garage's windows were just left in place when the prior owners added the second garage.