Yesterday, I learned that ZBrush (my 3D design program) now has an extension that lets it directly export files I can use with my Computer Aided Manufacturing (CAM) programs. I spent most of my work time today testing the output of various designs to see how they looked.
ZBrush has this 'built-in' since version 4R6 came out, it was available as a plug-in before, but since it calls itself a 3D printing plug-in, I ignored it, assuming it was software to sent object data to one or more of the commercial 3D printing services, like Shapeways. Turns out it's an exporter for standard 3D object file formats like .stl.
This is a huge improvement for my workflow of going from design to a finished part prototype in the real world. Before I had to use a very complex conversion program. Its control panel makes the flight deck of a 747 look simple. And if I didn't get the settings just right, I could get some really nasty effects in the final machining. Using the same settlings over again doesn't work, I had to adjust things based on the size of the object, the scale of features on it, the size of the material it would be cut out of, the relative size of the tool, etc., etc.
Now that difficult & frightening step is gone. I do a couple of passes to simplify the 3D object design as much as possible without losing detail (which I was doing anyway, it speeds up everything later), set a couple of simple settings in the exporter, like the real-world size the final object will be, then export.
The resulting files load just fine into the two different programs I use that create the list of instructions for my CNC machine to cut the 3D object out of a solid block of some material (usually a polyurethane plastic). I did a dry run to set up two test files tonight--doing everything short of actually making the parts. Tomorrow I plan to make an actual part from a new file as a final test. Probably something fun.
For those interested in trying this at home, I use both MeshCAM and Vectric's Cut3D for CAM. Cut3D is my usual preference, though I'm using an older version of MeshCAM (4). I prefer Cut3D's interface for setting tabs, and its included machining preview.
Both produce excellent GCode for my CNC (a MicroCarve A4 driven by EMC2 and a Gecko G540 controller.)
For doing image depth maps, I use EMC2's built in facility, though if you want to bypass the copious experimentation & two pages of notes I use to get it looking good, you might want to look into one of the dedicated commercial programs for this.
Showing posts with label CAM. Show all posts
Showing posts with label CAM. Show all posts
Tuesday, November 19, 2013
Thursday, May 3, 2012
Trying to Learn ZBrush, Hitting Lots of Land Mines
After having a lot of fun with the free Sculptris program, and with the need for a more fully-featured 3D modeling program, I decided to buy ZBrush a couple of weeks ago.
Tweet
Unfortunately, it been a tough road trying to learn it.
I was running into a problem early on where I'd get out of Edit mode (3D editing) and couldn't get back into it. Going from 3D mode to 2D mode is strictly one-way. There are any of a number of ways to do it by accident, and once you do, there's no Undo. After about a week, it stopped happening to me, and now it's not so much of a problem. At first, though, I had no clue what was happening. And the "getting started" information was no help, nor was a search on the terms I could think of on the web site. There were dire warnings on Pixologic's site about saving a 3D object as a 2D image, then not being able to reload and re-edit the object even when you believed you saved it. I hadn't encountered that particular problem yet, but that wasn't my problem.
Finally I found an old video tutorial that's not featured in their "online classroom" any more that explained what is happening, and since I've seen that I've been able to mostly avoid running into the problem, and recovering when I do. Before that, I'd already developed some techniques on my own to tiptoe past that particular land mine.
New Land Mines
Since then I've had my work go *poof* on me in several different other ways. It's not exactly inviting you to explore its features when this keeps happening. My most recent (about ten minutes ago) was trying to add a new subtool to a project.
When I got started, I was mostly just sculpting shapes out of one object, or "subtool" in ZBrush parlance (a single mesh.) I learned how to add additional objects to a scene, but it was awkward enough for me with what all else I was trying to master that I was just avoiding it until later.
Now I've gotten to where not having separate pieces is more of a problem than dealing with adding, aligning, etc. the additional objects.
So I was working with a sort of cartoonish fox head. I had the basic head pretty well sculpted. I added a pair of eyeballs as separate spheres (which is a lot cleaner is Sculptris--there you can add a pair of objects simultaneously and move them fluidly around your reflection plane. In ZBrush you add one, position it, then, so far as I know now, create a duplicate and position it by guess and by golly to a position that matches the first one on the opposite side of the object you want it in. All very clunky.) I decided to do the teeth as separate objects as well. So I appended a new subtool, picked a Cone3D object, used the clunky sliders in the Deformation menu to move it (isn't that a Transformation, not a deformation?) Then I scaled it down to about the right size and slid it more or less in place.
Then I wanted to sculpt its form a bit. I wasn't entirely sure whether it was a primitive or a mesh, and I wanted to subdivide it to create more detail (rule: NEVER be ignorant about ANYTHING in ZBrush. You must understand absolutely everything, it would appear, in its entirety to avoid ending up with nothing to show for your time.) Well, I clicked the "Make PolyMesh3D" button in the Tools menu.
And the complex sculpt I'd gotten to a good state over the prior hour went *poof*. No warnings, no undoes, no saving throw. The head and eye subtools are gone. They don't appear in the available tools when I click "Append" in the subtool directory. I've found things that I thought went poof there a couple of times. Should I mention the times I did a save and had things disappear from view? In those cases they reappear when I click back in the work area. They just disappear to startle me, is the best I can figure.
But my fox head is gone and unrecoverable.
Yeah, I know I should save more often. As it is, I do save very often. I'm filling my hard disk with minor deltas of my fooling around and hoping this starts to be productive projects. I'm disinclined to save every time I click a button. I could wish that when I'm going to click a button that deletes subtools with no means of recovering them I'd get a nice warning, like I do on so many other things that aren't recoverable. I do get warnings on lots of other things, many of which I don't understand what it's asking me or the consequences of my choices, but at least I get a wake-up that lets me save before I start spelunking through my possible answers.
Not All Bad, But Jury's Still Out
The program has a lot of cool capabilities. But the question is whether I'll be able to get through all the trouble to really be able to take advantage of them. I'm two weeks into working with it, and I've got less to show than I had with one afternoon with Sculptris, or for that matter, one day with Sculpt-Animate 3D or Lightwave on my old Amiga over 20 years ago. There are a lot of places where I just don't feel like I've got much control, I'm just hoping for the best, or trying to jigger things with hand and eye.
A lot of sculpting tools behave in odd fashions--at times. If they were like that all the time I'd be able to at least avoid trouble. But they cause geometry problems that are difficult or time consuming to solve. There are other times where you're trying to do something just the way you have been all along, and nothing, or almost nothing happens. Then, suddenly, on another attempt, it shoots off, out of control.
I'm really hoping to make this work, because there's a lot I'd like to get out of this program in producing models for my CNC milling machine. But, if I don't start getting more out of it pretty soon, well, $700 is just too much for me to not ask for my money back. Especially after all the time I've put into watching training videos, reading documentation, and just working with the tool trying to get somewhere that I can reasonably predict the results I'm going to get--without even starting to talk about how much time it'll take me to get those results, yet.
Friday, October 21, 2011
MeshCAM: An Inexpensive Commercial CAM Program
I was recently contacted by Robert Grzesek, developer of MeshCAM, a 3D CAM program. He'd seen my earlier article where I express some frustration with "free" software, particularly for CAM. The free software I tried usually did simple rasterized cuts of the object loaded, with the result that a lot of the design's detail was lost.
Robert offered me a free copy of MeshCAM if I'd blog about it. I took a look at the product information online and took him up on his offer.
MeshCAM is in the same price range as the other commercial CAM program I've been using--it's a hobbyist-affordable program. This is very nice, as so much of the available software is well beyond the budget of an amateur, or a small business where CAM work is a sideline without a large budget.
It's documentation and the tutorials are very good. Having recently gone through some tutorial-based training with some other programs that are from much larger companies in the past few days, I'm pretty well up to speed with what can go wrong with a tutorial. The MeshCAM tutorials are up to date and in sync with the current version of MeshCAM. They describe the process well from the basis of someone trying to get a specific task accomplished, they're not just a description of what appears in the menus.
At first, I wasn't sure that double-sided machining for full 3D objects was going to be covered, but it was, I just needed to stop anticipating possible problems quite so much.
Working with MeshCAM itself, I've opened up the provided files and a couple of files of my own. For the file types it accepts (STLs and DXFs, in addition to its own MCF format, plus a number of 2D image formats for image-based height maps), it opens the files without a problem and displays them properly. Wavefront OBJ files would be a nice addition, but then that's why I've got the open source program MeshLAB (which has no relation to the MeshCAM line of products) which is frustrating at times, but mostly does the job of object type conversion and it's free.

Above is an example of MeshCAM's display of an object. The way MeshCAM displays its axes is a bit cartoonish, but at least you won't have to worry about missing them. They can get in the way of small objects in the display screen. There may be a way to deal with that by changing the way they're displayed, but so far I've just moved or rotated my objects away to view detail then moved them back.
The thing that makes MeshCAM stand out for me at this point is its finishing abilities:
It has built-in multi-pass finishing. I've managed to get the same results from Cut3D through a work-around. There, I create a finishing toolpath for one tool, save those toolpaths, then go back and define a different finishing pass, then save those toolpaths, and run them on the CNC one after the other.
MeshCAM doesn't require this. It gives a great set of finishing options for multiple tool passes right out of the box. I'm presently working on a model specifically to take advantage of these capabilities. Since much of what I'm doing is intended to have a high level of detail, I'm looking forward to seeing what comes off the CNC when I use MeshCAM to build the toolpaths.
MeshCAM displays the toolpaths it generates in the 3D view once they've been calculated, which gives a good first-look check to make sure that things came out right. There's no preview of the cutting operation built in to MeshCAM, however, as in Cut3D. Instead, a separate program, CutViewer is offered. Or you can do a "dry run" in most CNC control programs like EMC2 or Mach3 to see what the cutting will look like, at least as far as tool head movement is concerned.
The previews of the cutting operations have been one of my favorite features of Cut3D, so it's a feature I miss in a CAM program. I've gotten a higher degree of confidence from using this to see how the cutting operation will proceed ahead of time--the order of cuts is not always what you'd expect. The ability to check this during the CAM operation is very nice.
So I'd recommend planning to add CutViewer to your purchase if you buy MeshCAM, or make sure you're comfortable with your CNC control program's preview abilities. I'm using the preview abilities of EMC2's Axis view, myself.
Once I've finished the models I'll be trying out with MeshCAM, I'll be reporting on the final results. I'm planning both a flat relief object and a full 3D, 2-sided object.
Stay tuned...
Tweet
Robert offered me a free copy of MeshCAM if I'd blog about it. I took a look at the product information online and took him up on his offer.
MeshCAM is in the same price range as the other commercial CAM program I've been using--it's a hobbyist-affordable program. This is very nice, as so much of the available software is well beyond the budget of an amateur, or a small business where CAM work is a sideline without a large budget.
It's documentation and the tutorials are very good. Having recently gone through some tutorial-based training with some other programs that are from much larger companies in the past few days, I'm pretty well up to speed with what can go wrong with a tutorial. The MeshCAM tutorials are up to date and in sync with the current version of MeshCAM. They describe the process well from the basis of someone trying to get a specific task accomplished, they're not just a description of what appears in the menus.
At first, I wasn't sure that double-sided machining for full 3D objects was going to be covered, but it was, I just needed to stop anticipating possible problems quite so much.
Working with MeshCAM itself, I've opened up the provided files and a couple of files of my own. For the file types it accepts (STLs and DXFs, in addition to its own MCF format, plus a number of 2D image formats for image-based height maps), it opens the files without a problem and displays them properly. Wavefront OBJ files would be a nice addition, but then that's why I've got the open source program MeshLAB (which has no relation to the MeshCAM line of products) which is frustrating at times, but mostly does the job of object type conversion and it's free.
Above is an example of MeshCAM's display of an object. The way MeshCAM displays its axes is a bit cartoonish, but at least you won't have to worry about missing them. They can get in the way of small objects in the display screen. There may be a way to deal with that by changing the way they're displayed, but so far I've just moved or rotated my objects away to view detail then moved them back.
The thing that makes MeshCAM stand out for me at this point is its finishing abilities:
It has built-in multi-pass finishing. I've managed to get the same results from Cut3D through a work-around. There, I create a finishing toolpath for one tool, save those toolpaths, then go back and define a different finishing pass, then save those toolpaths, and run them on the CNC one after the other.
MeshCAM doesn't require this. It gives a great set of finishing options for multiple tool passes right out of the box. I'm presently working on a model specifically to take advantage of these capabilities. Since much of what I'm doing is intended to have a high level of detail, I'm looking forward to seeing what comes off the CNC when I use MeshCAM to build the toolpaths.
MeshCAM displays the toolpaths it generates in the 3D view once they've been calculated, which gives a good first-look check to make sure that things came out right. There's no preview of the cutting operation built in to MeshCAM, however, as in Cut3D. Instead, a separate program, CutViewer is offered. Or you can do a "dry run" in most CNC control programs like EMC2 or Mach3 to see what the cutting will look like, at least as far as tool head movement is concerned.
The previews of the cutting operations have been one of my favorite features of Cut3D, so it's a feature I miss in a CAM program. I've gotten a higher degree of confidence from using this to see how the cutting operation will proceed ahead of time--the order of cuts is not always what you'd expect. The ability to check this during the CAM operation is very nice.
So I'd recommend planning to add CutViewer to your purchase if you buy MeshCAM, or make sure you're comfortable with your CNC control program's preview abilities. I'm using the preview abilities of EMC2's Axis view, myself.
Once I've finished the models I'll be trying out with MeshCAM, I'll be reporting on the final results. I'm planning both a flat relief object and a full 3D, 2-sided object.
Stay tuned...
Monday, October 3, 2011
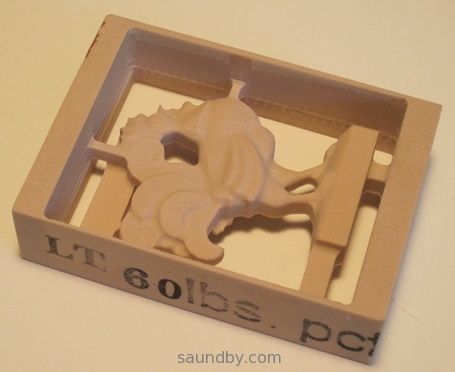
CNC Rooster: Third Time's a Charm
In a prior post, I'd made a mistake handling the material when cutting a full 3D object using gcode files generated by Vectric's Cut3D CAM software. After that I tried again. That time things were going swimmingly until I got some gunk on a leadscrew that hung up the X axis and ruined the cut.
Well, I tried again today. After doing some preventative maintenance on my microCarve A4 CNC, testing it thoroughly and making sure of myself as well, I managed to turn out a small urethane rooster:


The part turned out very well. The whole time the second side was cutting, I was fretting over how good my alignment would be. It turned out to be just fine.
The beak looks worse than it actually is because of a loose bit of plastic that'll come off when I scrape it with a thumbnail. It isn't perfect, however, because of the overcut depth I specified for the first side's cut. It's too deep for the thickness of the beak, and though the overall alignment of front and back side is excellent, the beak is at an angle, so one side is lower than the other. If I hadn't specified such a deep overcut, it would not have cut through this way.
Still, it'll clean up nicely.
Further Observations
The facets you see, particularly in areas like the chicken's breast, are part of the original 3D model. They aren't machining flaws. On the second side I cut the machining marks that are there are a little deeper than they should be because I trimmed my tab sizes down way too much, so they flexed a bit during machining.
Still, the overall quality of the part is such that I could clean it up to use as a casting master easily, if I were going to duplicate this part.
The Materials
The prior two tries were done using NC Proofboard, a urethane foam board, with densities of 60 and 48 lbs. per cubic foot. This last one was done in Butter-Board, which has a density of about 64 lbs per cubic foot. All are machinable plastics from Golden West Manufacturing.
60# NC Proofboard
The 60# proofboard was a very nice material. The cell size of the foam is very, very small and could easily be coated to smooth it enough to use a part made from it as a casting master. In fact, the mold release might be sufficient. It's very tough, and machines like a dream.
48# NC Proofboard
The 48# proofboard machines very easily as well, but tends to be a bit more brittle in thin sections than the 60# board. The cell size is about half again as large, but still small enough to be easy to coat, it'd just take more to do it--some sort of filler rather than a primer coat or a thick mold release agent.
Butter-Board
The Butter-Board machines to a fine, smooth surface. It takes a little more care in feed rates than the proofboards, which have a lot of resiliency thanks to being foamed products. But the completed part has an impeccable surface so far as the machining makes it so. It's not as tough in thin sections as the 60# proofboard, but it's stronger than the 48# board in thin sections in general, though it tends a bit toward the brittle.
I like all three materials quite a bit, and plan on getting some more of the Butter-board and 60# NC Proofboard soon for both business and hobby use.
Tooling
The rough cuts were done with a 1/8" 2 flute square end mill, the finishing cuts were done with a 1/16" 2 flute ball nose end mill. Both bits were purchased from IMService, at nice prices and the bits are very good. I was concerned that I may want to use single-flute bits, but these bits performed admirably with these materials. At some point I'll try a future cut with single-flute bits for comparison's sake, but these bits cut well, showed no propensity for clogging. They stayed sharp and cool through the cuts.
CAM Software
As to Cut3D, I'm quite happy with it so far, and I'm planning two more jobs for it in the immediate future. I'm also going to be giving MeshCAM a spin for a high relief piece of work in the near future, and I'll be reporting on that soon.
Tweet
Well, I tried again today. After doing some preventative maintenance on my microCarve A4 CNC, testing it thoroughly and making sure of myself as well, I managed to turn out a small urethane rooster:
Rooster, Side A
Rooster, Side B
The part turned out very well. The whole time the second side was cutting, I was fretting over how good my alignment would be. It turned out to be just fine.
The beak looks worse than it actually is because of a loose bit of plastic that'll come off when I scrape it with a thumbnail. It isn't perfect, however, because of the overcut depth I specified for the first side's cut. It's too deep for the thickness of the beak, and though the overall alignment of front and back side is excellent, the beak is at an angle, so one side is lower than the other. If I hadn't specified such a deep overcut, it would not have cut through this way.
Still, it'll clean up nicely.
Further Observations
The facets you see, particularly in areas like the chicken's breast, are part of the original 3D model. They aren't machining flaws. On the second side I cut the machining marks that are there are a little deeper than they should be because I trimmed my tab sizes down way too much, so they flexed a bit during machining.
Still, the overall quality of the part is such that I could clean it up to use as a casting master easily, if I were going to duplicate this part.
The Materials
The prior two tries were done using NC Proofboard, a urethane foam board, with densities of 60 and 48 lbs. per cubic foot. This last one was done in Butter-Board, which has a density of about 64 lbs per cubic foot. All are machinable plastics from Golden West Manufacturing.
60# NC Proofboard
The 60# proofboard was a very nice material. The cell size of the foam is very, very small and could easily be coated to smooth it enough to use a part made from it as a casting master. In fact, the mold release might be sufficient. It's very tough, and machines like a dream.
48# NC Proofboard
The 48# proofboard machines very easily as well, but tends to be a bit more brittle in thin sections than the 60# board. The cell size is about half again as large, but still small enough to be easy to coat, it'd just take more to do it--some sort of filler rather than a primer coat or a thick mold release agent.
Butter-Board
The Butter-Board machines to a fine, smooth surface. It takes a little more care in feed rates than the proofboards, which have a lot of resiliency thanks to being foamed products. But the completed part has an impeccable surface so far as the machining makes it so. It's not as tough in thin sections as the 60# proofboard, but it's stronger than the 48# board in thin sections in general, though it tends a bit toward the brittle.
I like all three materials quite a bit, and plan on getting some more of the Butter-board and 60# NC Proofboard soon for both business and hobby use.
Tooling
The rough cuts were done with a 1/8" 2 flute square end mill, the finishing cuts were done with a 1/16" 2 flute ball nose end mill. Both bits were purchased from IMService, at nice prices and the bits are very good. I was concerned that I may want to use single-flute bits, but these bits performed admirably with these materials. At some point I'll try a future cut with single-flute bits for comparison's sake, but these bits cut well, showed no propensity for clogging. They stayed sharp and cool through the cuts.
CAM Software
As to Cut3D, I'm quite happy with it so far, and I'm planning two more jobs for it in the immediate future. I'm also going to be giving MeshCAM a spin for a high relief piece of work in the near future, and I'll be reporting on that soon.
Tuesday, September 20, 2011
CNC with Vectric's Cut3D: It's Great, I'm So-So
After running through a bunch of free CAM software that didn't do what I wanted, I finally ended up where I pretty well knew I was going to end up. I downloaded a trial version of Vectric's Cut3D software.
I also happened to have some samples of machinable urethane plastics to try out, and the new software was just the thing to do that with.
I started with one of Vectric's sample files, the rooster statue. The statue is initially scaled to stand twelve inches tall. My material was about 3.5 by 2.4 by 0.9 inches in size. So I used Cut3D to scale the object, no problemo.
I positioned it in the block, added some tabs, again no problem.

Since this was my first time using Cut3D, my only concern as I went through the simple linear process of setting things up was what I would end up with in the way of files at the end. Would I get a file with some sort of pauses in it, during which I would do tool changes and material flips (to machine top and bottom), or would I have to edit these in, or what?
As it turned out, Cut3D produced four gcode files. Top rough cut, top finish cut, bottom rough cut, and bottom finish cut. For machines with tool changers, it can consolidate the files that have tool changes between them.
So this makes it easy. Load up the material, align the machine, run the rough cut for the side you start with, and wait for it to complete. Then change tools, recheck alignment, run the finish cut for that side. When that's over, flip the material, put in the correct bit for roughing, align, and run the other side's rough cut file. When that's complete, change bits and check alignment one last time then do the finish cut on the second side. Voila, you're done!
When machining a part on more than two sides, I presume that there are more files.
Well, Cut3D worked great. I didn't have the recommended post-processor file for my setup, but the Sherline inches was close enough so I tried that. I got the recommended post-processor for my setup from Vectric's support in my email today. The Sherline gcode worked fine, however.
The only thing that didn't work was me.
Here's my CNC setup. Here's what I got:

Everything started out fine, but I let myself get distracted by some visitors when I went to do the back side cut. I got the alignment right, but had it upside-down from the orientation I should have had it.
Moral of the story: put unambiguous markings on your workpiece to avoid mistakes during machining, and if a distraction gets introduced, set the work aside until it's gone. ;)
The material I'm machining out of is one of the denser varieties of NC Proofboard from Golden West Manufacturing. They're a short way away from me, and this was the first sample piece of their materials I've machined. And it machines like a dream! I may never machine wood again. Well, wood is awfully pretty so I'm sure I will, but not unless I really have to.
Their materials deserve their own article, so I'll be writing more about them once I've tried out a few more of my samples.
Upshot, Cut3D is a great program, and the price is great. I'm looking forward to doing a bunch of work with it, and possible upgrading to VCarve Pro some time later when I feel the need for more flexibility.
Tweet
I also happened to have some samples of machinable urethane plastics to try out, and the new software was just the thing to do that with.
I started with one of Vectric's sample files, the rooster statue. The statue is initially scaled to stand twelve inches tall. My material was about 3.5 by 2.4 by 0.9 inches in size. So I used Cut3D to scale the object, no problemo.
I positioned it in the block, added some tabs, again no problem.
Since this was my first time using Cut3D, my only concern as I went through the simple linear process of setting things up was what I would end up with in the way of files at the end. Would I get a file with some sort of pauses in it, during which I would do tool changes and material flips (to machine top and bottom), or would I have to edit these in, or what?
As it turned out, Cut3D produced four gcode files. Top rough cut, top finish cut, bottom rough cut, and bottom finish cut. For machines with tool changers, it can consolidate the files that have tool changes between them.
So this makes it easy. Load up the material, align the machine, run the rough cut for the side you start with, and wait for it to complete. Then change tools, recheck alignment, run the finish cut for that side. When that's over, flip the material, put in the correct bit for roughing, align, and run the other side's rough cut file. When that's complete, change bits and check alignment one last time then do the finish cut on the second side. Voila, you're done!
When machining a part on more than two sides, I presume that there are more files.
Well, Cut3D worked great. I didn't have the recommended post-processor file for my setup, but the Sherline inches was close enough so I tried that. I got the recommended post-processor for my setup from Vectric's support in my email today. The Sherline gcode worked fine, however.
The only thing that didn't work was me.
Here's my CNC setup. Here's what I got:
Front Side, so far so good...
Back side. Whoops! It's Upside-Down!
Everything started out fine, but I let myself get distracted by some visitors when I went to do the back side cut. I got the alignment right, but had it upside-down from the orientation I should have had it.
Moral of the story: put unambiguous markings on your workpiece to avoid mistakes during machining, and if a distraction gets introduced, set the work aside until it's gone. ;)
The material I'm machining out of is one of the denser varieties of NC Proofboard from Golden West Manufacturing. They're a short way away from me, and this was the first sample piece of their materials I've machined. And it machines like a dream! I may never machine wood again. Well, wood is awfully pretty so I'm sure I will, but not unless I really have to.
Their materials deserve their own article, so I'll be writing more about them once I've tried out a few more of my samples.
Upshot, Cut3D is a great program, and the price is great. I'm looking forward to doing a bunch of work with it, and possible upgrading to VCarve Pro some time later when I feel the need for more flexibility.
Subscribe to:
Posts (Atom)


 Webomator.com: Backward into the