Monday, November 28, 2011

CNC Enclosure: A Home for My MicroCarve A4

I originally set up my microCarve A4 on my workbench as I got the various bits and pieces put together and checked out. This was a convenient place to do the work at that time, but once everything was working, there were two significant problems:
  • It was in the open air. Sawdust and plastic chips were flying everywhere.

  • I wanted my workbench back for other projects!

So it was time to take time off from making cool CNC projects and time to make an enclosure. I spent quite a bit of time thinking through what I wanted. If I put the computer and CNC side by side, it'd take up too much room in the shop. I tried a test arrangement of putting the computer below the CNC, the display above the CNC, and the keyboard and mouse in a drawer just under the tabletop that the CNC sat on. This did my neck no favors at all.

Finally I settled on putting the CNC itself a bit higher, with the computer completely underneath it. This worked out, barely. I had to replace my old CRT monitor with a lower-profile LCD display to get the heights I wanted. It was worth it.

microCarve A4 CNC enclosure, CNC in box on top, computer and controllers on desktop

The desktop is at 26 inches above the floor, the bottom of the CNC is at 48 inches above floor level. It's low enough to handle the tools, parts, and everything else inside as well as keep an eye on the machining as it goes, though an optimum height would probably be a bit lower. A different arrangement of the computer stuff down below could probably allow someone else to make theirs about six inches shorter, if they don't mind looking down at their computer monitor rather than propping it up on the computer cabinet for a comfortable height, as I did.

The desktop holds the computer, monitor, power control center, CNC power supply and Gecko G540 control unit, wireless network hub, keyboard, mouse, and an occasional can of soda (with care).

Another view of the enclosure, and all-in-one roller unit that has the CNC and all of its related electronics in a thirty inch wide unit.

The CNC box has removable panels on the back and sides. The back panel is in three sections, so that a middle section can be taken out for working with stock that's too long for the enclosure. This leaves a panel at the bottom to catch chips, and a top panel to trap some of the high-flying chips. If necessary, one or both of the front doors can be left open with longer pieces, a bottom panel will still cover the lower three inches of the front to trap some of the chips from spilling out. I thought about making sectioned doors, but this project was already getting too complicated.

A look inside the CNC enclosure box at the top of the unit, showing the CNC inside with integral lighting and a power bar for the router spindle.

The top box can lift off of the base with the computer desk. It has small feet that rest inside the uprights on the base and lock it in, as well as a pair of angle brackets that screw into it. Basically the power and control cables that run into the box through the two PVC feed-throughs are are disconnected, the box is lifted off the top of the base (a two-person operation when the CNC is in there!), then set on its feet where ever it suits you.

The base has casters on the bottom, so I can roll it around the shop or out onto the concrete apron outside if I feel like doing my CNC work under the sky. ;)

I plan on adding a vacuum motor and dust trap below the desktop when the urge to take things a step further strikes. I'll cut another feed-through into the box for the vacuum as well as an air intake for the enclosure. Until then I'll just be reaching in with the hose of a nearby canister vacuum to clean things out.

Sunday, November 27, 2011

Amateur Radio Station from the Ground Up

I earned my amateur radio license about a week ago, and it posted in the FCC's data base last Wednesday. My call sign is AG6HU. Vanity call sign, here we come. ;)

Getting on the Air
Still, it's a good enough call sign to get me on the air.

I have two radios at present, both pretty old. One is an Icom IC-230 that I got from a ham in Hayward back in 1986 (another time when I was preparing for a license but didn't get one.) It was my one and only rig when I was KD6KGV. Presently, it's lost in storage some where. I remember coming across it sometime in the past year, so it's not completely lost. When I got it it needed some TLC. A little work and some new crystals and I was in business when I got my first license in 1992.

The other is a rig a friend gave me back when my first license was still active. It had been his father's and he wanted to find a good home for it. Unfortunately, I never got on the air with it. It's a Kenwood TS-700A, vintage 1976 or so. It's a pretty rig, and it was a lot easier to find than the Icom when I went into the garage this last week. However, when I turned it on and started listening to the local repeaters I found that the frequency readout shows a different frequency than the actual frequency of the repeater--by a lot. So I'm afraid to transmit on it until I can recalibrate it. I have the service manual, I just need to pull together some test equipment beyond what I normally use. Back to the garage I go, for more boxes.

Doing What Can Be Done

Meanwhile, I picked up an eight foot ground rod and a clamp at the hardware store, I already had a bag of rock salt on hand. I've got a place picked out in the back of one of my garages for my station set-up, and I was planning on installing the rod just outside. I've got two garages, both attached to the house. The spot I picked has a nice window, and I'll be able to install a combination heater/cooler unit in the wall beneath it.

I decided to use a technique similar to that used by Roger Halstead, K8RI. I had a heavy duty hose with no connector on one end that I slipped over a piece of full conduit (I didn't have a straight enough piece of thin wall tubing on hand). Then I put on a hose clamp, hooked it up to a hose bibb, and I was ready to do some hydromining.

My house is built on rock in a cut that was made to make enough flat space to build the house, run a driveway and so on. So a rock drill and blasting charges would be the most appropriate tools for making a deep hole. However, there's an area around the foundation of the house that was excavated for the foundation. My thought was that I'd put the rod into the area next to the foundation that was excavated, then backfilled.

Unfortunately, I couldn't get more than two feet deep this way. It appears the backfill is primarily what came to hand most easily:rock. So I changed my plans. I'll admit that while I was fighting with the conduit under the eaves of the house the idea of putting down a subsurface wire grid occurred to me, but that would be a weekend-long project at least.

I also have a retaining wall that forms the back wall of my far garage. That puts the ground rod a bit farther from where I want to stack my rigs, but not much further. If there's a real problem I can always move the station from one side of the garage to the other, even if it means being a but farther from the window.

So I climbed up the hill and tried again. It took about ten minutes, but I managed to get a seven foot deep hole without too much trouble. It's a good thing I used schedule 40, I had to ram down through some of the sandstone at two places, I don't think thin wall tubing would have managed that as well. Though schedule 40 required me to wiggle the tube around a bit to clear enough of a hole for the thick walls of the conduit.

I'm Grounded
I left the conduit in the hole until I had the ground rod ready to go in. In the dying light (hence no photos until tomorrow) I pulled out the conduit and ran in the ground rod. A few blows with a sledge seated it nicely at the tip. A few more minutes with a shovel dug a trench out around it that I poured a bag of rock salt into. It's raining off and on here right now, so it should have the ability to diffuse nicely over the next few days and raise conductivity.

New Toys
Meanwhile, I ordered some new equipment last Wednesday after I saw my call appear in the FCC ULS and realized my current rig wasn't going to get me on the air any time soon. I've got a new MFJ-259B antenna analyzer/frequency counter/cable tester/bottle opener headed my way with a full slate of accessories. I've also purchased a Yaesu FT-250R HT to get me in touch with my local hams while I fuss with the Kenwood and start working toward building up a station for HF work.

Frankly, test equipment is one of my favorite things in the world. Amateur radio lets me justify more test equipment. That's a good thing. :D

First QSO Soon
Each day I'm working to do something material toward getting a station running. My first QSO will probably be on the HT once I get it out of the box and charged up. But I'm looking forward to using the Kenwood once I get it sorted out, and getting connected with the local amateur community to learn about more types of operation. Plus getting or building more equipment to do even more.

Saturday, November 19, 2011

Amateur Radio is Contagious

A little over a week ago I stopped in at a local Radio Shack to pick up some connectors. My supply of 1/8" phono connectors was running low, I keep some on hand for off-the-cuff projects and I'd recently pulled out the last one and used it.

While I was getting rung up, I chatted with the fellow behind the counter. He was another electronics enthusiast, and we shared our laments over Radio Shack's diminished stock of electronic components for hobbyists. He mentioned that he's a ham as well, and commented on how easy it is to get a license these days.

Well, that got me to thinking. So I had a look online. No Morse code requirements at any level, plenty of tests nearby on a regular basis. I wondered how I might do on a test. So, just for the heck of it, I found an online practice test and took it at Technician level (the lowest level.)

I passed!

How about that? So I tried the next level up. A General class license test. I passed that, too. But I missed a few more questions. Fortunately the test was pretty generous about how many questions you can miss. What next? Well, there's the highest level test. Amateur Extra class.

It's just an online test, what have I got to lose?

Apparently nothing. I dove in. This one was more difficult, but I was getting lots of questions on areas I'm already pretty good at, like video and amplifier circuits.

I passed it, too. Register shock and a little bit of horror at the back of the mind. I stared at the result at the bottom of the page saying "You Passed!" It didn't seem possible that maybe...maybe...I could get an Amateur Extra class license.

Well, life is busy and all that so I laid it aside for a day. But the results kept nagging at me. After another day I was back on, repeating the tests. I'd just gotten lucky, there's no way I could pass all three tests cold. So I tried again.

Technician-pass.
General-pass.
Extra-fail. Aha! I knew it. I missed by...one? One lousy question?

Where was I weakest? OK, operational procedures and rules and regs. No surprise. I'd just been making my best guesses all they way through those questions any way. How am I supposed to know what treaty does what or which part of what band I could send transmission X in? Some of the band questions weren't so bad--they'd ask something like "What part of the X meter band can you..." and only one of the frequencies listed in the answers were in that band. No problemo. But if they listed more than one frequency in the correct band it was "pin the tail on the donkey" time for me.

So I went out to the FCC website and pulled a copy of CFR, Part 97 and gave it a read. I got through about 1/3 before my forehead hit the keyboard (actually I'm pretty used to reading dry stuff, and it wasn't that bad. I just couldn't wait to try another practice test.)

Then I went back and tried the tests again. Tech: pass. General: pass. Extra: fail by one. Argh! Off to the ARRL website to look up information on current frequency allocations. I ran into a whole bunch of those questions on the last round of online tests.

Repeat: Pass, pass, and...pass! Woot!

But those scores weren't all that great. Let's work on that...
I've been studying in all my free time over the past several days. I picked up a book to make it go easier. The time it saved me in web searches alone made it worth the price:

Today, just over a week after a short stop for five dollars worth of parts at Radio Shack, I went in for the real test:
Certificate of Successful Completion of Exam, I passed all three exams at once!


I passed all three exams!

What I haven't mentioned is that this interest of mine started a long time ago:

Wednesday, November 9, 2011

Low Level Computer Teaching Options

We have a current discussion on the COSMAC Elf Discussion Group that centers on the idea of a small computer to teach low level computer concepts. Many of us in the group got our start with the COSMAC Elf as our first home computer. It is a small, simple, inexpensive computer. One of its finest points is that it is simple enough that a person of ordinary intelligence can understand how every part of it works, down to the lowest detail.

The place for a small teaching computer, as we're discussing it, lies somewhere between electronics and the standard non-computer science introductory computer programming class. It's a matter of teaching what the components in the system do, and how they do it. This becomes a model of what happens inside more powerful modern computers at larger scale. Such as in current desktops, laptops, tablets, and smartphones.

COSMAC Elf single-board computer with PIXIE video. A complete computer system in 1977 with only 13 integrated circuits!
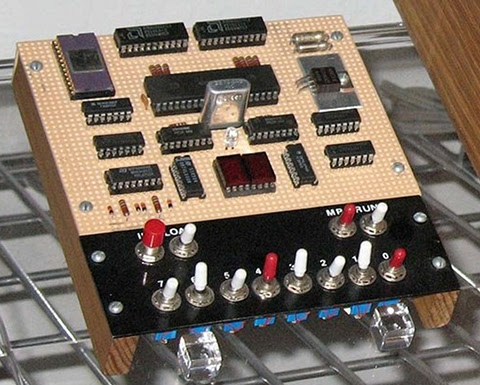
The COSMAC Elf, this version includes video graphics.


Is anyone using something along the lines of a microprocessor trainer in the classroom today outside a college level EE class?

Personally I can see two general approaches to this, with several possible variations on the two themes. Let's look at them, then I'll go into Blue Sky mode to talk about what I sort of wish for.

Some Ways to Bring Computer Hardware into Class
One is to fake it entirely with present-day hardware. After all, if it's possible to do a complete chip-level simulation of an 8-bit processor in Javascript, it shouldn't be much of a stretch to simulate an entire simple 8-bit microcomputer in a program with the ability to "see" all the operations inside simulated on the screen.

The problem is that this still really fails to make what's being taught "real". To the students, it becomes just another show to watch--one with no particular interest to most of them.

The other approach is to use an actual old microcomputer in class, like the Elf, with the students handling the system, measuring voltages or using logic probes to "see" the signals in the computer. Something more sophisticated would be using chip clips with LEDs on the various lines as a sort of multi-line logic probe. (Here is a place where an Elf or other RCA1802-based system would shine. The 1802 is a fully static processor. It can run at clocks speeds from 0Hz on up to its maximum clock speed, with clock changes on the fly. I have literally clocked 1802 systems by hand by connecting and disconnecting the clock line to +5V and Ground lines, counting out machine cycles as displays show the status of various system lines. There are not a lot of computer systems that can do that!)

An annotated image of a COSMAC Elf computer, showing the location of CPU, memory, and other ICs.


Between these two lie many other options. One would be to have a hardware board that connects to a modern computer through a common interface, like USB, where some I/O devices could be visible controlled by the computer (via lights, motors, etc.) and with lines exposed that can safely be probed by the students.

Another would be using a more modern hardware platform, perhaps based on one or more microcontrollers that emulate the function of an older system, exposing such things as memory access, control signals, and so on to the students. The board could include displays and LEDs to show the status of the lines, internal pseudo-registers, and so on. The operation of the entire system, both inside and outside the simulated ICs, could be made available to the student's eyes.

Part of what needs definition is the acceptable limitations of the system. In my own case, I see such a system as being an introduction to low-level hardware operation and control of that operation through software.

Blue Sky Dreaming
If I could have what I wanted without any effort on my part or a significant amount of the school's money, here's what I'd like:

Step 1
I would want to introduce a basic system that's very similar to the original Elf of 1976.

It would have:
  • Toggle switch inputs (to associate signals with data and to help teach binary),

  • A binary LED display and a two-digit hexadecimal display,

  • Very limited memory (about 128 to 256 bytes)(to teach how much can be done in limited memory, and to limit the size of early programs to sane sizes.

  • Exposed memory and I/O lines, possibly with LED monitors

  • Extra monitors, like maybe dual color LEDs to show data direction on I/O ports, etc.

  • A simple machine language with whole-word mnemonics.

  • The ability to operate at extremely low clock speeds (0-100Hz) as well as higher speeds (1-10MHz or something like.)


Step 2
  • Hexadecimal Keyboard

  • 512B to 1024B of RAM

After the first few lessons, the toggle switches would get old and I'd want to introduce a hexadecimal keypad. This would teach hexadecimal, and continue the association of computer instructions with numeric values in the computer. Presumably the connection between signal levels and numbers has been made using toggle switches.

With the easier input technique, it'd be nice to add some more memory, up to something like 512 bytes to 1 kilobyte.

Step 3
  • Keyboard with instruction mnemonics and hex digits

  • Perhaps more memory, up to about 4K

Next, a keyboard would be attached. Perhaps writing software to interface the keyboard to the system would be one of the Step 2 projects. While I'd be tempted to use an ASCII keyboard, I think a raw matrix keyboard would teach more. On this keyboard, machine language instructions and hexadecimal numbers would be mapped to each key. This would again speed programming, and reduce errors. The simple machine language I envision has a particular addressing mode associated with each mnemonic, so there's still no assembling of code required.

Step 4: A larger step
Next, I'd move to a more abstract level. I believe that the activities prior to this point would teach low level operations well enough to take this jump and still be able to show the connection between the two.

For step 4, the computer would get:

  • More memory. Anywhere from 4K to 64K. Perhaps it would start at 4K and grow as the students hit the limitations of each memory size.

  • A terminal connection to a current generation computer for keyboard and display, or an encoded keyboard and some other form of text display.

  • New firmware (probably activated from on-board with a mode switch), which would provide a fairly sophisticated command line interface with command editing, recall, etc., as well as an interactive programming language. The specific language doesn't matter too much, it could be a BASIC, a bash-alike, a LOGO, or an interactive form of some other compiled language.

  • Mass storage. Probably some modern semiconductor memory.


The point at this step would be writing high level programs to perform low level actions like those seen in the earlier steps. Seeing line levels and I/O operations performed, using bitwise operators, seeing the signals represented as numbers of various bases within the language (which I'd expect to support at least binary, hex, and decimal for representation and constants.)

Step 5
The final step with the low level computer would be to produce more sophisticated programs. These would be longer programs, probably projects done by groups of students over a few weeks in class. At this point the understanding of the program control structures and data structures should be a bridge to programming in the chosen language directly on the modern computer.

Final Thoughts
These thoughts are somewhat half-baked as they stand. I or someone would have to do some more work to really define this and turn it into hardware and software and a curriculum to go with it. Some points that need considering are the demarcation between this and a robotics class, common in many schools now (including the one at which I teach.) Also, how much class time does this merit? And so on.

Personally I think that using a micro trainer level system is simple enough to be mastered by most middle-school level students. I've got some actual experience with students to back that up, in addition to my own experience (I was 14 when I constructed my own Elf.) For the students, the information not only gives them an understanding of the underlying technologies of current systems, but would open the doors to embedded systems, far more common than conventional general purpose computers. Either way, it would make the computer far less a piece of technical magic controlled by somebody else and far more something comprehensible, and therefore controllable, by themselves.

Some related work--a 4 bit TTL Processor.

The fact is, all the steps above would probably be unnecessary and involve too many changes to the hardware platform to be practical in class. A more reasonable approach would probably be to go from a slightly more capable Step 1 computer directly to Step 4. This would reduce the opportunity for student disorientation as a result of seemingly constant hardware changes, and still be enough to get the key points across.

The activities I envision for Steps 2 and 3 could be either dropped or performed in either the initial or final configuration of the system. This would also simplify the system itself.