Yesterday, I learned that ZBrush (my 3D design program) now has an extension that lets it directly export files I can use with my Computer Aided Manufacturing (CAM) programs. I spent most of my work time today testing the output of various designs to see how they looked.
ZBrush has this 'built-in' since version 4R6 came out, it was available as a plug-in before, but since it calls itself a 3D printing plug-in, I ignored it, assuming it was software to sent object data to one or more of the commercial 3D printing services, like Shapeways. Turns out it's an exporter for standard 3D object file formats like .stl.
This is a huge improvement for my workflow of going from design to a finished part prototype in the real world. Before I had to use a very complex conversion program. Its control panel makes the flight deck of a 747 look simple. And if I didn't get the settings just right, I could get some really nasty effects in the final machining. Using the same settlings over again doesn't work, I had to adjust things based on the size of the object, the scale of features on it, the size of the material it would be cut out of, the relative size of the tool, etc., etc.
Now that difficult & frightening step is gone. I do a couple of passes to simplify the 3D object design as much as possible without losing detail (which I was doing anyway, it speeds up everything later), set a couple of simple settings in the exporter, like the real-world size the final object will be, then export.
The resulting files load just fine into the two different programs I use that create the list of instructions for my CNC machine to cut the 3D object out of a solid block of some material (usually a polyurethane plastic). I did a dry run to set up two test files tonight--doing everything short of actually making the parts. Tomorrow I plan to make an actual part from a new file as a final test. Probably something fun.
For those interested in trying this at home, I use both MeshCAM and Vectric's Cut3D for CAM. Cut3D is my usual preference, though I'm using an older version of MeshCAM (4). I prefer Cut3D's interface for setting tabs, and its included machining preview.
Both produce excellent GCode for my CNC (a MicroCarve A4 driven by EMC2 and a Gecko G540 controller.)
For doing image depth maps, I use EMC2's built in facility, though if you want to bypass the copious experimentation & two pages of notes I use to get it looking good, you might want to look into one of the dedicated commercial programs for this.
Showing posts with label cad. Show all posts
Showing posts with label cad. Show all posts
Tuesday, November 19, 2013
Monday, May 7, 2012
ZBrush: Finding the Hidden Spotlight
As I've commented recently, I'm working on learning ZBrush and running into landmines and frustrations regularly. The program is incredibly powerful, so I'm hoping all the time and frustration will be worth it in the end. Though I'm less than convinced it'll be so at this point. Presently I'm a bit over two weeks in, with about 60-70 hours using it and a lot of additional time reading docs and watching training videos.
Spotlight
Among the tools I set for myself to try out today is Spotlight, a very powerful-looking tool featured in this impressive video. After getting the "sizzle" on Spotlight from that and some other videos, I tracked down some more pedestrian stuff that I hoped would let me see how to actually do a little of that.
For example, this great video, which takes things step by step and at a pace where you can actually see what is being done. Unfortunately, when I tried to follow along on my own, there was a missing step.
Getting the texture into Spotlight.
Which opened another can of worms...
Where is the Spotlight?
I opened my Lightbox, selected my texture, and Spotlight was nowhere to be seen. So I took a look at the Pixologic site to find some written documentation. I found what seemed to be just the thing. I read carefully through the instructions, particularly noting:
then, later the detailed instructions:
First, double-clicking on the texture in Lightbox did not bring up the Spotlight widget. Then, looking in the Texture Palette, and in the Texture tool on the side of the screen--in case I misunderstood--revealed no "Add to Spotlight" button.
The Hidden Spotlight Button
Well, I spent a fair bit of time reading FAQs and other information trying to find out why there were no visible parts of Spotlight in my ZBrush. Finally, I found an answer well down in this thread. The "Add to Spotlight" button is there, it's just not labelled, looks like it is inactive, and the icon makes no sense:
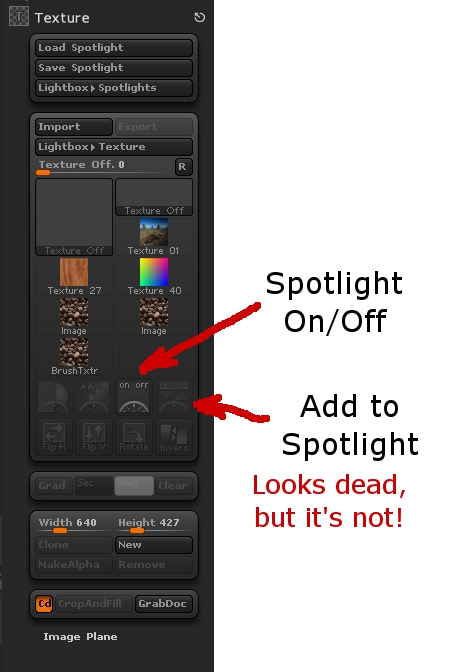
To be fair, it does say "Add to Spotlight" off to the side if you hover over it. But then, what's to induce me to hover over everything in the 90 square hectares of ZBrush's menus just to see if I can find a button by spelunking? Especially when it's greyed out so as to look dead, inactive, unavailable, and, in subtle grey-on-grey, almost invisible?
Clicking on this added the texture to Spotlight, brought up the Spotlight wheel, and let me get on with walking into a new set of frustrations. But it was progress.
Endemic Problems
This relates to several of the endemic problems with ZBrush, particularly its user interface. There's a mix of text and image icons. The image icons are seldom intuitive. The color scheme makes icons look inactive when they're not.
At a larger level ZBrush has the problem of being a huge tool box with no organization to it. There are multiple ways of doing things, with no clear way of choosing which will get the desired results, or do so in the most time-effective fashion. Likewise, the only way to determine what something will do is to experiment, experiment, experiment. And with the number of options and settings (spread through several different "palettes" or menus) there's no guarantee that you can recreate something you've seen someone else do, or even recreate your own work later if you happen to have changed a setting three menu levels down earlier then forgotten about it.
There's also the keyboard interface. It's tricky and timing-dependent. For example, if you're drawing with short strokes, say, putting a mask on in an area while zoomed in close on the geometry, it'll go along putting down short light strokes of mask then suddenly, while you're doing something that feels exactly like every other stroke, make your entire mask go *poof*! Fortunately, a Ctrl-Z (Undo) will fix that one. But when you're working with short, fast strokes you'll hit this repeatedly (like every third or fourth stroke.)
What's worse is when you are trying to do strokes across an object. It appears that if you start a stroke off of your subject (even if by a single nearly-invisible pixel) you'll end up moving and spinning it. And if you're doing something like texturing from Spotlight, the position and scale of the object is critical. You can't use Undo to fix this, because you can't Undo changes of viewpoint (which are "really" moves of the object relative to the Canvas in ZBrush, but still.) So you're hosed with one touch of the mouse (or tablet.) Go back and start over.
Overall, there are a lot of frustrations and a lack of clear structure in the program. But it is capable of some cool things. Just save your work often (saving both Projects and Tools!)
Can I recommend ZBrush? Not yet. Besides, I'm not at all conversant of what the available options are on the market right now.
Tweet
Spotlight
Among the tools I set for myself to try out today is Spotlight, a very powerful-looking tool featured in this impressive video. After getting the "sizzle" on Spotlight from that and some other videos, I tracked down some more pedestrian stuff that I hoped would let me see how to actually do a little of that.
For example, this great video, which takes things step by step and at a pace where you can actually see what is being done. Unfortunately, when I tried to follow along on my own, there was a missing step.
Getting the texture into Spotlight.
Which opened another can of worms...
Where is the Spotlight?
I opened my Lightbox, selected my texture, and Spotlight was nowhere to be seen. So I took a look at the Pixologic site to find some written documentation. I found what seemed to be just the thing. I read carefully through the instructions, particularly noting:
You first need to load your textures using the Texture palette or Light Box.
then, later the detailed instructions:
3. In the Texture palette, load or import a source texture with which you will paint on the model.Um, no.
4. Also in the Texture palette, click on the Add to SpotLight button. Your texture will be displayed as an overlay on the document and the SpotLight widget will appear. An alternative is to double click on a texture of your choice in Light Box.
First, double-clicking on the texture in Lightbox did not bring up the Spotlight widget. Then, looking in the Texture Palette, and in the Texture tool on the side of the screen--in case I misunderstood--revealed no "Add to Spotlight" button.
The Hidden Spotlight Button
Well, I spent a fair bit of time reading FAQs and other information trying to find out why there were no visible parts of Spotlight in my ZBrush. Finally, I found an answer well down in this thread. The "Add to Spotlight" button is there, it's just not labelled, looks like it is inactive, and the icon makes no sense:
To be fair, it does say "Add to Spotlight" off to the side if you hover over it. But then, what's to induce me to hover over everything in the 90 square hectares of ZBrush's menus just to see if I can find a button by spelunking? Especially when it's greyed out so as to look dead, inactive, unavailable, and, in subtle grey-on-grey, almost invisible?
Clicking on this added the texture to Spotlight, brought up the Spotlight wheel, and let me get on with walking into a new set of frustrations. But it was progress.
Endemic Problems
This relates to several of the endemic problems with ZBrush, particularly its user interface. There's a mix of text and image icons. The image icons are seldom intuitive. The color scheme makes icons look inactive when they're not.
At a larger level ZBrush has the problem of being a huge tool box with no organization to it. There are multiple ways of doing things, with no clear way of choosing which will get the desired results, or do so in the most time-effective fashion. Likewise, the only way to determine what something will do is to experiment, experiment, experiment. And with the number of options and settings (spread through several different "palettes" or menus) there's no guarantee that you can recreate something you've seen someone else do, or even recreate your own work later if you happen to have changed a setting three menu levels down earlier then forgotten about it.
There's also the keyboard interface. It's tricky and timing-dependent. For example, if you're drawing with short strokes, say, putting a mask on in an area while zoomed in close on the geometry, it'll go along putting down short light strokes of mask then suddenly, while you're doing something that feels exactly like every other stroke, make your entire mask go *poof*! Fortunately, a Ctrl-Z (Undo) will fix that one. But when you're working with short, fast strokes you'll hit this repeatedly (like every third or fourth stroke.)
What's worse is when you are trying to do strokes across an object. It appears that if you start a stroke off of your subject (even if by a single nearly-invisible pixel) you'll end up moving and spinning it. And if you're doing something like texturing from Spotlight, the position and scale of the object is critical. You can't use Undo to fix this, because you can't Undo changes of viewpoint (which are "really" moves of the object relative to the Canvas in ZBrush, but still.) So you're hosed with one touch of the mouse (or tablet.) Go back and start over.
Overall, there are a lot of frustrations and a lack of clear structure in the program. But it is capable of some cool things. Just save your work often (saving both Projects and Tools!)
Can I recommend ZBrush? Not yet. Besides, I'm not at all conversant of what the available options are on the market right now.
Friday, October 21, 2011
MeshCAM: An Inexpensive Commercial CAM Program
I was recently contacted by Robert Grzesek, developer of MeshCAM, a 3D CAM program. He'd seen my earlier article where I express some frustration with "free" software, particularly for CAM. The free software I tried usually did simple rasterized cuts of the object loaded, with the result that a lot of the design's detail was lost.
Robert offered me a free copy of MeshCAM if I'd blog about it. I took a look at the product information online and took him up on his offer.
MeshCAM is in the same price range as the other commercial CAM program I've been using--it's a hobbyist-affordable program. This is very nice, as so much of the available software is well beyond the budget of an amateur, or a small business where CAM work is a sideline without a large budget.
It's documentation and the tutorials are very good. Having recently gone through some tutorial-based training with some other programs that are from much larger companies in the past few days, I'm pretty well up to speed with what can go wrong with a tutorial. The MeshCAM tutorials are up to date and in sync with the current version of MeshCAM. They describe the process well from the basis of someone trying to get a specific task accomplished, they're not just a description of what appears in the menus.
At first, I wasn't sure that double-sided machining for full 3D objects was going to be covered, but it was, I just needed to stop anticipating possible problems quite so much.
Working with MeshCAM itself, I've opened up the provided files and a couple of files of my own. For the file types it accepts (STLs and DXFs, in addition to its own MCF format, plus a number of 2D image formats for image-based height maps), it opens the files without a problem and displays them properly. Wavefront OBJ files would be a nice addition, but then that's why I've got the open source program MeshLAB (which has no relation to the MeshCAM line of products) which is frustrating at times, but mostly does the job of object type conversion and it's free.

Above is an example of MeshCAM's display of an object. The way MeshCAM displays its axes is a bit cartoonish, but at least you won't have to worry about missing them. They can get in the way of small objects in the display screen. There may be a way to deal with that by changing the way they're displayed, but so far I've just moved or rotated my objects away to view detail then moved them back.
The thing that makes MeshCAM stand out for me at this point is its finishing abilities:
It has built-in multi-pass finishing. I've managed to get the same results from Cut3D through a work-around. There, I create a finishing toolpath for one tool, save those toolpaths, then go back and define a different finishing pass, then save those toolpaths, and run them on the CNC one after the other.
MeshCAM doesn't require this. It gives a great set of finishing options for multiple tool passes right out of the box. I'm presently working on a model specifically to take advantage of these capabilities. Since much of what I'm doing is intended to have a high level of detail, I'm looking forward to seeing what comes off the CNC when I use MeshCAM to build the toolpaths.
MeshCAM displays the toolpaths it generates in the 3D view once they've been calculated, which gives a good first-look check to make sure that things came out right. There's no preview of the cutting operation built in to MeshCAM, however, as in Cut3D. Instead, a separate program, CutViewer is offered. Or you can do a "dry run" in most CNC control programs like EMC2 or Mach3 to see what the cutting will look like, at least as far as tool head movement is concerned.
The previews of the cutting operations have been one of my favorite features of Cut3D, so it's a feature I miss in a CAM program. I've gotten a higher degree of confidence from using this to see how the cutting operation will proceed ahead of time--the order of cuts is not always what you'd expect. The ability to check this during the CAM operation is very nice.
So I'd recommend planning to add CutViewer to your purchase if you buy MeshCAM, or make sure you're comfortable with your CNC control program's preview abilities. I'm using the preview abilities of EMC2's Axis view, myself.
Once I've finished the models I'll be trying out with MeshCAM, I'll be reporting on the final results. I'm planning both a flat relief object and a full 3D, 2-sided object.
Stay tuned...
Tweet
Robert offered me a free copy of MeshCAM if I'd blog about it. I took a look at the product information online and took him up on his offer.
MeshCAM is in the same price range as the other commercial CAM program I've been using--it's a hobbyist-affordable program. This is very nice, as so much of the available software is well beyond the budget of an amateur, or a small business where CAM work is a sideline without a large budget.
It's documentation and the tutorials are very good. Having recently gone through some tutorial-based training with some other programs that are from much larger companies in the past few days, I'm pretty well up to speed with what can go wrong with a tutorial. The MeshCAM tutorials are up to date and in sync with the current version of MeshCAM. They describe the process well from the basis of someone trying to get a specific task accomplished, they're not just a description of what appears in the menus.
At first, I wasn't sure that double-sided machining for full 3D objects was going to be covered, but it was, I just needed to stop anticipating possible problems quite so much.
Working with MeshCAM itself, I've opened up the provided files and a couple of files of my own. For the file types it accepts (STLs and DXFs, in addition to its own MCF format, plus a number of 2D image formats for image-based height maps), it opens the files without a problem and displays them properly. Wavefront OBJ files would be a nice addition, but then that's why I've got the open source program MeshLAB (which has no relation to the MeshCAM line of products) which is frustrating at times, but mostly does the job of object type conversion and it's free.
Above is an example of MeshCAM's display of an object. The way MeshCAM displays its axes is a bit cartoonish, but at least you won't have to worry about missing them. They can get in the way of small objects in the display screen. There may be a way to deal with that by changing the way they're displayed, but so far I've just moved or rotated my objects away to view detail then moved them back.
The thing that makes MeshCAM stand out for me at this point is its finishing abilities:
It has built-in multi-pass finishing. I've managed to get the same results from Cut3D through a work-around. There, I create a finishing toolpath for one tool, save those toolpaths, then go back and define a different finishing pass, then save those toolpaths, and run them on the CNC one after the other.
MeshCAM doesn't require this. It gives a great set of finishing options for multiple tool passes right out of the box. I'm presently working on a model specifically to take advantage of these capabilities. Since much of what I'm doing is intended to have a high level of detail, I'm looking forward to seeing what comes off the CNC when I use MeshCAM to build the toolpaths.
MeshCAM displays the toolpaths it generates in the 3D view once they've been calculated, which gives a good first-look check to make sure that things came out right. There's no preview of the cutting operation built in to MeshCAM, however, as in Cut3D. Instead, a separate program, CutViewer is offered. Or you can do a "dry run" in most CNC control programs like EMC2 or Mach3 to see what the cutting will look like, at least as far as tool head movement is concerned.
The previews of the cutting operations have been one of my favorite features of Cut3D, so it's a feature I miss in a CAM program. I've gotten a higher degree of confidence from using this to see how the cutting operation will proceed ahead of time--the order of cuts is not always what you'd expect. The ability to check this during the CAM operation is very nice.
So I'd recommend planning to add CutViewer to your purchase if you buy MeshCAM, or make sure you're comfortable with your CNC control program's preview abilities. I'm using the preview abilities of EMC2's Axis view, myself.
Once I've finished the models I'll be trying out with MeshCAM, I'll be reporting on the final results. I'm planning both a flat relief object and a full 3D, 2-sided object.
Stay tuned...
Thursday, October 20, 2011
Objects of Rotation in Google Sketchup: A Problem of Nomenclature
I've been using Google's free Sketchup program for some 3D object designs lately. I've been using it for a while, but I only use it off and on, so my expertise is growing slowly.
Tonight I wanted to model something based on an Object of Rotation, which we all remember from math class is what you get when spin a shape around an axis. This is usually a trivial thing to do in both CAD and 3D design programs like AutoCAD, Lightwave, and so on. I couldn't remember how to do it offhand, so I did a quick search, expecting "sketchup object of rotation" would get me there in moments.
Technically Accurate, but Useless
I soon got lots of results for "Rotate Object", including a Sketchup tutorial video link. Unfortunately, I realized about 30 seconds into the video that it wasn't what I was looking for. It's a very nice tool for rotating an existing object's position around some arbitrary center of rotation, and possibly replicating it in a pattern around that center.
Nice, but not what I needed.
After a few frustrating attempts to rephrase the search to get what I wanted, I ended up just doing a search on what I knew is usually created as an object of rotation: a rocket.
"Sketchup rocket" yielded a couple of promising results. An amateur rocketry buff had instructions for drawing model rockets in Sketchup. The instructions for the nose cone were: how to draw an object of rotation in Sketchup.

Words Get In the Way
The tool for creating objects of rotation in Sketchup is the Follow-Me tool. In Sketchup terminology, an object of rotation is called a Lathed Object. Which makes perfect sense, if you already know it. (Thank you for the meme, Arthur Conan Doyle!)
So, to successfully search for how to create an object of rotation in Sketchup, use the terms "sketchup lathed object" or "sketchup follow me tool" to get what you want.
Hopefully this will show up when you search for "sketchup object of rotation" and save you some grief. ;)
Tweet
Tonight I wanted to model something based on an Object of Rotation, which we all remember from math class is what you get when spin a shape around an axis. This is usually a trivial thing to do in both CAD and 3D design programs like AutoCAD, Lightwave, and so on. I couldn't remember how to do it offhand, so I did a quick search, expecting "sketchup object of rotation" would get me there in moments.
Technically Accurate, but Useless
I soon got lots of results for "Rotate Object", including a Sketchup tutorial video link. Unfortunately, I realized about 30 seconds into the video that it wasn't what I was looking for. It's a very nice tool for rotating an existing object's position around some arbitrary center of rotation, and possibly replicating it in a pattern around that center.
Nice, but not what I needed.
After a few frustrating attempts to rephrase the search to get what I wanted, I ended up just doing a search on what I knew is usually created as an object of rotation: a rocket.
"Sketchup rocket" yielded a couple of promising results. An amateur rocketry buff had instructions for drawing model rockets in Sketchup. The instructions for the nose cone were: how to draw an object of rotation in Sketchup.
Words Get In the Way
The tool for creating objects of rotation in Sketchup is the Follow-Me tool. In Sketchup terminology, an object of rotation is called a Lathed Object. Which makes perfect sense, if you already know it. (Thank you for the meme, Arthur Conan Doyle!)
So, to successfully search for how to create an object of rotation in Sketchup, use the terms "sketchup lathed object" or "sketchup follow me tool" to get what you want.
Hopefully this will show up when you search for "sketchup object of rotation" and save you some grief. ;)
Subscribe to:
Posts (Atom)


 Webomator.com: Backward into the