Showing posts with label zbrush. Show all posts

Wednesday, March 1, 2017

3D Text from an Image in ZBrush


(Skip to the brief step-by-step directions)

Here's a simple process I use to create raised 3D text for my CNC in ZBrush. It has many other uses, too, of course, and can also be used to create any
sort of embossed or raised pattern you wish.

The raised object can also be used with ZBrush's solid geometry tools as a subtraction mesh to create indented text or patterns.

Create the Image

Create an image file of the text or pattern. ZBrush accepts .jpg and .psd and probably other common formats as well. I usually use .psd files, as they can also be used in other ways with ZBrush, but .jpgs work just as well.

Set a high resolution for good detail. I use from about 1400x1400 to about 2500x1500

The letters should be black on white. You can also do white on black, but I find that it's easier to see what's happening in ZBrush using black on white, since the black area will be transparent in Spotlight in ZBrush. Leave a margin around your text or design, about 2 or 3 letters wide works well. Save the image and go to ZBrush.

Set Up an Object in ZBrush

Append a 3D plane to your project to put the text on initially. You want enough resolution in the object to take the details of what you're projecting on it. Dividing it 6 or 7 times should do the trick. I usually have smoothing off when doing this, but since a plane doesn't get smoothed except around the edges, it doesn't matter much. Delete the lower subdivisions.

We will get a consistent height on the projected text by using the Layer brush. Layer brush always builds to a set height for a single stroke. So we will be doing the whole projection as a single stroke of the brush across the mask we'll be making from our image. If you mess up--don't cover all the text in a single stroke, or accidentally do multiple strokes leaving the projection of unequal height, then use Ctrl-Z to undo and try again. On large projections it often take me a few tries to make sure I cover it all and don't bobble the stroke (I usually use the mouse for this rather than my tablet, in fact.)

Select the Layer Brush, set your brush size well larger than a single character in the center ring. Set Zadd on. Make sure Material (M), MRGB and RGB are off.


Import the Image

Import the image into ZBrush's available textures in the texture menu. Clicking on the Texture Off thumbnail will bring up a menu with an Import button on the lower left side. Use that to select your image in the filesystem. You should now have a thumbnail of your image in the Texture menu.

Now you need to get it into Spotlight. This requires using the unlabeled "Add to Spotlight" button (See ZBrush: Finding the Hidden Spotlight for information beyond the image below.)
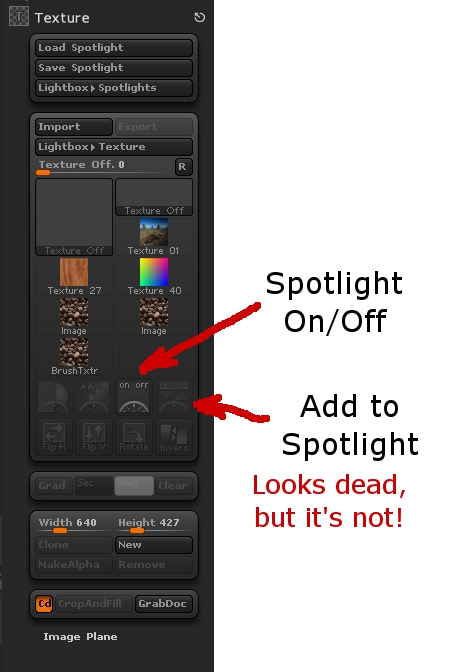
Image showing Spotlight Buttons

Then, if Spotlight doesn't turn itself on, do so, and use its tools to position your text (or design) over the 3D plane. It should have some extra plane on all sides of the text, but not a lot. In fact, the blank area at the edges of the image in Spotlight should lap over the edges of the 3D plane a bit if possible.


Embossing the Text

As stated earlier, we use the Layer brush to emboss the 3D Plane with the "cutout" in Spotlight. In one stroke, with Alt (or Option) pressed to raise the text, sweep repeatedly back and forth across the image over the plane to emboss it all to the same level. The actual level it ends up at doesn't matter, we just want it raised compared to the background of the plane to an even level overall. Once that's done, the scaling and deformation tools in ZBrush can raise it to the actual level you want it at.


To crop away the unwanted areas, put a mask over the text you want to keep, then go to Tools->Subtools->Visibility->Hide Pt to hide the unmasked points. Then go to Tools->Subtools->Geometry->Modify Topology and click "Del Hidden" to remove the hidden points.


Finally, simply grow or shrink the text along the axis that the embossing is raised in to set its height.


Quick Reference, Step by Step
  1. Create a black-on-white high res image of your text or design.
  2. Append a 3D Plane object to your ZBrush project. (Tool->Subtool->Append, choose 3D Plane) Make it the active object.
  3. Turn off smoothing on Divide (Tool->Subtool->Geometry->Smt is not highlighted.)
  4. Divide the plane 6 or 7 times (Tool->Subtool->Geometry->Divide)*
  5. Delete Lower Subdivisions (Tool->Subtool->Geometry->Del Lower)
  6. Position the plane square facing you in the display, zoomed so that it just fits in the display area.
  7. Select the Layer Brush (Hotkeys: B, L, A)

  8. Set Z Intensity to 100% (at top of screen).

  9. Zadd is ON. MRGB, RGB, and M are Off.

  10. Set a large draw size. (Top of screen slider, or Hotkey S)

  11. Load your image into the Texture menu (Texture->Click on Texture Off, click Import on lower left of drop-down, select your image from the filesystem.

  12. Load your image into Spotlight (Click your image's thumbnail in the Texture menu, then click on the Add to Spotlight button--it's top right below the thumbnails.)

  13. Turn on Spotlight (button to left of Add to Spotlight) if it doesn't do it itself.

  14. Position and scale the image over the plane.

  15. Press Alt, hold the left mouse button, wipe brush repeatedly across the letters or design all as one stroke (don't let up the mouse button).

  16. Crop the plane to the outline you want.(Ctrl-Boxmask area you want. Visibility: Hide Pt. Modify Topology: Del Hidden)

  17. Use deformations to stretch the plane the letters are projected in to set the height of the letters.

* Alternately, Divide a couple of times, then turn it into a Dynamesh with a resolution of about 240 or so.

Thursday, May 29, 2014

ZBrush Export to Unity 3D, Mesh + UV

ZBrush is a great tool in many ways. But there are other ways in which it is infuriating. It is mysterious about what it is doing in many cases, and the documentation on these mysteries is usually nothing more than a longer version of the text on the buttons and menus.

UV maps are one of the places where the data is slim, and the documentation tells you nothing about what's going on with the choices you make. It's like that Sherlock Holmes quote about it making perfect sense once you already know the answer.

On top of that, there's a lot of FUD about transferring data from ZBrush to Unity. Certainly there are other programs for which Unity makes the process more or less seamless, but ZBrush is perfectly capable of providing all the same data to Unity. It's just a matter of knowing the correct process. Which is difficult with ZBrush if you're just trying it on your own, because there are so many settings for which ZBrush doesn't show you directly the effects of your choices. You have to keep going back and forth between ZBrush and Unity--does this work? Does that work? What about that? On and on. And at each stage you're guessing, because you can't look at what comes through in Unity and say, "Oh, I see the problem. I need to just do -that-!" It's just a mishmash of unmatched data.

Well, I spent two solid days experimenting. Trying out different things, getting something to work, making sure I can do it twice in a row and have it work both times. Researching on the internet to see if someone else had a better way, and so on. You don't need to hear the whole litany--getting it done was my job, now here's the results for you to take advantage of so that you can get on with your project.

I'm using Unity 4.3.4f1 and ZBrush 4R6 for this. I'm covering just exporting the object mesh and its UV texture here. A normal map works similar to the UV texture--the key point being that it has to be vertically flipped to align with the mesh in Unity. If you're interested in another post that covers normal maps specifically, email me or leave a comment and I'll do it.

You've Got an Object in ZBrush

So your object is sculpted and polypainted in ZBrush, now you want to drop it into Unity.

First, you've got to convert the polypainting into a separate image file that will wrap around your object's mesh in Unity. This is called a UV texture. What makes things confusing is that it's often called a UV Map in casual usage, but a UV map is actually something else. The UV Map is the relationship between pixels on a UV Texture and points on the mesh. In ZBrush these are separate and distinct items. In many other programs, the UV Map and UV Texture are conflated to simplify things. Which makes it seem like ZBrush has an extra step when creating UV Textures for Unity and other 3D software.

Before beginning, save your project and your tool(s) in ZBrush. There will be opportunities for things to get messed up or confused.

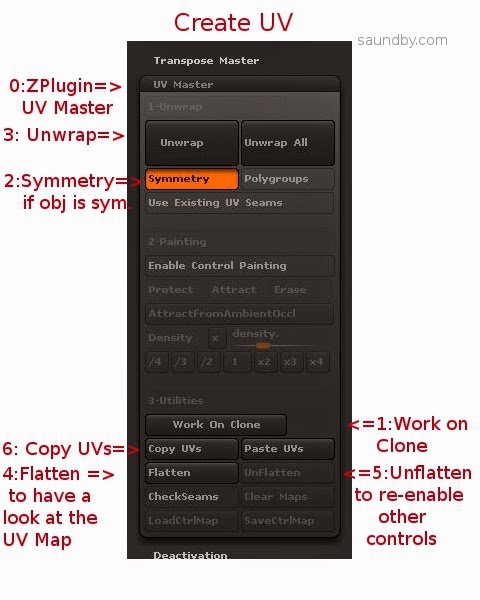
Create the UV Map


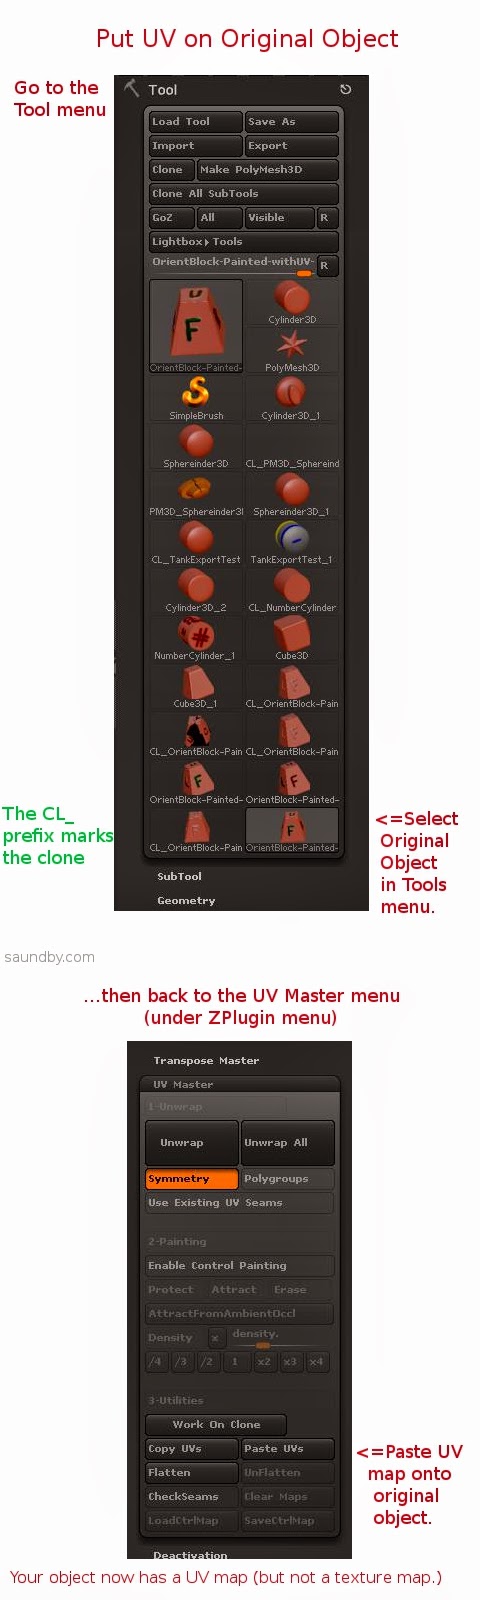
0: Open up UV Master in the ZPlugin menu.

This is where we'll create the UV Map, the Texture itself comes later.

1: Click Work on Clone

This takes care of a bunch of stuff to prepare for making the UV without disturbing your original object. I've screwed up several meshes trying to go without it. My advice is to just use it, it makes things easier.

2: Turn on Symmetry if your object is symmetrical.
Symmetry will try to make a symmetrical UV map, which results in a symmetrical UV texture that's easier to edit by hand. If your object is just sort of symmetrical, you might give it a try, too.

3: Click the big Unwrap button.
This will unwrap the current tool. My advice is to work one tool at a time, and to reduce the number of tools to the minimum necessary before getting to this point to reduce the repetition of exporting meshes and maps.

4: Click Flatten to have a look at the shape of your UV map.
You will see a wireframe of the UV map, this is the form into which your object's polypainting will be projected to make a UV texture. If you're expecting to do any hand editing of the texture's details, make sure that the forms are not too distorted and that seams are not crossing critical areas of the mesh, like across the face of a character. If they are, you can use Control Painting to get a better mesh.

I'm not going to cover that in detail, there are good videos on this at Pixologic and on YouTube, but the short form is:

  • Click Unflatten to get the controls back.
  • Click Enable Control Painting
  • Click Protect, then draw red on the parts of your mesh where you absolutely don't want a seam in the UV map (like the face of a character.)
  • Click Attract, then draw in blue the areas that you'd like the seam to be (like the back of a character's head, or under their chin.)
  • Click Unwrap again and check the results using Flatten.

5: Click Unflatten to get your controls back.

6: Click Copy UVs to put your UVs from the Clone on the Clipboard.


You've now created a UV map, which you need to apply to your original object to guide the creation of a UV texture from its polypainting.


7: Select your original object from the Tool menu.
This will bring it back into the Document view and make it the active object. If something's wrong, or you can't find it, reload it using Load Tool (because you saved it before starting like I advised, right?)

8: Click Paste UVs in the UV Master menu.
This puts the UV from the Clone that's on the Clipboard on your object. It's now ready to have its texture map made from the polypaint on it.

9: Save your tool. Give it a distinctive name, like MyTool-withUVs.ztl.

10: Take a deep breath. The rest is pretty easy.


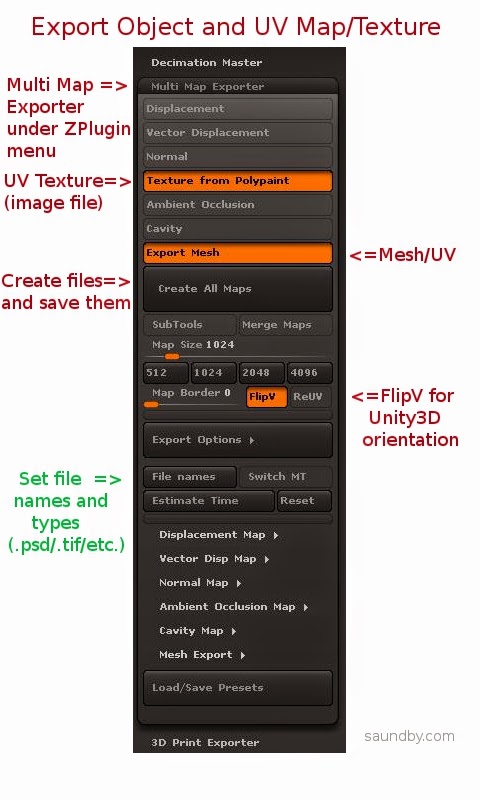
11: Open Multi Map Exporter under the ZPlugin menu.

12: Choose the things you want to export. Mesh and Texture from Polypaint for this example.

13: Choose FlipV to orient maps correctly for Unity.

If you want to have your map files in a specific format, select it in the Export Options and file names sections.

14: Click Create All Maps to create the UV texture and to save the mesh as an .OBJ file. This is one of the most poorly worded bits of button text in ZBrush. Even just "Save" would have made more sense. Oh, well, if we start talking about what's screwy with ZBrush's UI, we'll never finish.

15: Import assets into Unity (Assets=>Import New Asset...).


Gotchas

OK, that's the process. Having it all written out in detail makes it look worse than it really is, it actually happens very quickly once you know it. It's those first few passes that are a problem.

One of the things that really slowed me down in ZBrush is the fact that ZBrush doesn't tell you anything inside ZBrush about what the orientation of the UV map is relative to the base orientation of the mesh. If you open the Tools=>UV Map menu and start clicking the buttons like FlipV, FlipH, Cycle UV, Switch U<>V, it's easy to get lost really quickly as to which transformations you've applied. And there's no simple way to set it back to its base orientation.

Finally, what I ended up doing was creating the UV texture, while applying no transformations at all, then I opened it in GIMP & performed all the tranformations there, saving a clearly marked file for each. Then I pulled the mesh into Unity as well as all the versions of the map. I just drug maps onto the mesh object in Unity until I got the right one (FlipV.)

Colors from ZBrush

To make sure, I saved the map from ZBrush again with FlipV on, and it worked. But then I noticed something. The colors were off on part of the map in Unity. It looked OK in ZBrush and GIMP, but for some reason the color encoding came across wrong in Unity.

Left, Texture map in .psd straight from ZBrush. Right, texture map opened in GIMP and re-saved.

The quick fix was to load the map in GIMP then re-save. It may also be possible to use other file types, like .tif, and have the colors work out perfectly from ZBrush.

The Effects of UV Orientation
The map on the left was saved with FlipV on, the one on the right was saved without. If you get an object looking like the one on the right, check your UV map's orientation, or flip it vertically in an image editor (flip, don't just rotate 180.)

Mesh Orientation

The mesh orientation will get rotated front-for-back when going from ZBrush to Unity, too. It's just a 180 degree rotation, so it's not difficult to fix, just turn it around. If it's facing the camera in ZBrush, it'll be facing away when it comes into Unity.


The object on the left has been rotated to bring the 'F' side (Front) to face the camera, as it was saved in ZBrush, the one on the right is how it came into Unity.

Torn Edges on UVs

You'll notice in that picture of the back of the block above that there's some ragged stuff showing at the edges of the UV map. At first I blamed bringing the map through GIMP, but it does that straight from ZBrush, too. Fortunately the fix for that is simple, too.

For this simple texture, I just did a flood-fill of the black areas of the UV map with the background color (white). With a more complex texture, I would have used smudge or something like to bleed out the edges of the map a few extra pixels.

Map on the left has been cleaned up, UV on the right is as original, with visible seams.

Here are the maps used in the above image:


The original UV texture map from ZBrush.

The UV texture map with the black areas flood-filled with the foreground color of the object.

That's a Wrap

I hope that helps. If you feel I've been unclear anywhere here, or missed something important, please leave a comment or drop me an email message. If I've been helpful, let me know that, too!

Good luck with your ZBrush and Unity endeavors!

Tuesday, November 19, 2013

ZBrush for CNC Got Better

Yesterday, I learned that ZBrush (my 3D design program) now has an extension that lets it directly export files I can use with my Computer Aided Manufacturing (CAM) programs. I spent most of my work time today testing the output of various designs to see how they looked.

ZBrush has this 'built-in' since version 4R6 came out, it was available as a plug-in before, but since it calls itself a 3D printing plug-in, I ignored it, assuming it was software to sent object data to one or more of the commercial 3D printing services, like Shapeways. Turns out it's an exporter for standard 3D object file formats like .stl.

This is a huge improvement for my workflow of going from design to a finished part prototype in the real world. Before I had to use a very complex conversion program. Its control panel makes the flight deck of a 747 look simple. And if I didn't get the settings just right, I could get some really nasty effects in the final machining. Using the same settlings over again doesn't work, I had to adjust things based on the size of the object, the scale of features on it, the size of the material it would be cut out of, the relative size of the tool, etc., etc.

Now that difficult & frightening step is gone. I do a couple of passes to simplify the 3D object design as much as possible without losing detail (which I was doing anyway, it speeds up everything later), set a couple of simple settings in the exporter, like the real-world size the final object will be, then export.

The resulting files load just fine into the two different programs I use that create the list of instructions for my CNC machine to cut the 3D object out of a solid block of some material (usually a polyurethane plastic). I did a dry run to set up two test files tonight--doing everything short of actually making the parts. Tomorrow I plan to make an actual part from a new file as a final test. Probably something fun.

For those interested in trying this at home, I use both MeshCAM and Vectric's Cut3D for CAM. Cut3D is my usual preference, though I'm using an older version of MeshCAM (4). I prefer Cut3D's interface for setting tabs, and its included machining preview.

Both produce excellent GCode for my CNC (a MicroCarve A4 driven by EMC2 and a Gecko G540 controller.)

For doing image depth maps, I use EMC2's built in facility, though if you want to bypass the copious experimentation & two pages of notes I use to get it looking good, you might want to look into one of the dedicated commercial programs for this.

Thursday, October 11, 2012

Introducing ZBrush by Eric Keller

This is the book that Pixologic should have included with ZBrush. It explains ZBrush in a clear fashion with common pitfalls clearly pointed out and described. If I'd had this book from day 1, I'd have spent less time being confused and confounded by the interface and its way of working.

As it is, I'm still learning new things from this book. Plus, I'm getting the reassurance that those things I've sort of figured out on my own are correct.

My earliest experiences with ZBrush were frustration with it doing things that I didn't understand. At points that made no sense to me conceptually, it would remove work from the editing area above the canvas, sometimes obviously putting the data elsewhere, other times apparently just losing my work--so far as I could tell. It was a field of landmines.

Then, once I started to come to grips with some of the basics of object creation and editing, it became a game of "how do I do this simple task?" Obvious, simple operations in 3D modelling were possible, but performed in mysterious ways. The searches for information done against Pixologic's online documentation were frequently fruitless. But gradually I built up a repertoire of actions I could perform, and remember the processes for, to build models.

But some things remained a mystery. I have no idea how much time I spent watching videos, screaming at the screen "How did you do that?" as they blipped casually past a whole series of critical operations that I needed to learn how to do in a few milliseconds. Note to Pixologic: in tutorial videos use something that shows keypresses and mouse clicks on screen. At least then I can go back frame by frame and find out what sort of finger gymnastics went into the quick and spiffy operation that just flashed by.

The next stage was gathering confidence in what I could do, while trying to gradually expand the envelope on that. While trying to produce models to my prior concept, rather than just sitting down and seeing what happens. Here I had many pieces of work come to a halt because of some simple operation that I didn't know how to perform. How to cut a piece into multiple pieces? How to match colors? How to control dimensions tightly? And so on.

After a while in this phase, I started to get a sense of how ZBrush "thinks", and I started to learn more of the program ever faster. There were still lots of mysteries, including a lot of the buttons in the standard interface, but I was able to do most of the things that ZBrush was good at, and make some of the things that I'd bought ZBrush to model.

That's the point was at where I got Eric Keller's book. It might seem that I was past the point of needing an introductory-level book at that point. But I needed it in the worst way. A lot of the most basic elements of ZBrush that I needed to know, to go from sort of working my way through ZBrush to being really productive with it and using my time effectively was what I needed and what this book delivered. Two chapters in I had a handle on the entire standard interface, now I'm going through the rest of the book, learning different sections in detail.

When is a Button not a Button?
One of the really important things I learned was why a number of the "buttons" around the canvas don't seem to do anything. There are a number of buttons, they look just like the other buttons above and below them. The other buttons do something when you click on them. They turn on the wireframe, or make other parts you're not editing transparent, or whatever.

But these buttons show your click, but do nothing. Seemingly.

That's because they're not really buttons. They're something else.

It's UI, Jim, but not UI as We Know It
These "buttons" are like some throwback to the early days of the Atari ST or Amiga, when intrepid programmers ignored the Human Interface recommendations made by earlier pioneers and rolled their own visual interface components.

They work like this: You click on them, then drag off of them to perform some action.

There are a number of these scattered around ZBrush. That's how color picking works. The color selection tool, which Pixologic calls a "Color Picker" (which is why searches on how to pick a color in ZBrush will be frustrated), has this method of operation as a secondary function (secondary, at least from what it apparent.) Clicking in the Color Picker's central area, then dragging to the Canvas and releasing over some color there will match the color of the object on the Canvas or being edited above the Canvas. Holding Alt while doing this will select the displayed color (including shading) rather than the actual color of the object.

Clear as mud, eh?

Well, Eric Keller makes it clear. That and the other buttons that operate this way.

If you've got ZBrush, no matter what your experience level, I highly recommend this book. The info in it might be elsewhere, but it's not as clear, concise, or as well organized.

Pixologic should provide a copy of this book with every license they sell.

Tuesday, September 25, 2012

Starting to "Get" ZBrush

It's taken a while to get here, but I figured that there had to be a "here" so I kept at it.

I think I'm finally at the point where I "get it" with ZBrush. I'm not just struggling with basics and wondering where my mesh went when I do something any more. Instead, I have a number of modelling skills well in hand, I can pretty well control my projects and know what's going on while I work, and I'm expanding what I can do without too much trouble.

Prior posts expressing some of my frustration when learning ZBrush:
Trying to Learn ZBrush, Hitting Lots of Landmines
ZBrush: Finding the Hidden Spotlight

Subtleties of ZBrush
One of the things it takes time to learn are subtle little indications in the interface that let you know what's going on if you already know them and are sufficiently sensitive to notice them. It takes time to get to the point where they work for you, even when the docs tell you they are there (which they often don't, or at least not in the places you'll typically end up when searching at pixologic.com for information on what you're doing.)

After a while you notice little things, though. Like a thin white line around the border of the canvas when you're in Edit mode. So you begin to learn (in about the same way as an animal hit with a cattle prod when it does something "wrong") that you have to turn on Edit before doing something to a mesh if you don't see the border.

The same goes for subtle changes in the pointer. A very small + changes to a minus, subtle changes in shading and color occur, and so on. After a while it becomes obvious, and knowing that it's there helps.

Where is My Mesh?

There are some big things that are far too subtle that it takes too much trial and error to learn.

One of them is knowing what's going to happen to your mesh and when. There are operations that take your current mesh, or other meshes you presently have in work but aren't doing something to right now, and remove them from the work area. They go poof.

Sometimes they're still available, in the tool menu. Other times, it appears, they go poof, because they were in some transitional state and you should have saved them. Until you know what's going to happen when, it becomes a matter of saving your work with practically every brush stroke, because you never know when it's just going to disappear and no Undo will bring it back.

Because sometimes it warns you that you can't undo, other times it doesn't. When it doesn't warn you, it's usually just putting the objects in the tool menu. But if you can't distinguish them from other objects there (you haven't changed the name, a small picture doesn't distinguish them), or you just plain don't know to go looking there, you're going to end up very frustrated.

There's Hope

I'm here to tell you that perseverance can pay off. After a while, you start to get a feel for what's going on. The best way is to pick some part of ZBrush and try to learn to use it, even if it's not directly tied to the type of modelling you're most interested in. For me it was ZSpheres. They're most useful for soft-body modelling, like most of ZBrush, and most of what I hope to use ZBrush for is hard body modelling (combined with soft objects, later, which is why I'm using ZBrush and not Lightwave or something, but I need hard or hardish objects at the core), but learning to use them taught me a lot of things about ZBrush and how it "thinks".

For me, the next breakthrough came with the new solid modelling features in ZBrush version 4R4. I saw what looked like symbols for additive, subtractive, and intersection geometry in the Subtool palette of ZBrush 4R3. But I couldn't find docs for them anywhere, with a wide variety of searches on the pixologic site, or by reading the docs for the Subtool palette straight through. They were there, but not documented as far as I could tell.

Finally, I saw a video on the new ZBrush that showed them being used for solid geometry operations with Dynamesh, and now I'm able to do the solid geometry stuff I need to do to set up properly proportioned hard shape objects as starting points for the work I want to do.

Now I'm trying to learn the new Transform tool. It looks like it solves some problems I was having before, as well.

Monday, May 7, 2012

ZBrush: Finding the Hidden Spotlight

As I've commented recently, I'm working on learning ZBrush and running into landmines and frustrations regularly. The program is incredibly powerful, so I'm hoping all the time and frustration will be worth it in the end. Though I'm less than convinced it'll be so at this point. Presently I'm a bit over two weeks in, with about 60-70 hours using it and a lot of additional time reading docs and watching training videos.

Spotlight

Among the tools I set for myself to try out today is Spotlight, a very powerful-looking tool featured in this impressive video. After getting the "sizzle" on Spotlight from that and some other videos, I tracked down some more pedestrian stuff that I hoped would let me see how to actually do a little of that.

For example, this great video, which takes things step by step and at a pace where you can actually see what is being done. Unfortunately, when I tried to follow along on my own, there was a missing step.

Getting the texture into Spotlight.

Which opened another can of worms...

Where is the Spotlight?

I opened my Lightbox, selected my texture, and Spotlight was nowhere to be seen. So I took a look at the Pixologic site to find some written documentation. I found what seemed to be just the thing. I read carefully through the instructions, particularly noting:

You first need to load your textures using the Texture palette or Light Box.

then, later the detailed instructions:

3. In the Texture palette, load or import a source texture with which you will paint on the model.
4. Also in the Texture palette, click on the Add to SpotLight button. Your texture will be displayed as an overlay on the document and the SpotLight widget will appear. An alternative is to double click on a texture of your choice in Light Box.
Um, no.

First, double-clicking on the texture in Lightbox did not bring up the Spotlight widget. Then, looking in the Texture Palette, and in the Texture tool on the side of the screen--in case I misunderstood--revealed no "Add to Spotlight" button.


The Hidden Spotlight Button

Well, I spent a fair bit of time reading FAQs and other information trying to find out why there were no visible parts of Spotlight in my ZBrush. Finally, I found an answer well down in this thread. The "Add to Spotlight" button is there, it's just not labelled, looks like it is inactive, and the icon makes no sense:

The icon for


To be fair, it does say "Add to Spotlight" off to the side if you hover over it. But then, what's to induce me to hover over everything in the 90 square hectares of ZBrush's menus just to see if I can find a button by spelunking? Especially when it's greyed out so as to look dead, inactive, unavailable, and, in subtle grey-on-grey, almost invisible?

Clicking on this added the texture to Spotlight, brought up the Spotlight wheel, and let me get on with walking into a new set of frustrations. But it was progress.


Endemic Problems

This relates to several of the endemic problems with ZBrush, particularly its user interface. There's a mix of text and image icons. The image icons are seldom intuitive. The color scheme makes icons look inactive when they're not.

At a larger level ZBrush has the problem of being a huge tool box with no organization to it. There are multiple ways of doing things, with no clear way of choosing which will get the desired results, or do so in the most time-effective fashion. Likewise, the only way to determine what something will do is to experiment, experiment, experiment. And with the number of options and settings (spread through several different "palettes" or menus) there's no guarantee that you can recreate something you've seen someone else do, or even recreate your own work later if you happen to have changed a setting three menu levels down earlier then forgotten about it.

There's also the keyboard interface. It's tricky and timing-dependent. For example, if you're drawing with short strokes, say, putting a mask on in an area while zoomed in close on the geometry, it'll go along putting down short light strokes of mask then suddenly, while you're doing something that feels exactly like every other stroke, make your entire mask go *poof*! Fortunately, a Ctrl-Z (Undo) will fix that one. But when you're working with short, fast strokes you'll hit this repeatedly (like every third or fourth stroke.)

What's worse is when you are trying to do strokes across an object. It appears that if you start a stroke off of your subject (even if by a single nearly-invisible pixel) you'll end up moving and spinning it. And if you're doing something like texturing from Spotlight, the position and scale of the object is critical. You can't use Undo to fix this, because you can't Undo changes of viewpoint (which are "really" moves of the object relative to the Canvas in ZBrush, but still.) So you're hosed with one touch of the mouse (or tablet.) Go back and start over.

Overall, there are a lot of frustrations and a lack of clear structure in the program. But it is capable of some cool things. Just save your work often (saving both Projects and Tools!)

Can I recommend ZBrush? Not yet. Besides, I'm not at all conversant of what the available options are on the market right now.