(Skip to the brief step-by-step directions)
Here's a simple process I use to create raised 3D text for my CNC in ZBrush. It has many other uses, too, of course, and can also be used to create any
sort of embossed or raised pattern you wish.
The raised object can also be used with ZBrush's solid geometry tools as a subtraction mesh to create indented text or patterns.
Create the ImageCreate an image file of the text or pattern. ZBrush accepts .jpg and .psd and probably other common formats as well. I usually use .psd files, as they can also be used in other ways with ZBrush, but .jpgs work just as well.
Set a high resolution for good detail. I use from about 1400x1400 to about 2500x1500
The letters should be black on white. You can also do white on black, but I find that it's easier to see what's happening in ZBrush using black on white, since the black area will be transparent in Spotlight in ZBrush. Leave a margin around your text or design, about 2 or 3 letters wide works well. Save the image and go to ZBrush.

Append a 3D plane to your project to put the text on initially. You want enough resolution in the object to take the details of what you're projecting on it. Dividing it 6 or 7 times should do the trick. I usually have smoothing off when doing this, but since a plane doesn't get smoothed except around the edges, it doesn't matter much. Delete the lower subdivisions.
We will get a consistent height on the projected text by using the Layer brush. Layer brush always builds to a set height for a single stroke. So we will be doing the whole projection as a single stroke of the brush across the mask we'll be making from our image. If you mess up--don't cover all the text in a single stroke, or accidentally do multiple strokes leaving the projection of unequal height, then use Ctrl-Z to undo and try again. On large projections it often take me a few tries to make sure I cover it all and don't bobble the stroke (I usually use the mouse for this rather than my tablet, in fact.)
Select the Layer Brush, set your brush size well larger than a single character in the center ring. Set Zadd on. Make sure Material (M), MRGB and RGB are off.

Import the Image
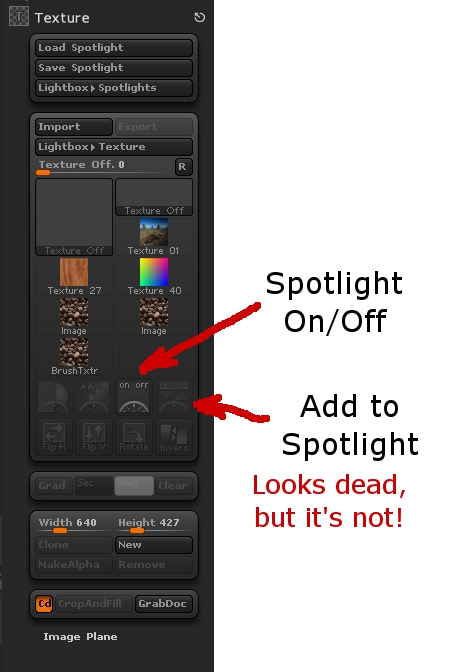
Import the image into ZBrush's available textures in the texture menu. Clicking on the Texture Off thumbnail will bring up a menu with an Import button on the lower left side. Use that to select your image in the filesystem. You should now have a thumbnail of your image in the Texture menu.
Now you need to get it into Spotlight. This requires using the unlabeled "Add to Spotlight" button (See ZBrush: Finding the Hidden Spotlight for information beyond the image below.)
Then, if Spotlight doesn't turn itself on, do so, and use its tools to position your text (or design) over the 3D plane. It should have some extra plane on all sides of the text, but not a lot. In fact, the blank area at the edges of the image in Spotlight should lap over the edges of the 3D plane a bit if possible.

Embossing the Text
As stated earlier, we use the Layer brush to emboss the 3D Plane with the "cutout" in Spotlight. In one stroke, with Alt (or Option) pressed to raise the text, sweep repeatedly back and forth across the image over the plane to emboss it all to the same level. The actual level it ends up at doesn't matter, we just want it raised compared to the background of the plane to an even level overall. Once that's done, the scaling and deformation tools in ZBrush can raise it to the actual level you want it at.

To crop away the unwanted areas, put a mask over the text you want to keep, then go to Tools->Subtools->Visibility->Hide Pt to hide the unmasked points. Then go to Tools->Subtools->Geometry->Modify Topology and click "Del Hidden" to remove the hidden points.

Finally, simply grow or shrink the text along the axis that the embossing is raised in to set its height.
Quick Reference, Step by Step
- Create a black-on-white high res image of your text or design.
- Append a 3D Plane object to your ZBrush project. (Tool->Subtool->Append, choose 3D Plane) Make it the active object.
- Turn off smoothing on Divide (Tool->Subtool->Geometry->Smt is not highlighted.)
- Divide the plane 6 or 7 times (Tool->Subtool->Geometry->Divide)*
- Delete Lower Subdivisions (Tool->Subtool->Geometry->Del Lower)
- Position the plane square facing you in the display, zoomed so that it just fits in the display area.
- Select the Layer Brush (Hotkeys: B, L, A)
- Set Z Intensity to 100% (at top of screen).
- Zadd is ON. MRGB, RGB, and M are Off.
- Set a large draw size. (Top of screen slider, or Hotkey S)
- Load your image into the Texture menu (Texture->Click on Texture Off, click Import on lower left of drop-down, select your image from the filesystem.
- Load your image into Spotlight (Click your image's thumbnail in the Texture menu, then click on the Add to Spotlight button--it's top right below the thumbnails.)
- Turn on Spotlight (button to left of Add to Spotlight) if it doesn't do it itself.
- Position and scale the image over the plane.
- Press Alt, hold the left mouse button, wipe brush repeatedly across the letters or design all as one stroke (don't let up the mouse button).
- Crop the plane to the outline you want.(Ctrl-Boxmask area you want. Visibility: Hide Pt. Modify Topology: Del Hidden)
- Use deformations to stretch the plane the letters are projected in to set the height of the letters.
* Alternately, Divide a couple of times, then turn it into a Dynamesh with a resolution of about 240 or so.


 Webomator.com: Backward into the
No comments:
Post a Comment